
Hot & Sweet Sausage.
My good friend Mike and I are now into our third year of making sausage. We’ve worked out a lot of the kinks in the production and have streamlined the process down from an all-day commitment to a 4 hour window. Practice is always a good thing!
Mike and I are early risers; at least I hope he is because he usually shows up at my house at 7am to begin preparation. Now that I think about it…….his family NEVER gets up at 7am when they are at our cottage. Oh well….. Mike thanks for getting up early for me!
While the coffee starts to perk, Mike begins to prepare the sausage casings. Natural sausage casings are hog intestines. OK, it’s now time TO GET OVER THIS!!!!!!! Don’t buy the artificial ones. Remember…. we’re here because we want to “step back” and reconnect with our food source.
Sausage casings packed in salt
When you go to your butcher to purchase the meat, ask him to recommend the right casings for your sausage. For the most part, hog casings are divided into 2 sections: 32mm – 35mm & 35mm – 38mm. We tend to lean towards the second size because we like a bigger sausage…. ARE WE GOING TO GET THROUGH THIS AS ADULTS!!!!!!!!
Anyways…..We bought a small container of casings this time in order to provide you with a good visual. Normally, we buy 100 yards of casing at a time.
When you open up your container, you will see that the casings are pretty shriveled because they are packed in salt. You can’t reuse casings after they have been prepared so it’s important to figure out how much you will need. This container had 15 pieces and we used 10 for a batch of 85 sausages. Experience has taught us that 15 lengths of casing (around 30 inches) from my shoulder to my fingertips makes for 3 picnic shoulders worth of meat. This would apply more if you purchased your casing in 100 yard increments.
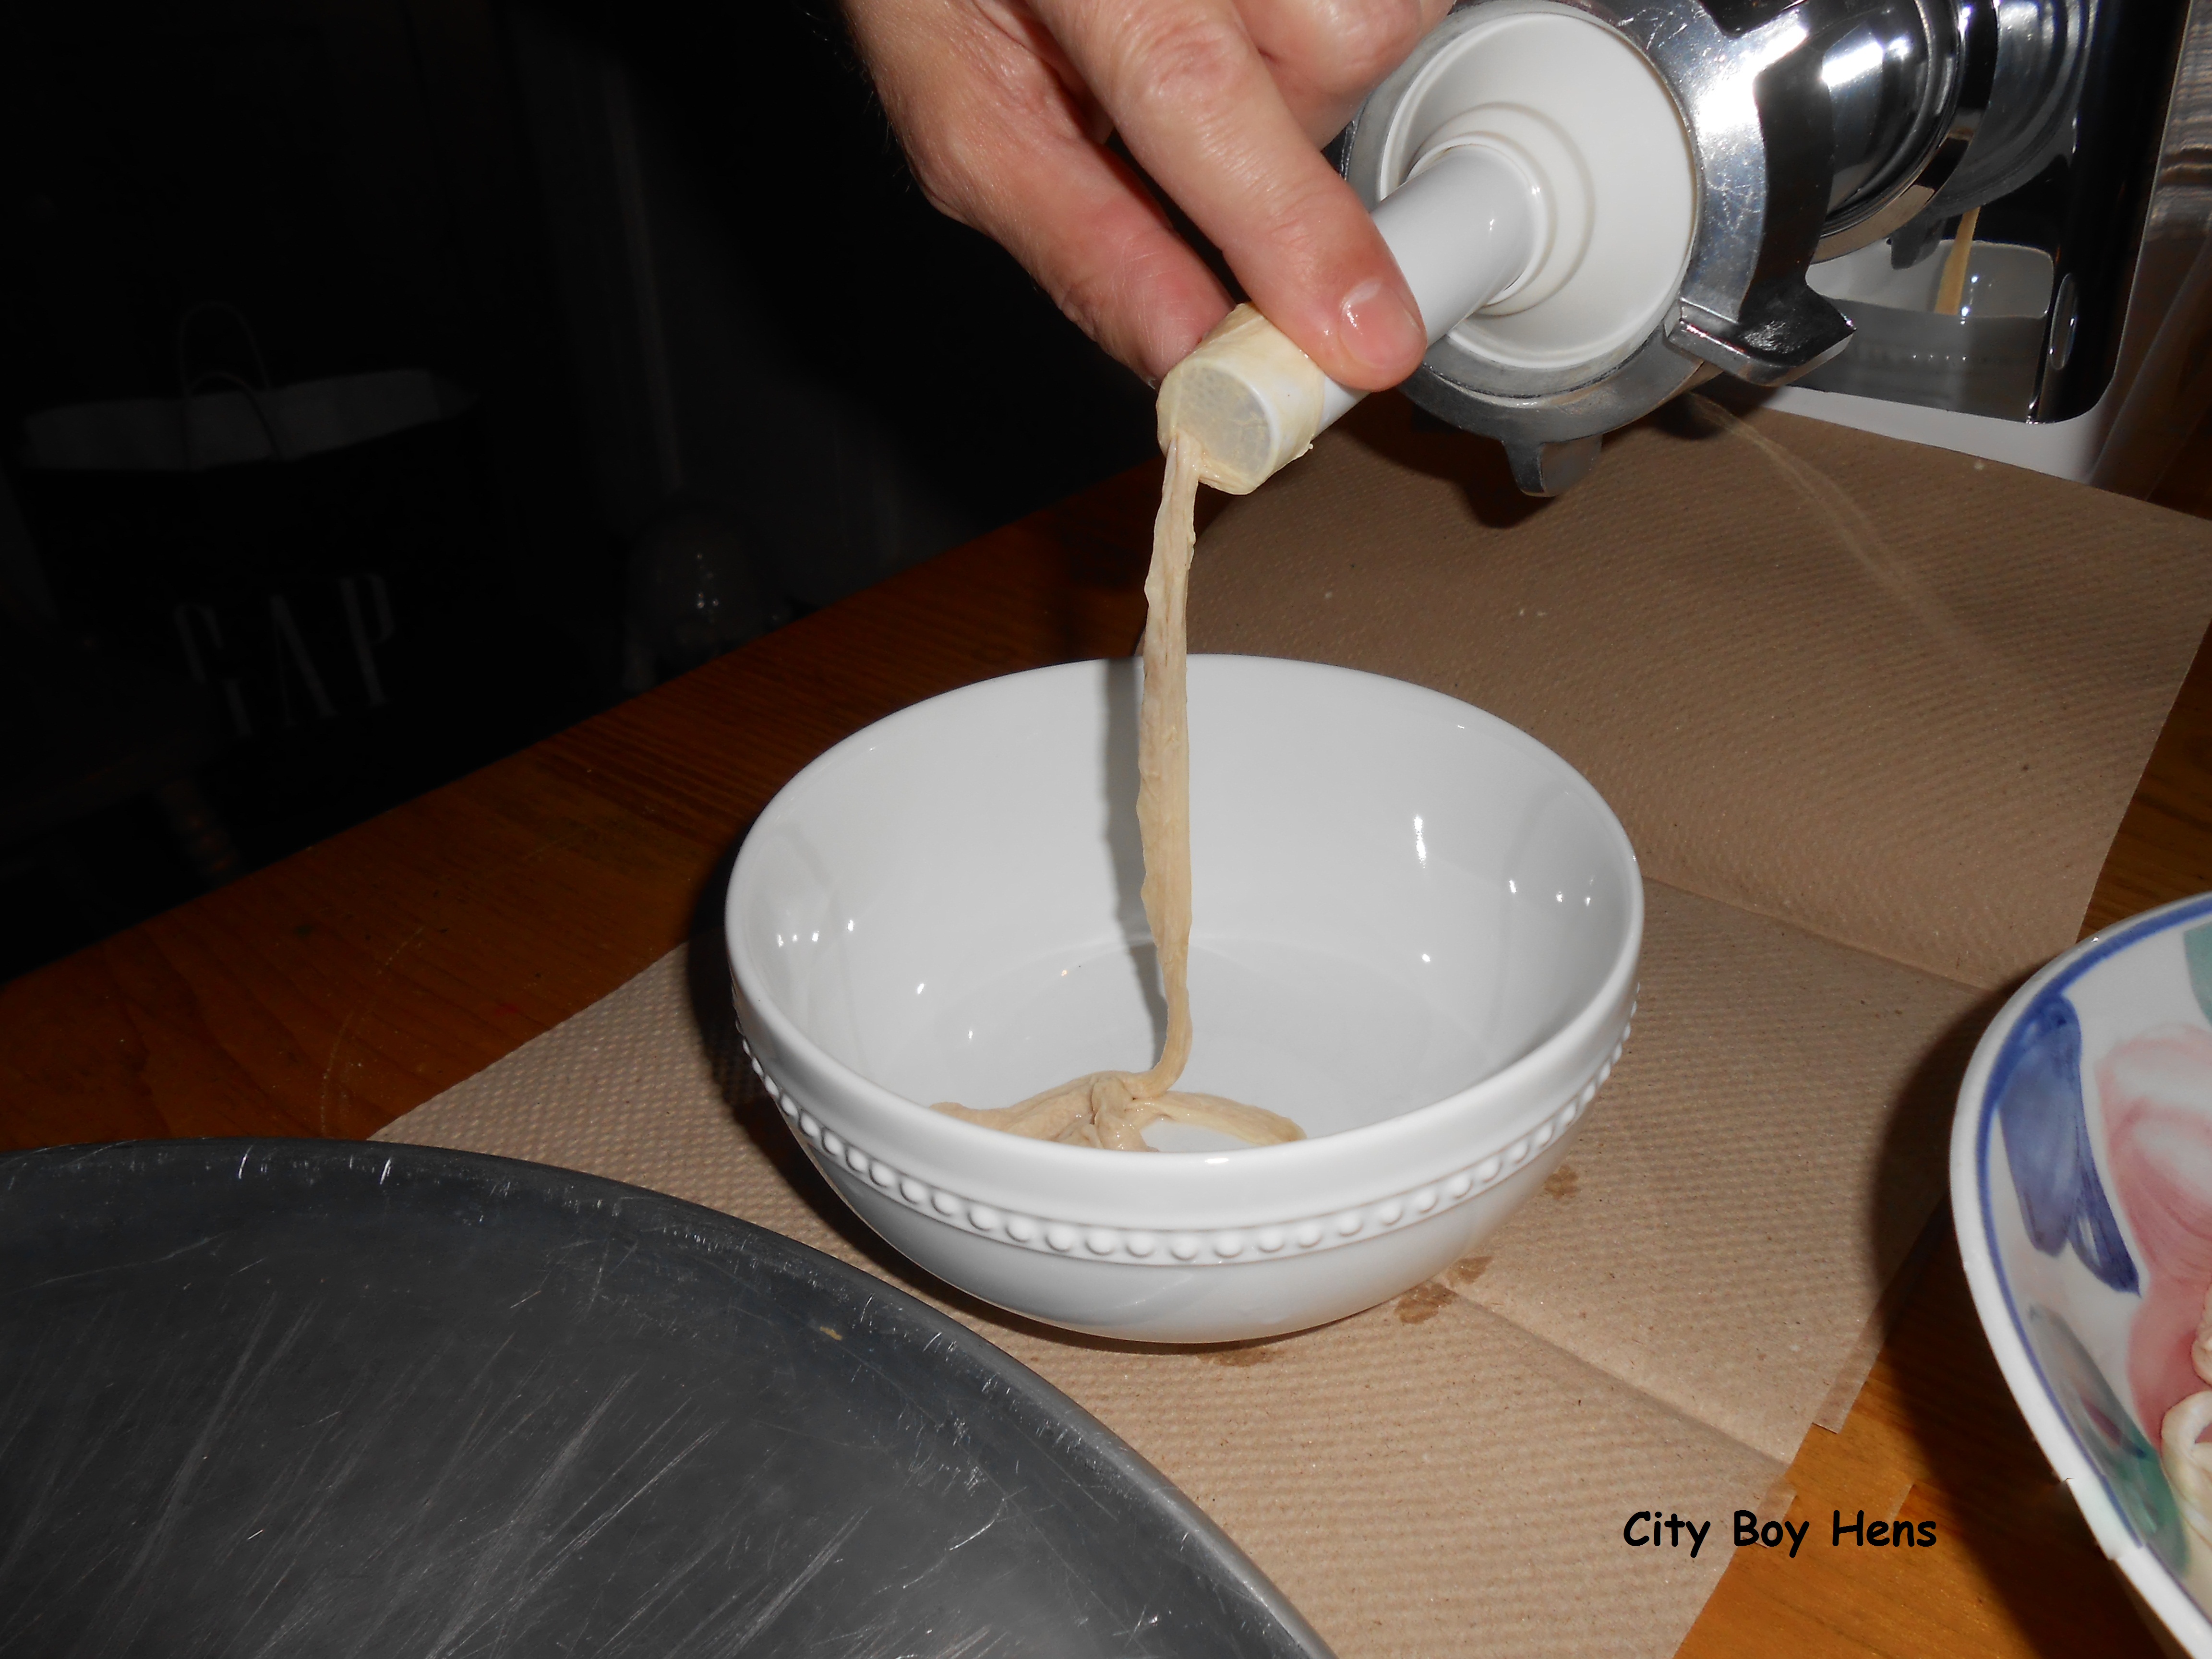
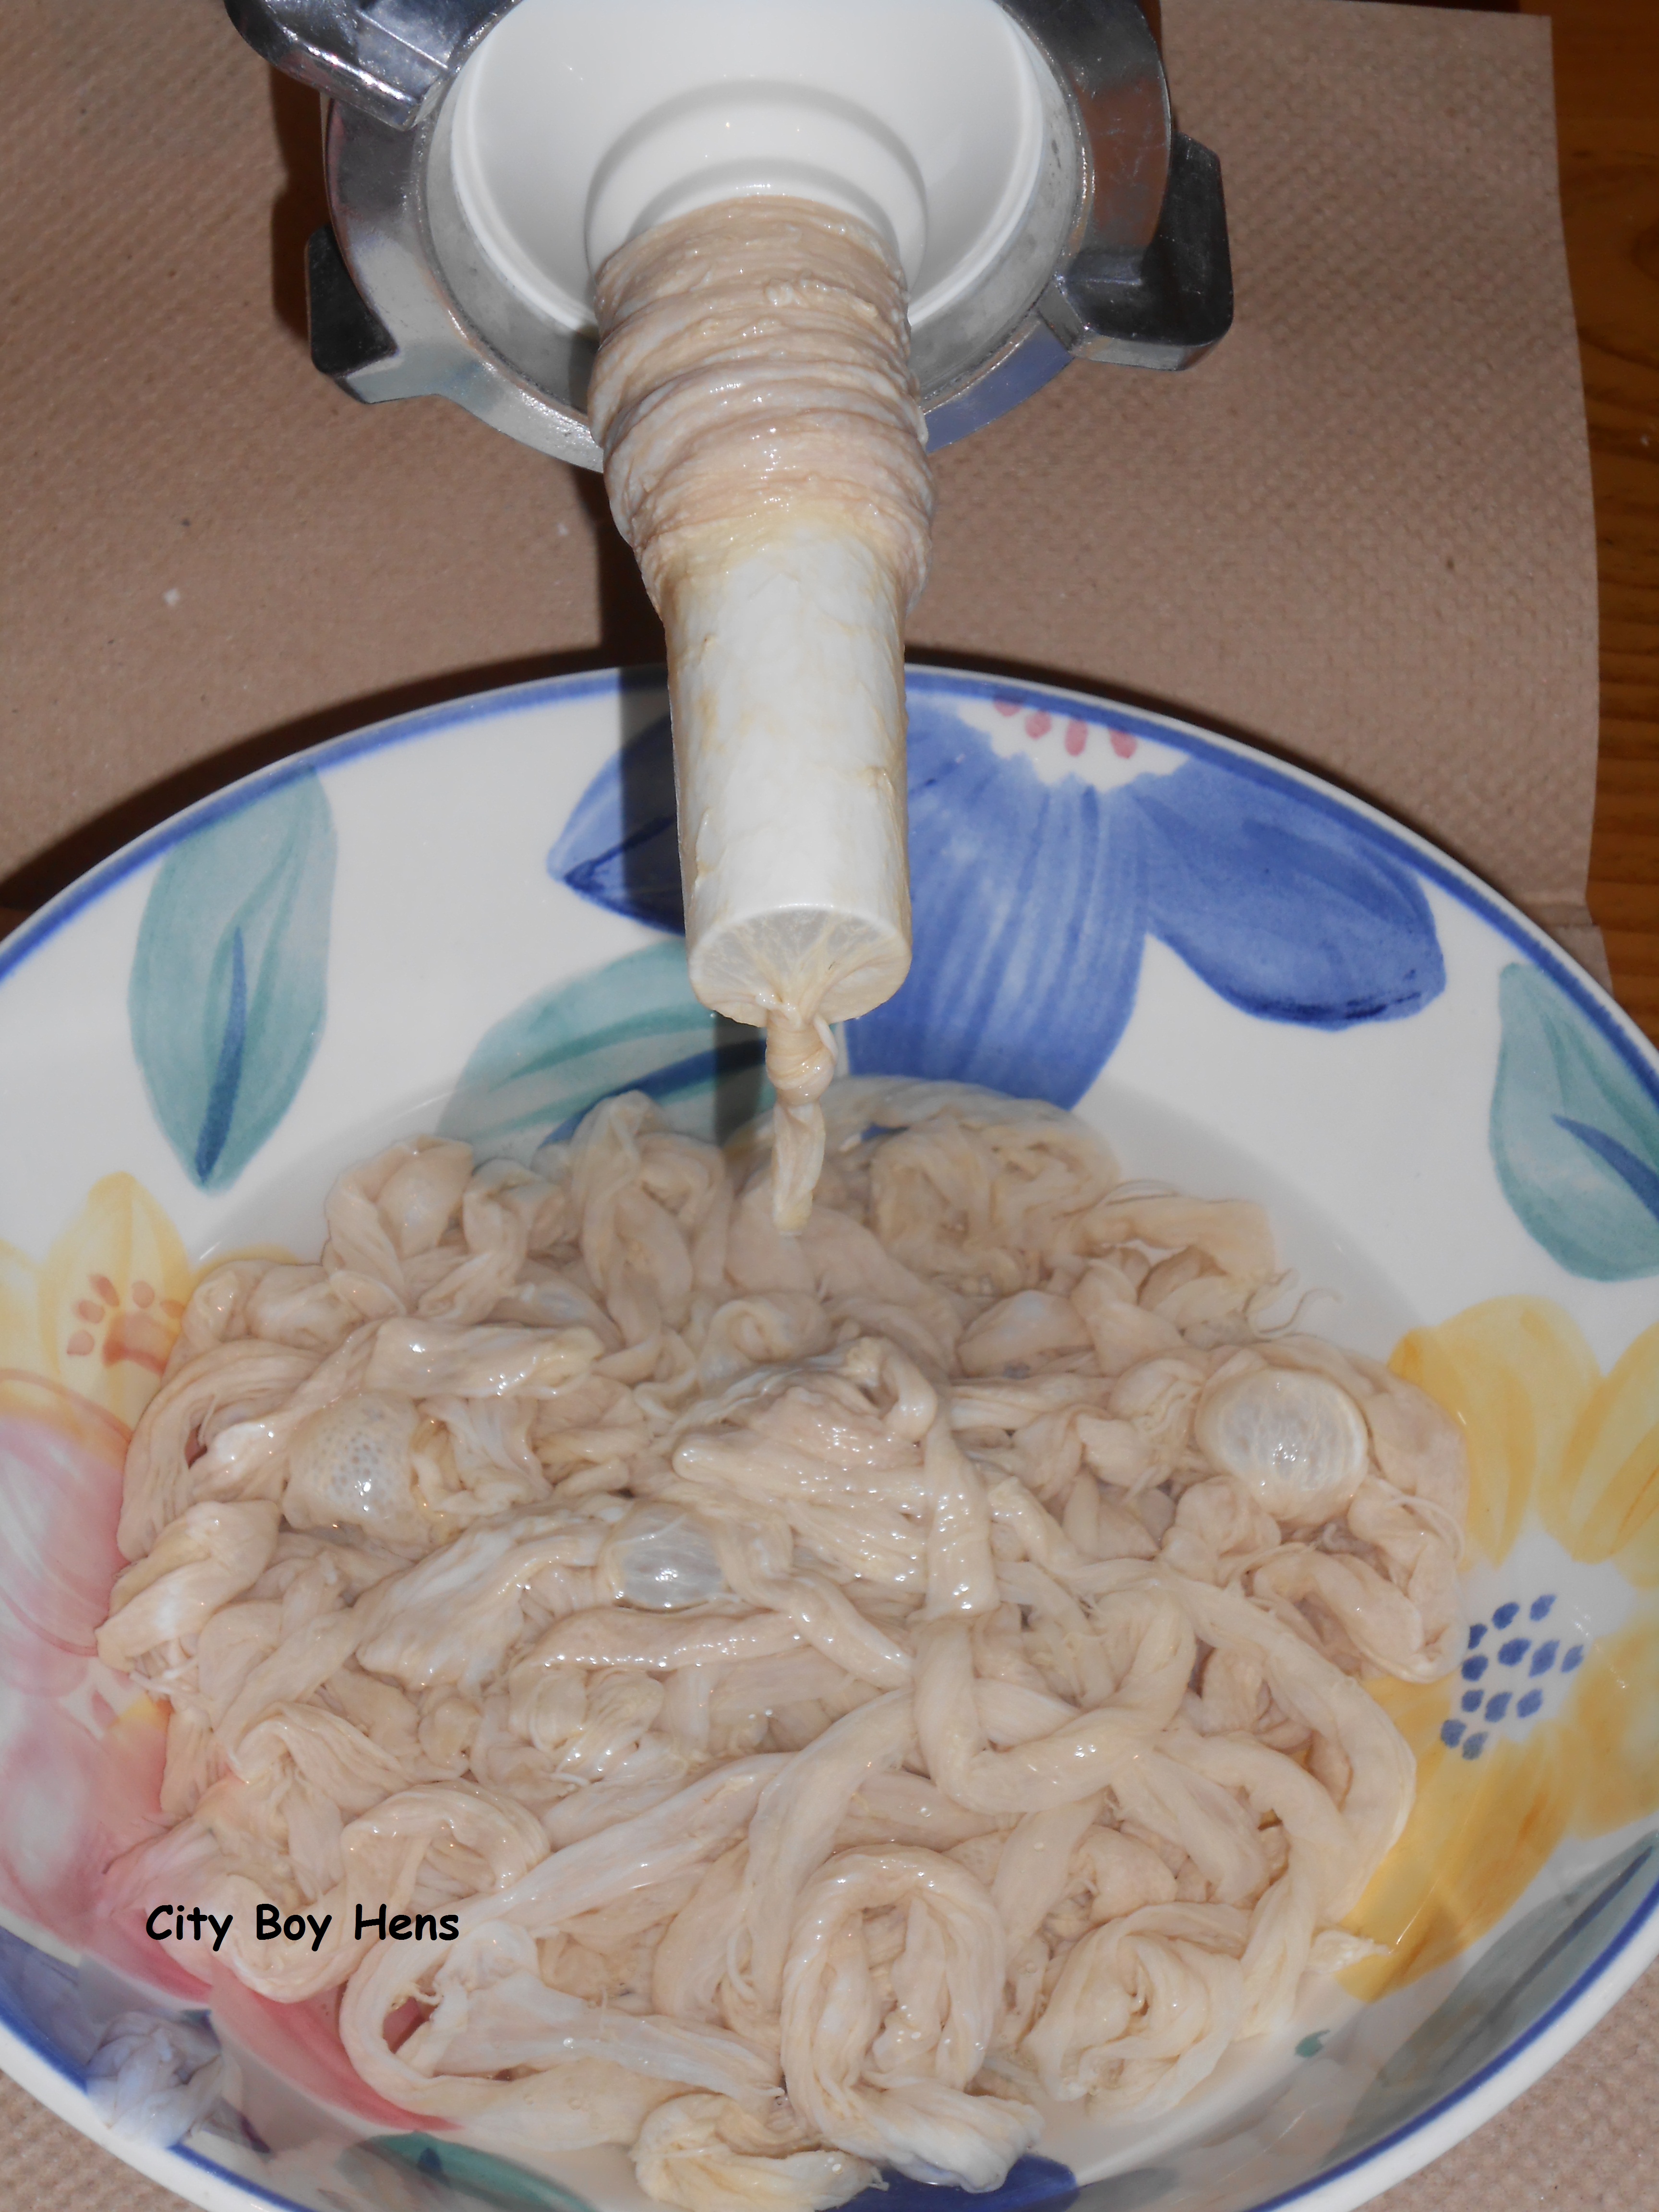
Once you have determined how much casing you will need, it is time to prepare them to be stuffed with meat. First, the salt must be rinsed off of them in warm water. Once this is done, they MUST be individually rinsed throughout. Mike is the man for this part of the job and he does it quite well. As you can see in the photo, Mike if filling the casing with warm water directly from the tap. The casing will begin to fill with water and begin to “balloon” at some segment of the casing. This is the result of a twist in the casing. Jiggle the “ballooned” casing that you are holding up & down and the gravitational pressure of the water ‘balloon” will open the twist and rinse the rest of your casing. Wash the casing one more time.

Mike rinsing the casings.
NOTE*****this is one of the most challenging steps for sausage making. Get this down pat and you’ve cleared a difficult hurdle!
After you have rinsed each of your casings, leave them in a bowl filled with cool water. This will allow them more time to soften. I have seen some people squeeze lemon juice into this water, but we do not.
While the casings are soaking, Mike and I head over to see Mike or Jose at European Meats http://www.europeanmeats.com/. Mike & Jose were very helpful when we first began making sausage. They never tired of our questions and were always patient. Thanks guys! I hope we can send you a lot of business via this post. If you plan on using European Meats, make sure you ask for Mike or Jose and tell them that you were recommended by City Boy Hens!
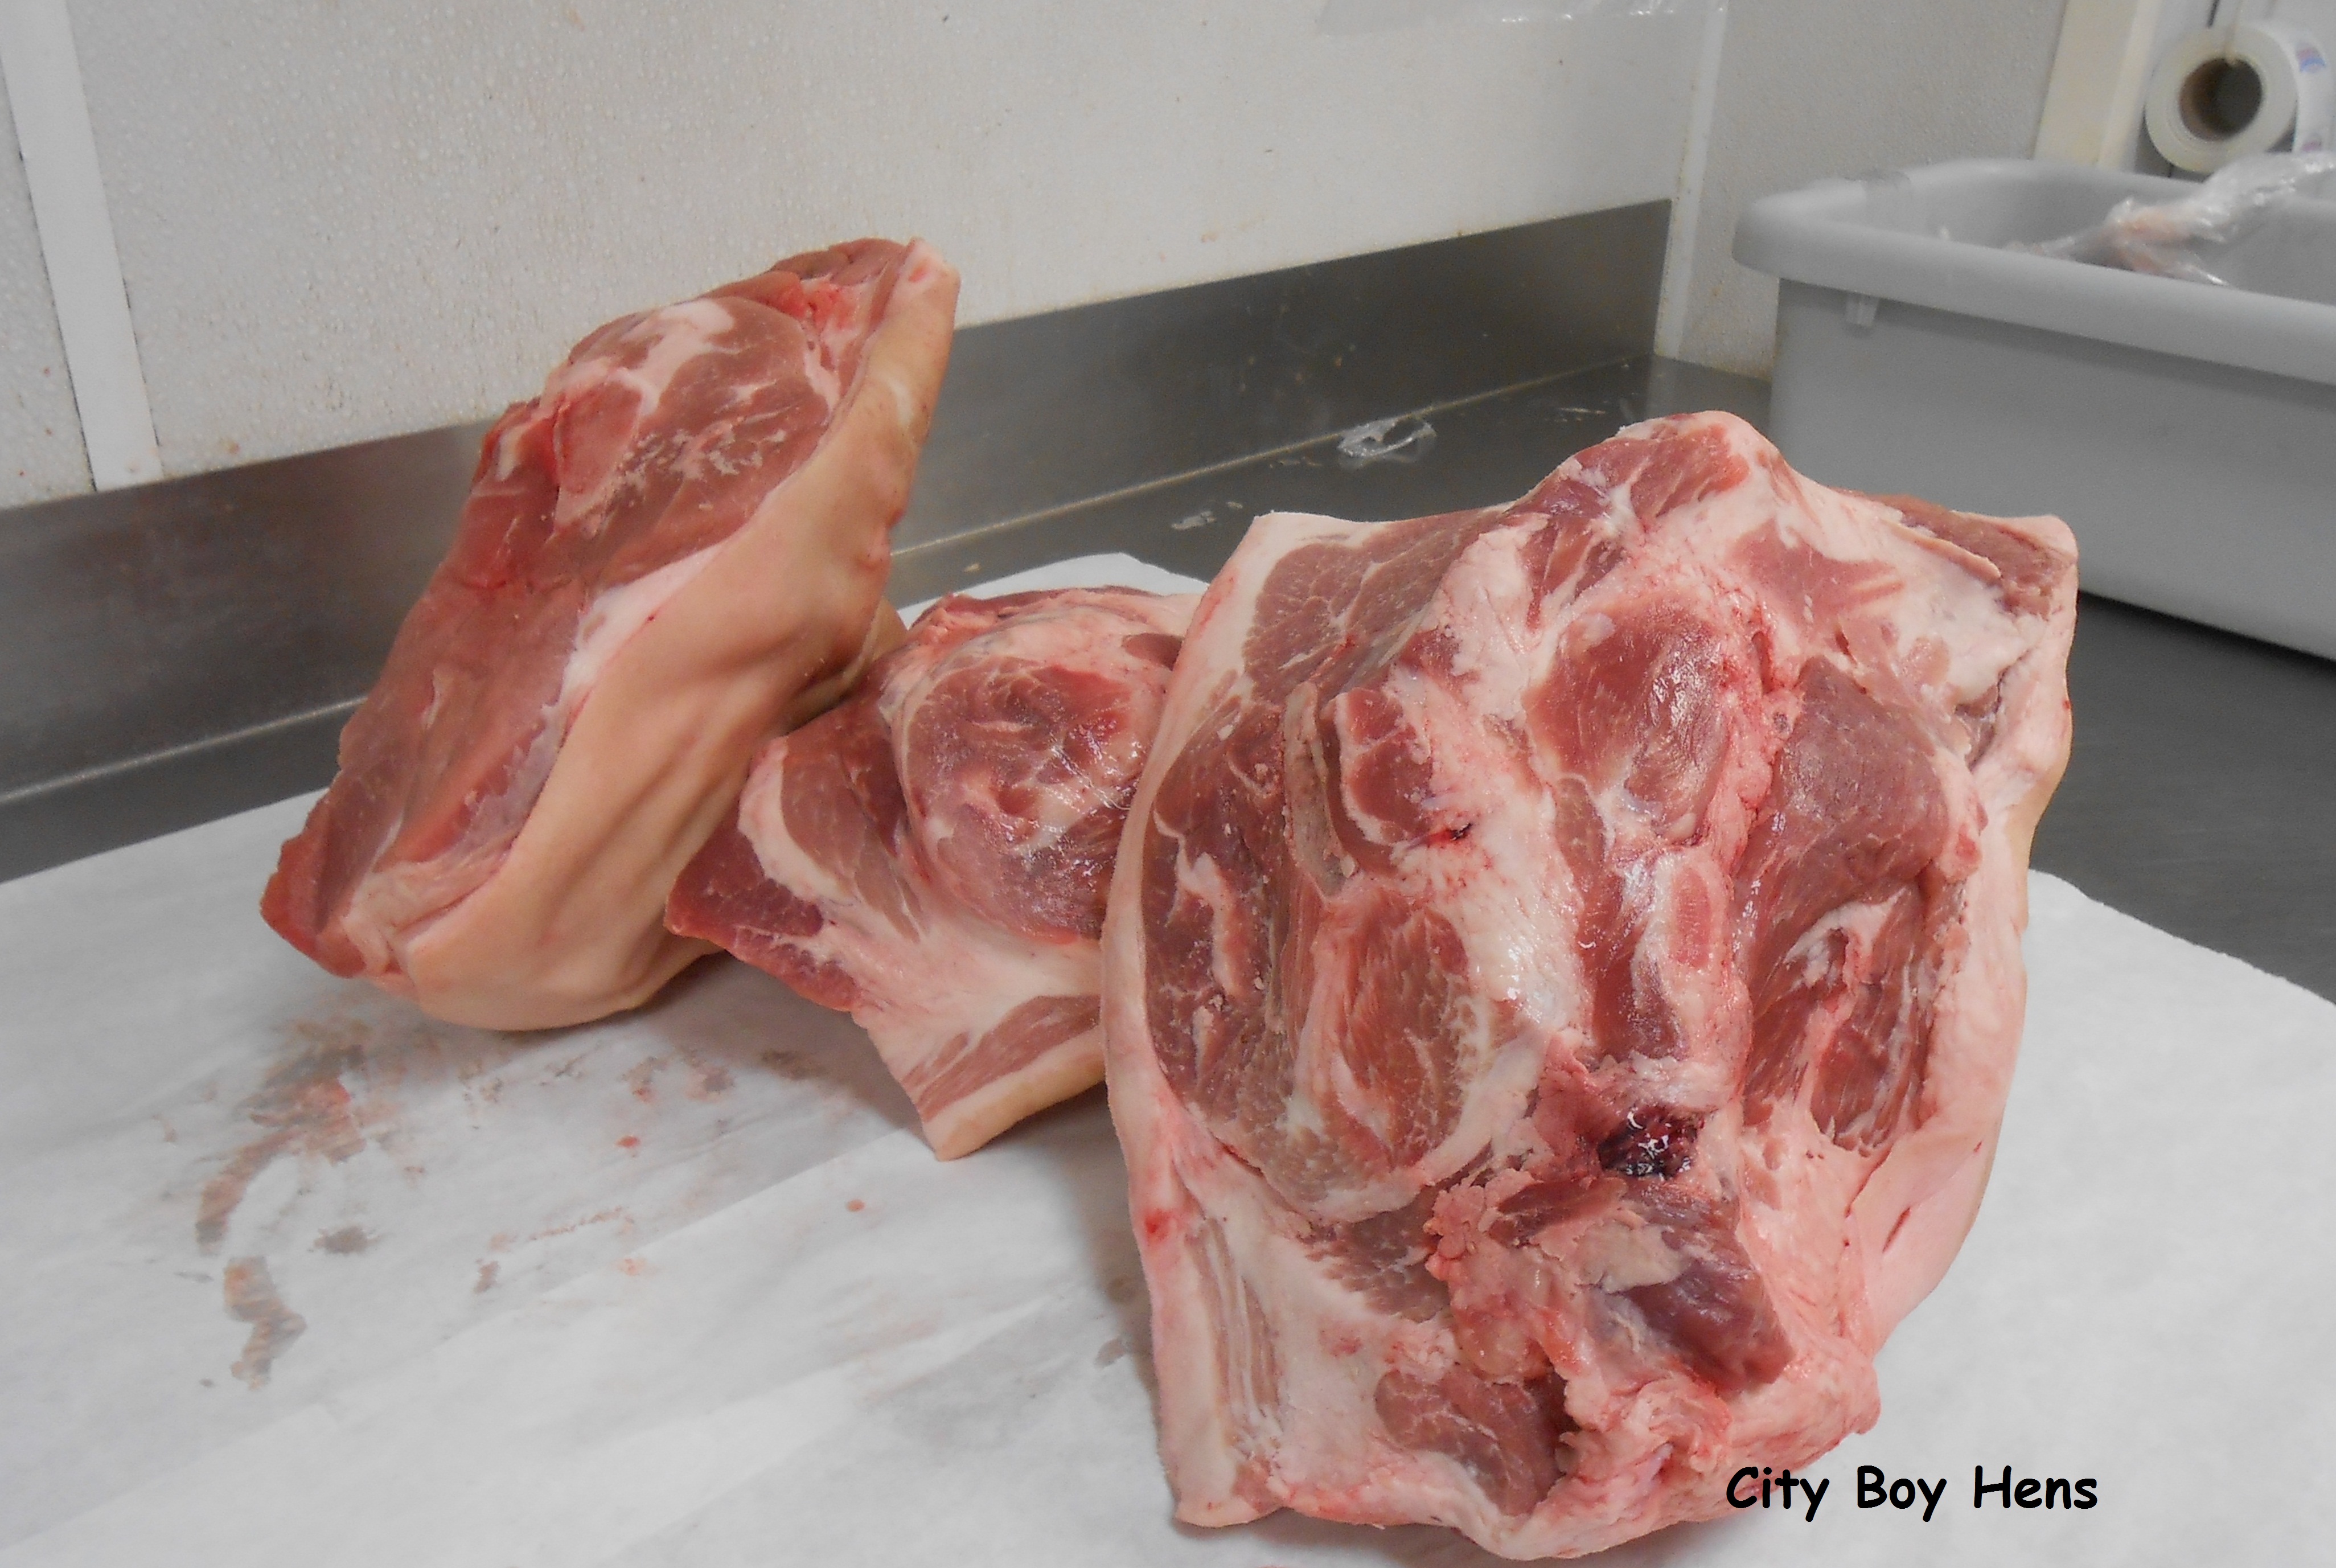
When making sausage, it is essential that you take the meat from the shoulder. This is located on the front leg of the pig from the elbow up to the back. The fat/meat ratio is perfect for sausage. DON’T JUST BUY GROUND PORK!
We buy “picnic” shoulders rather than complete shoulders because it is more economical. This is because the prized meat in a full shoulder is generally removed and reserved for making capicolo. Since we are grinding all of our meat, it would be foolish to pay the higher price to grind this cut as well. Thanks for that tip Jose!
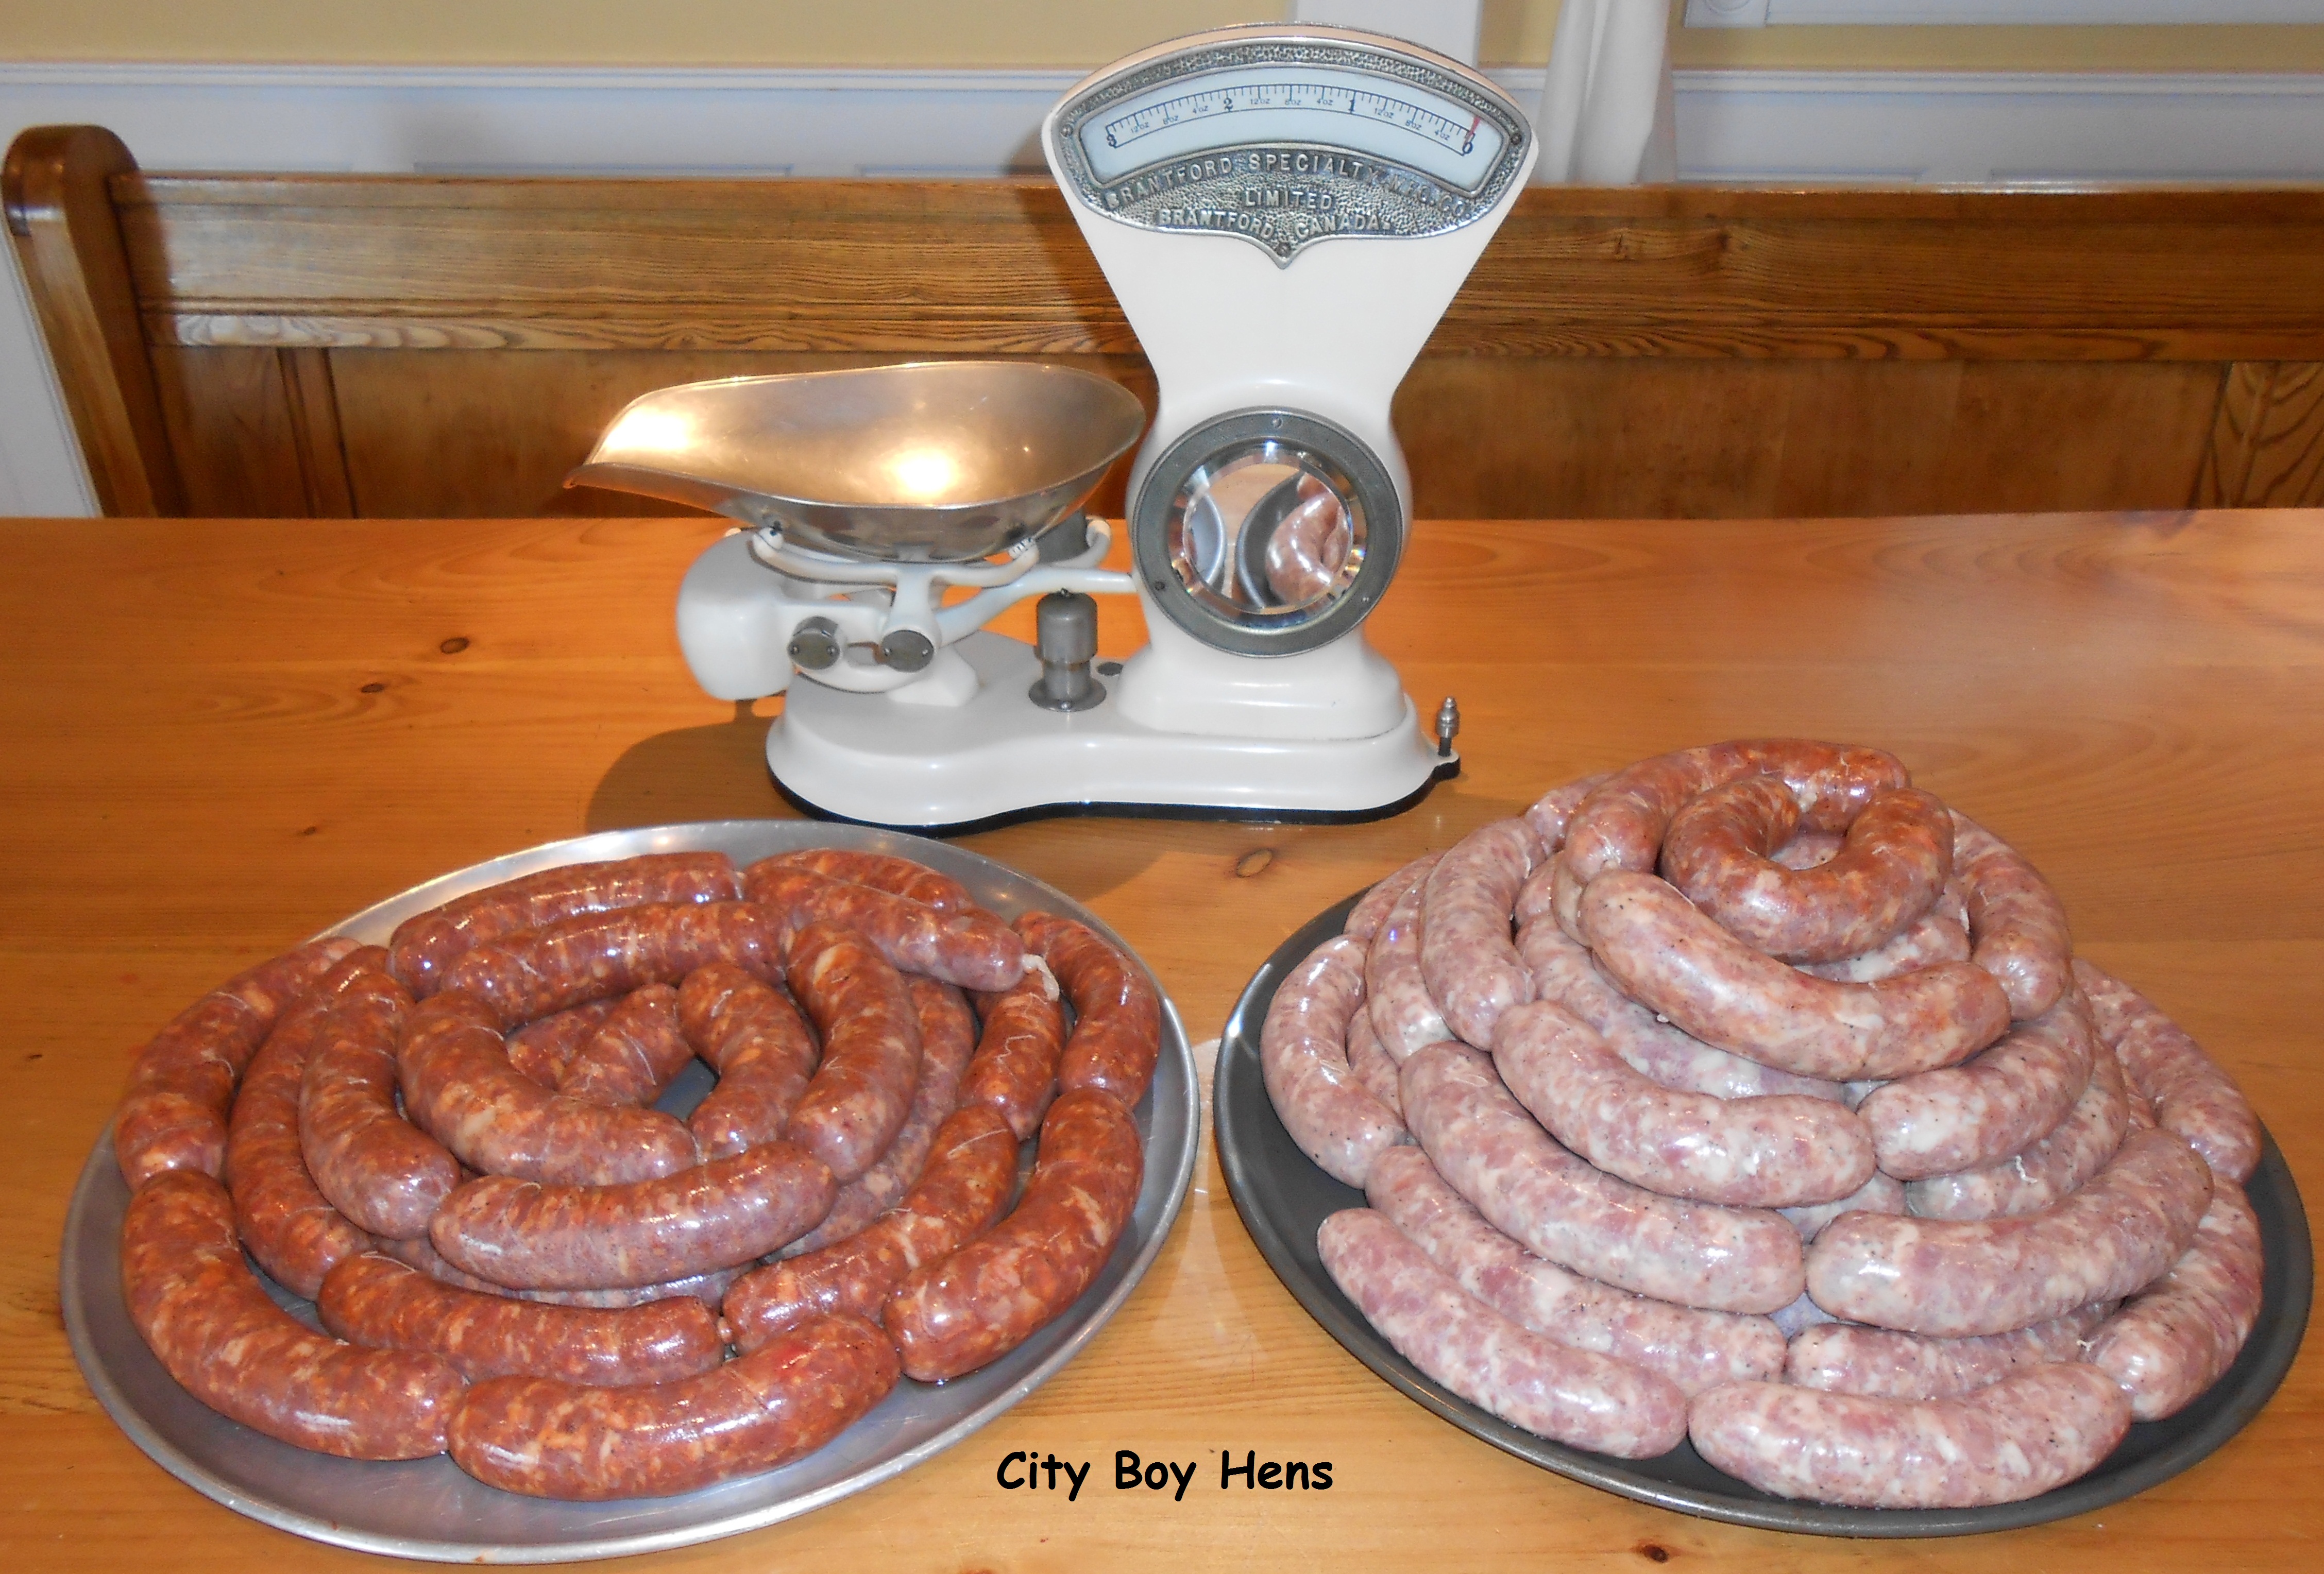
These 3 picnic shoulders made 85 sausages!
Mike and Jose also process our meat for about 10 cents/pound. This includes removing the bone and skin (approx. 2.5 lbs. /shoulder) and grinding the meat. This is a HUGE time saver for us and worth every penny! With their industrial machines, the entire job is done in a few minutes.
*Note –Make sure you have the leg bone included with your purchase. It is a great flavor enhancer to your tomato sauce! My wife always makes a batch of pasta sauce on Sundays and we can always tell when a pork bone was added to the sauce.
Back home, it’s time to begin spicing our meat. We make our sausage in 10 lb batches and weigh our meat using a 1950s vintage scale from my grandfather’s store. I like doing this part of the process because it gives me time to reflect on this man!

Weighing out the meat on Nono’s scale.
Once you have weighed out the amount, keep the rest of your meat in a cold place. Warm or cool meat will have a difficult time getting through your sausage machine. Now it’s time to add the spices. This is our recipe for Hot and Sweet sausage. The hot has a definite “kick” so decrease the chili peppers and cayenne if your palate is sensitive to these spices. You can also omit the wine, if you don’t want that flavor, but make sure to double the cold water.
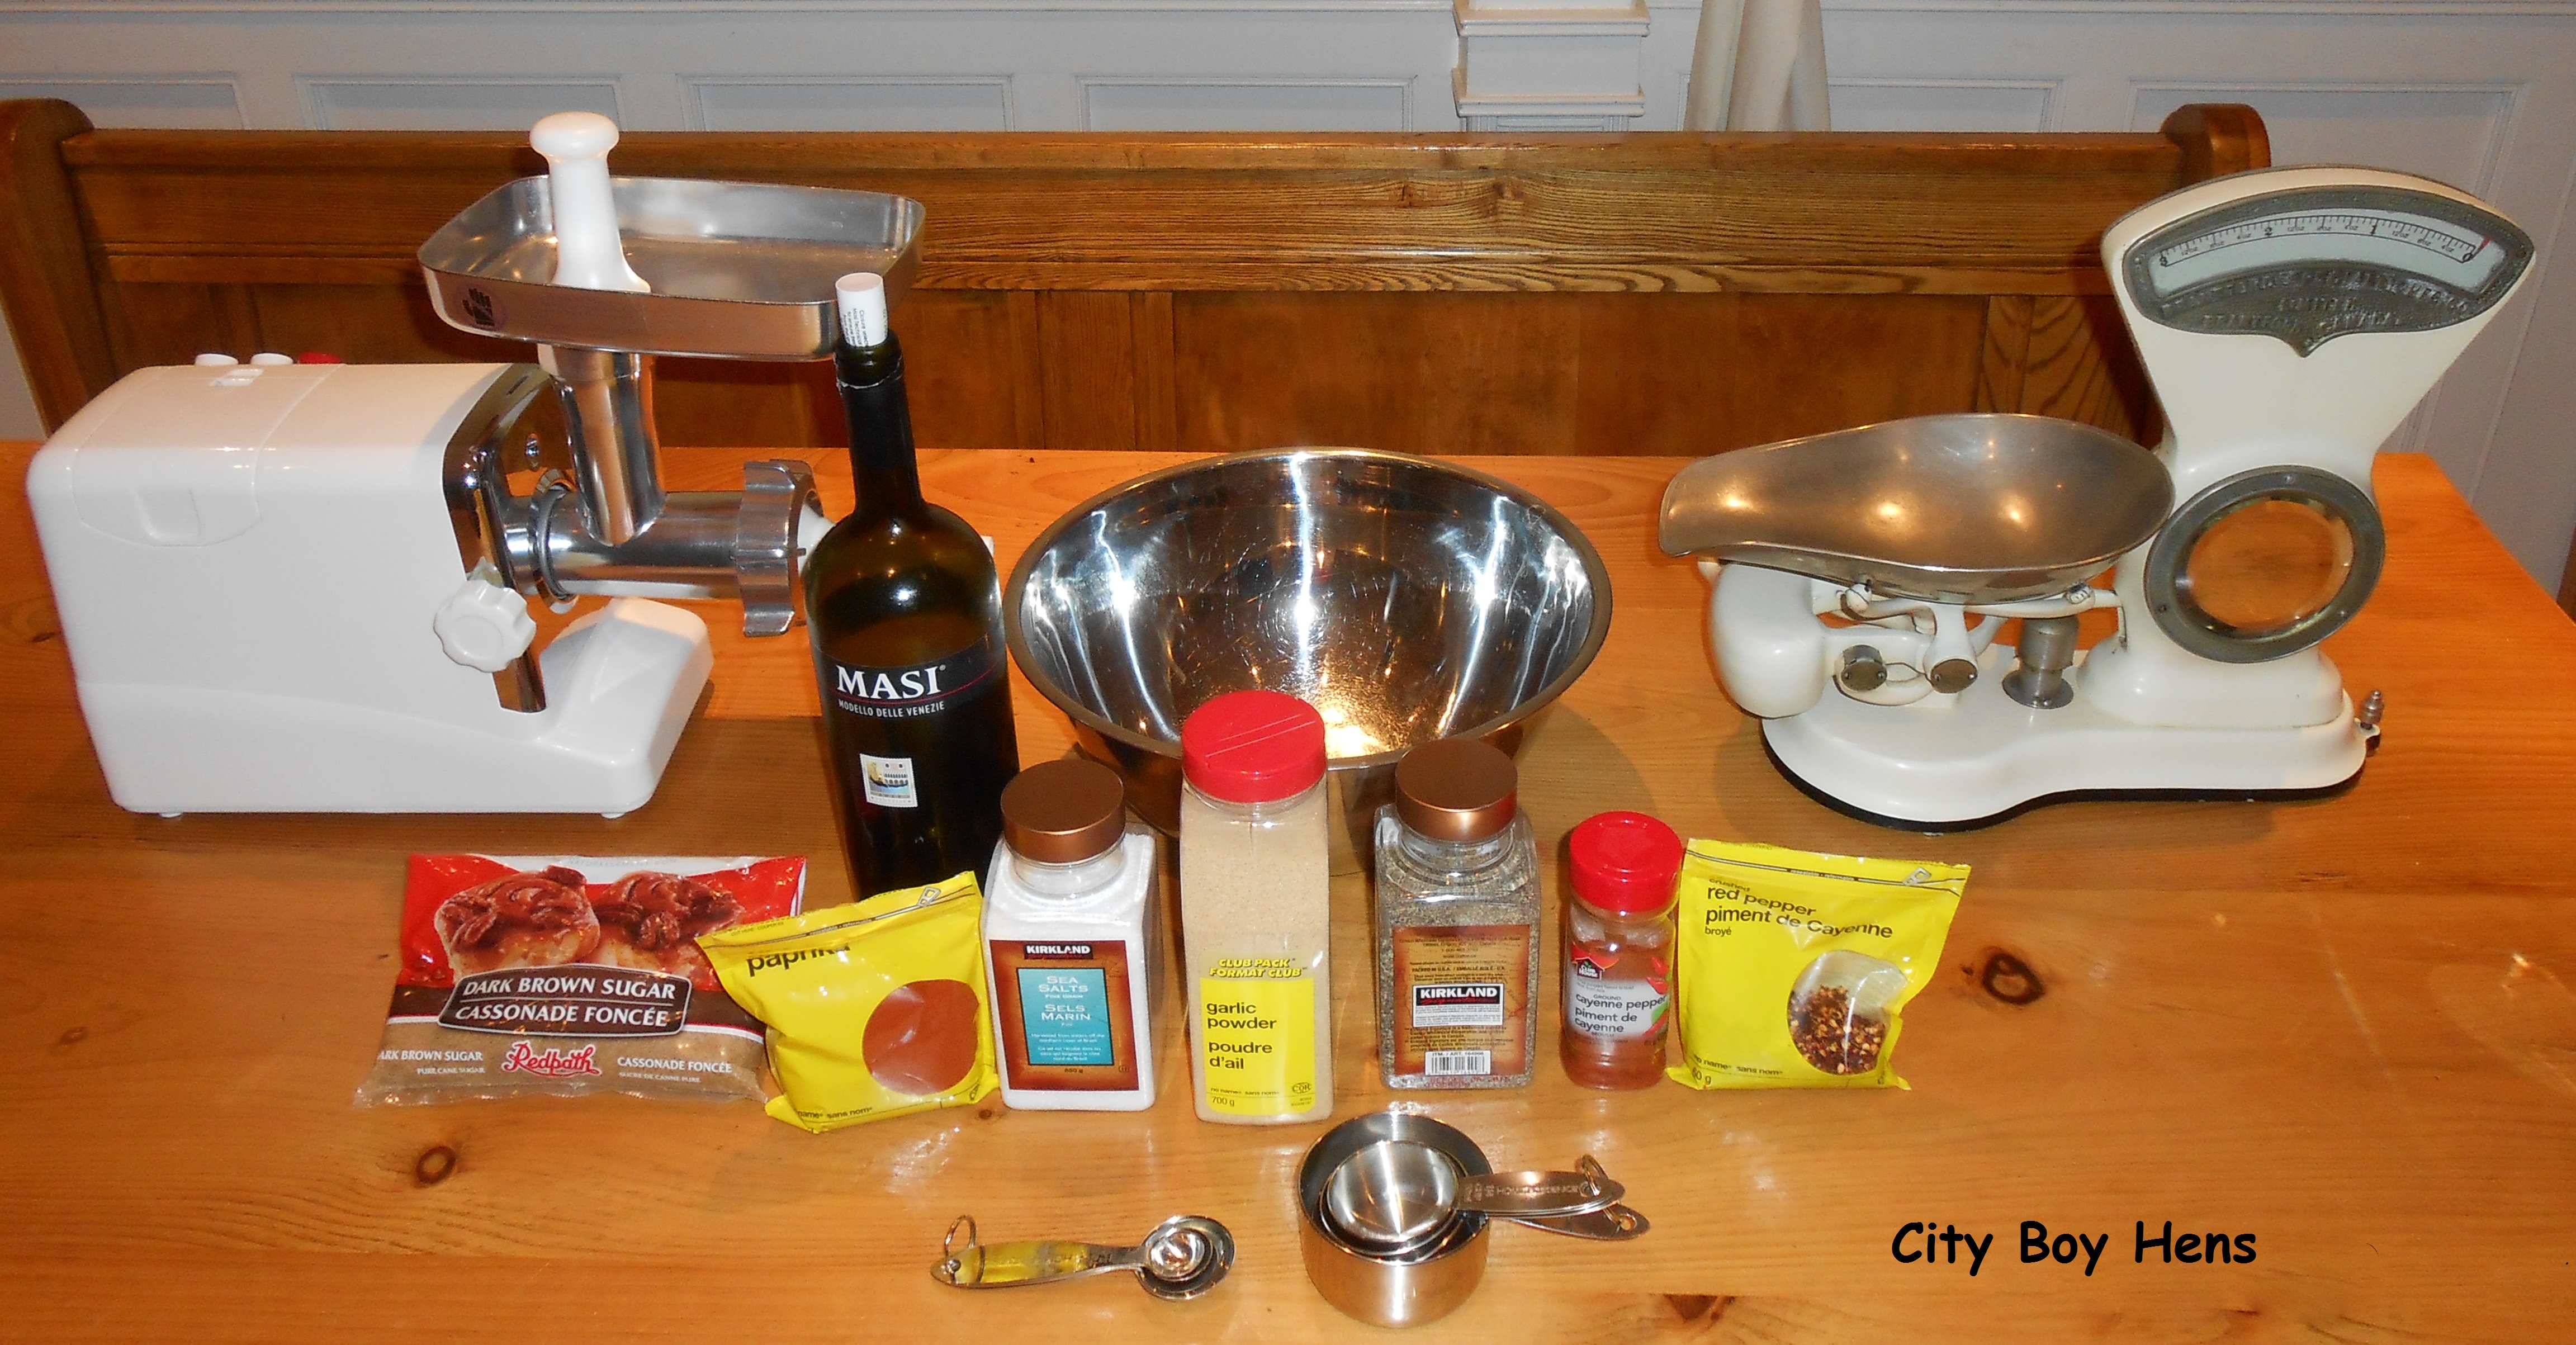
Hot & Sweet Ingredients.
Hot Sausage Sweet Sausage
10 lbs. pork 10 lbs. pork
1 cup cold red wine 1 cup cold white wine
1 cup cold water 1 cup cold water
10 tsp. salt 10 tsp. salt
2 tbsp. garlic powder 2 tbsp. garlic powder
2 tbsp. pepper 5 tsp. pepper
3 tsp. cayenne 4 tsp. brown sugar
2 tbsp. crushed chili peppers
10 tbsp. paprika
Combine the dry and wet ingredients into separate bowls and begin to add them to your bowl of pork. Your hands are going to get cold as you thoroughly blend the ingredients with the pork. This is a small bit of pain for the later gain. Remember….the meat must stay cold in order to properly run through your sausage machine! I generally mix, while Mike continues to add the ingredients.

Combining all the ingredients. Brrrrrrrrrrrrrrr!
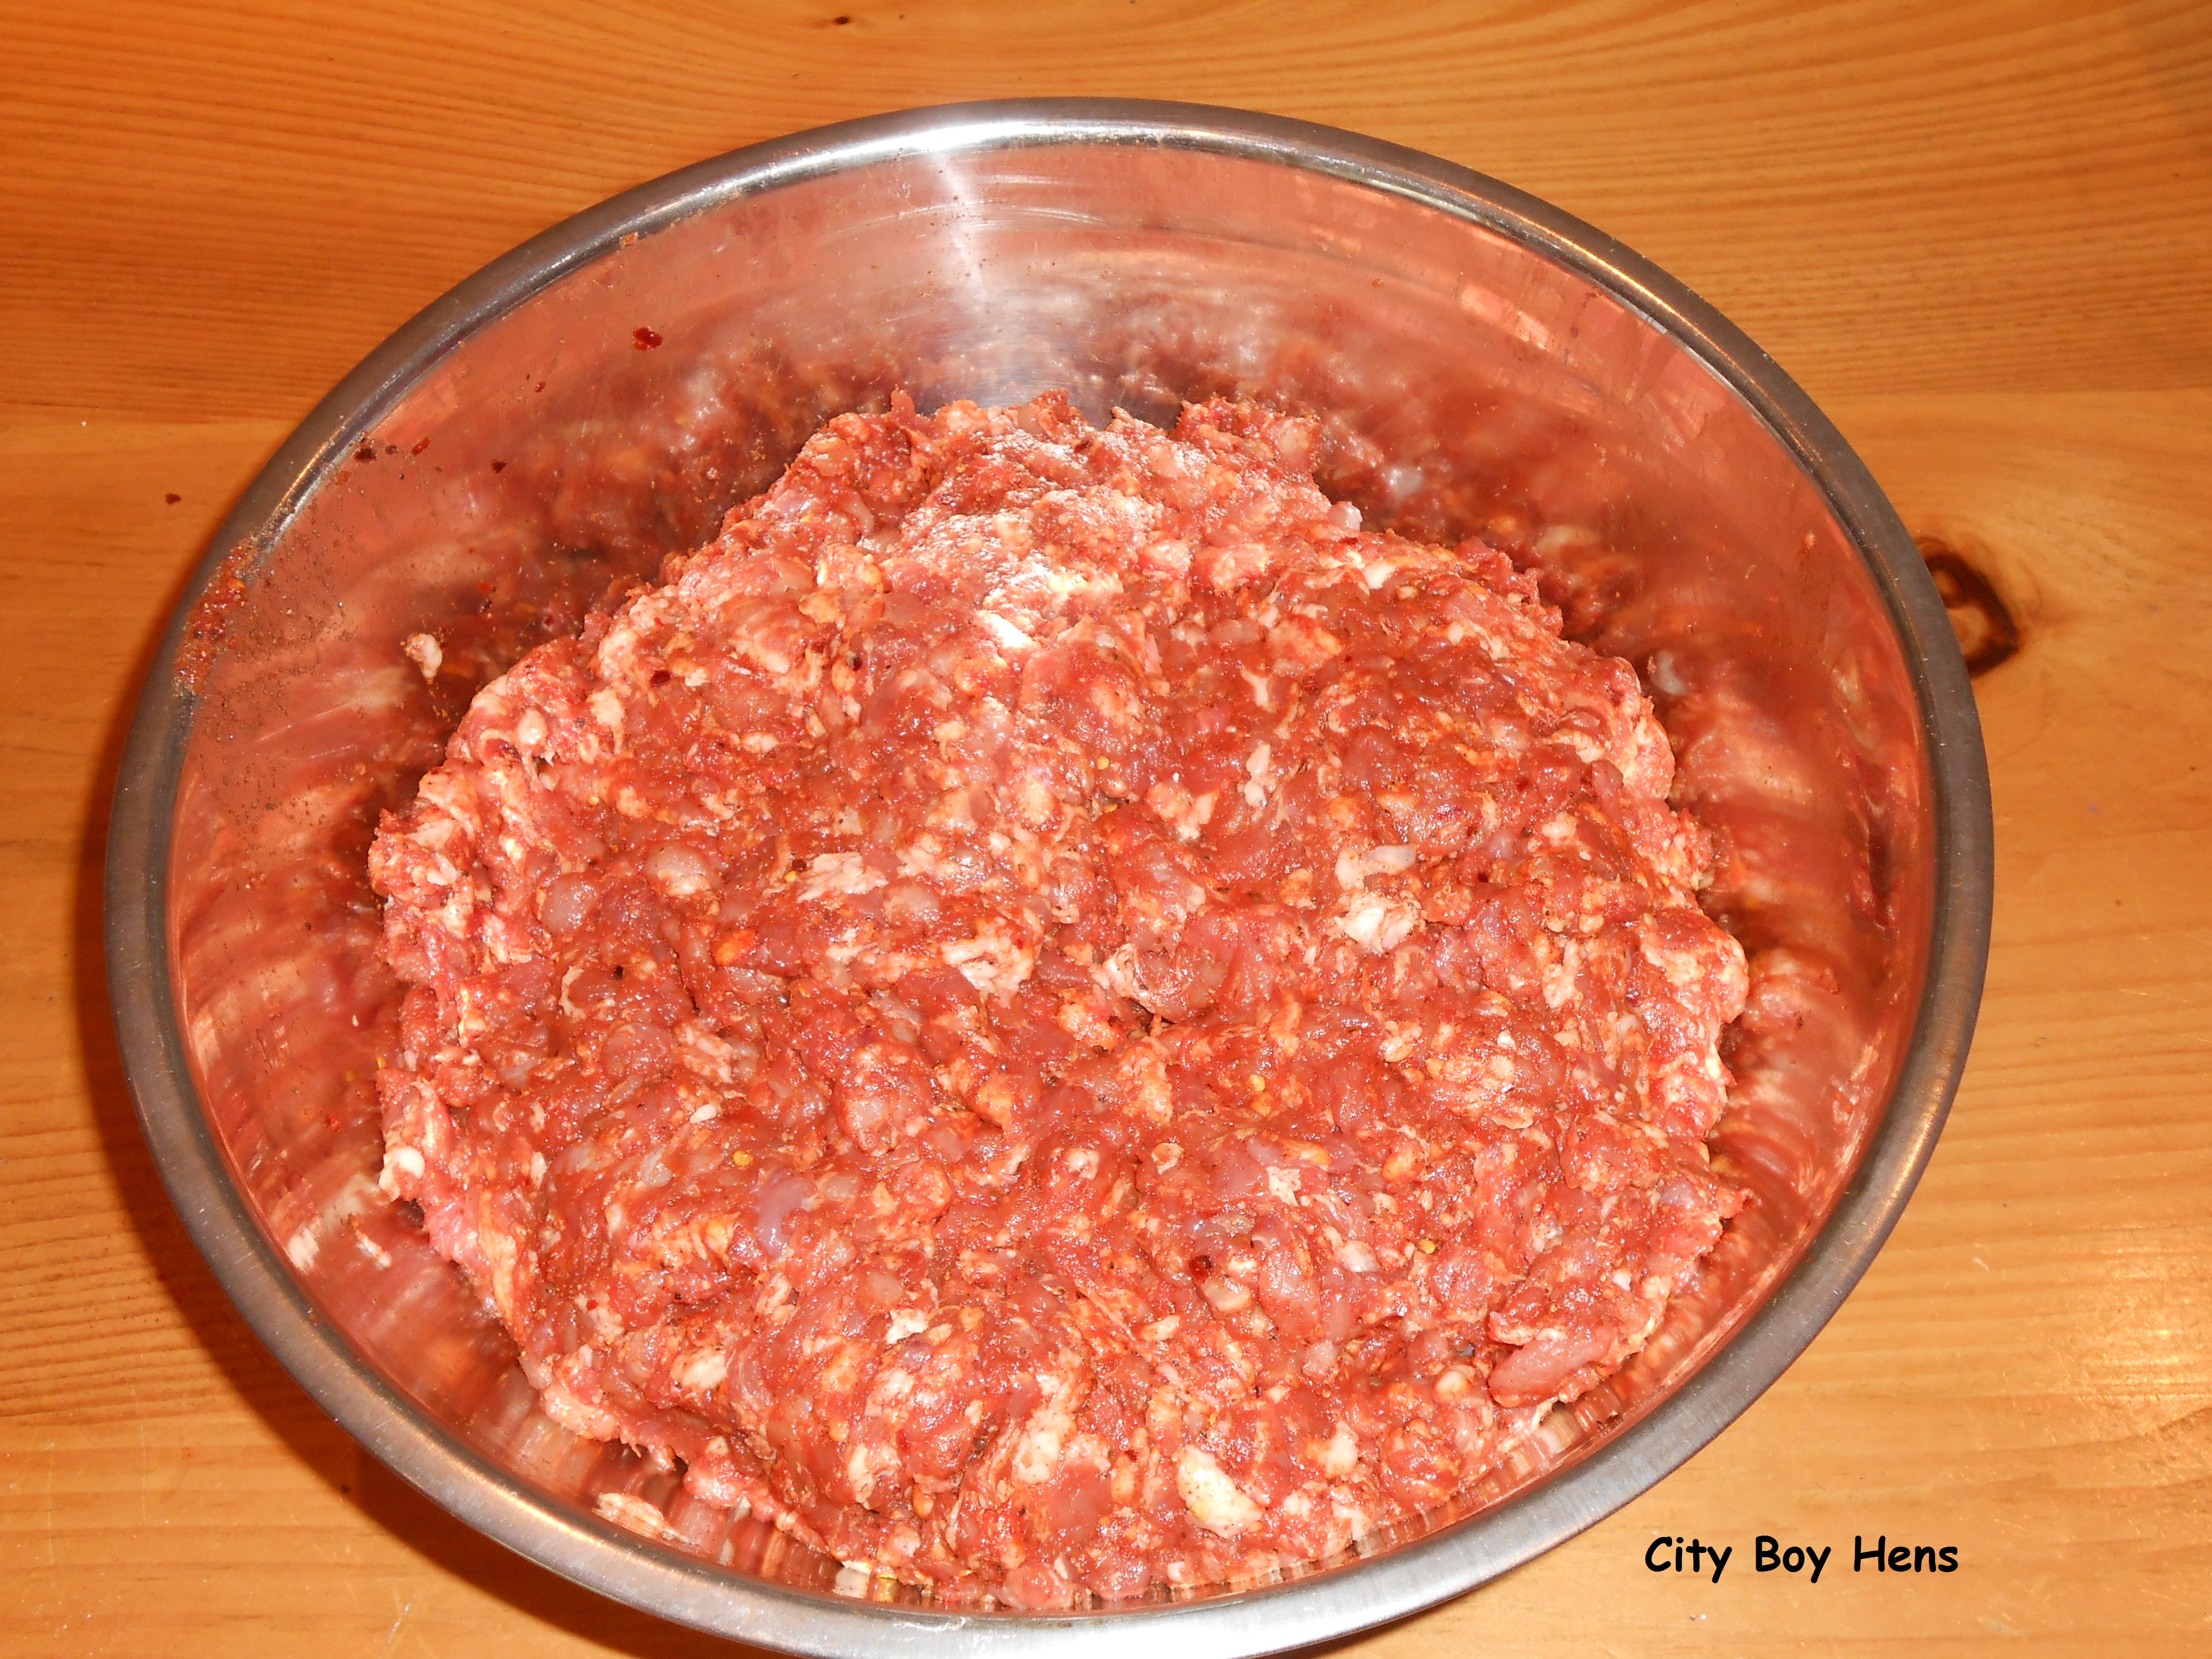
All mixed up!
Once the ingredients are thoroughly mixed, it’s time to thread your sausage casing on to the funnel. Before doing so, put a little bit of olive oil onto the funnel. This will act as an initial lubricant to help get your first casing threaded onto the funnel. Trial and error is going to work best at this stage. You will need to try to center the casing onto the funnel and gently continue to pull the entire length of casing onto the funnel. Once you get the hang of this, the process will become easy.

Ready to roll!
Threading the casing.
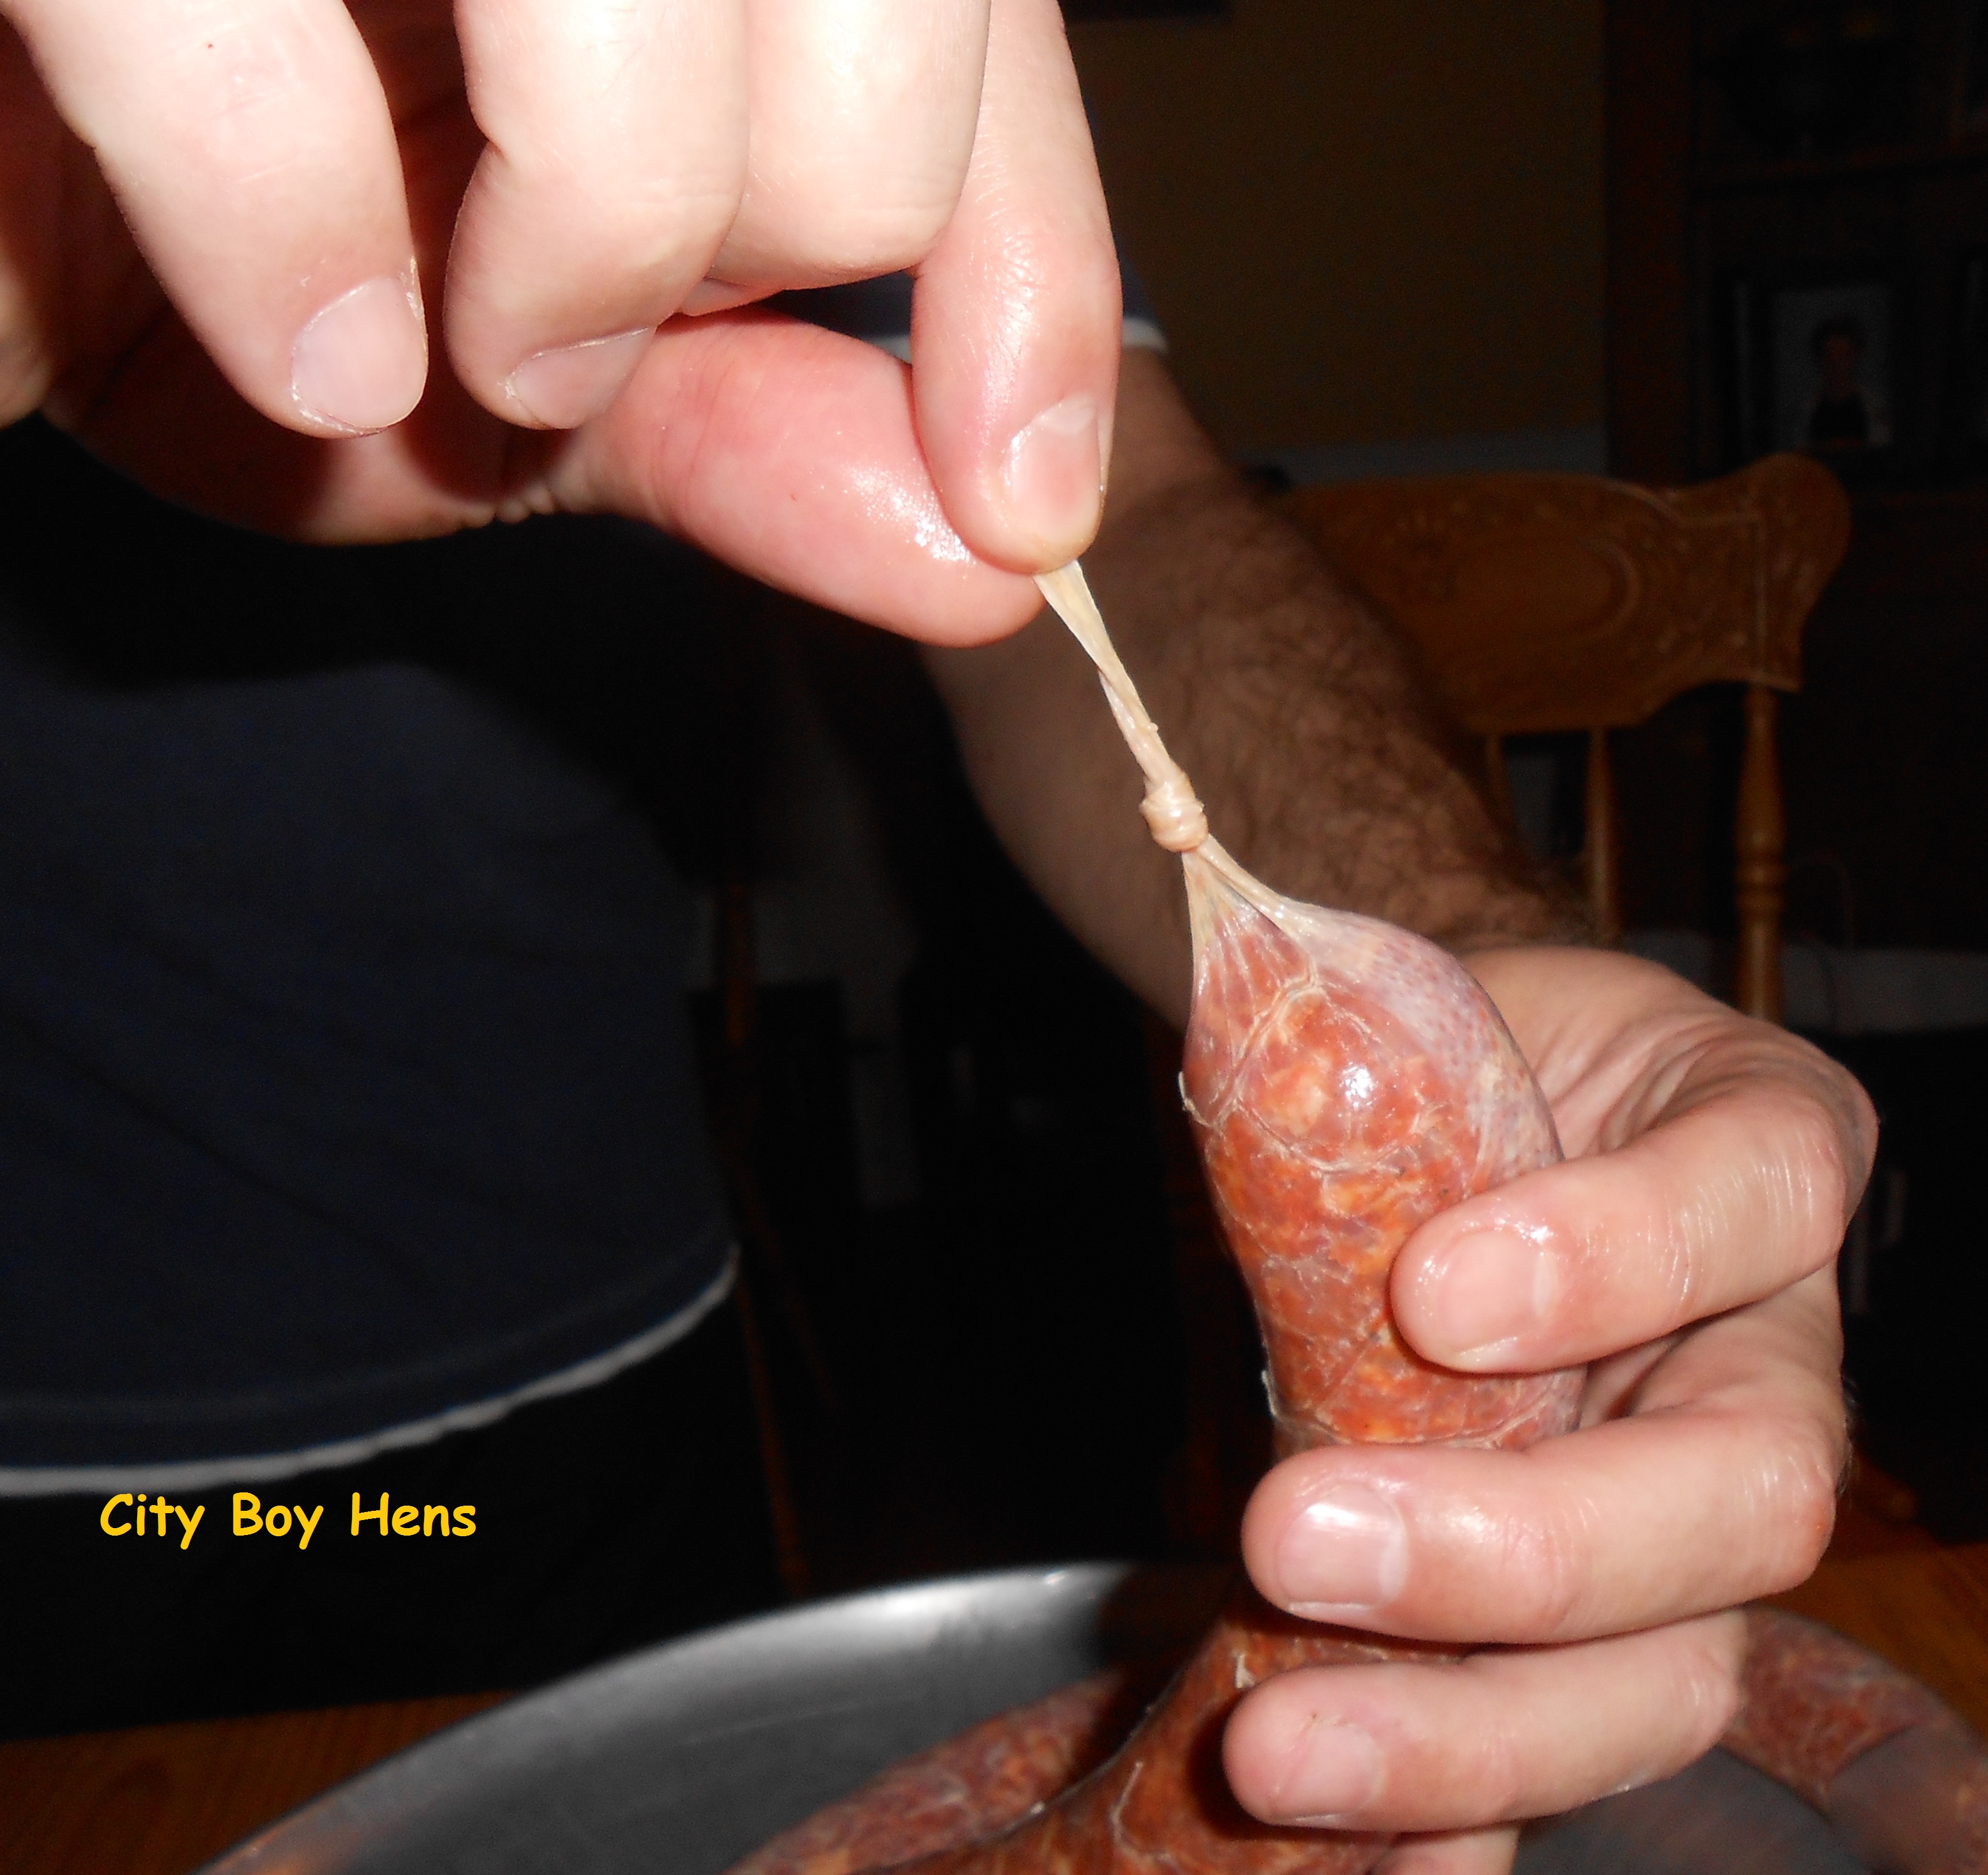
Once the casing is entirely threaded on to the funnel, pull it back towards you and tie it in a knot. Then push it back until the knot is centered on the opening of the funnel.
Tied off casing.
Now it’s time to start putting the meat into the machine. * Note: Remember we had our meat coarsely ground at the butcher so that we could skip the lengthy grinding step at home. Now we are using our meat grinder as a “stuffer” and therefore, attaching the stuffing plate (not grinding plate) onto our machine. Always remember to use the meat stomper when feeding meat into the machine. Never push the meat into the grinder head with your hands!

Let’s start stuffin’.
This part of the process is best shared by 2 people. I generally push the meat into the machine while Mike supports the casings as they fill with meat. It’s now up to Mike to determine how dense he wants our sausage to be. Holding the casing back too much will cause the casing to rupture and too little resistance will make for a poor looking finished product. Once again, this will be trial and error, but you will get the feel for it after a few attempts.
Mmmmmmm..sausage!
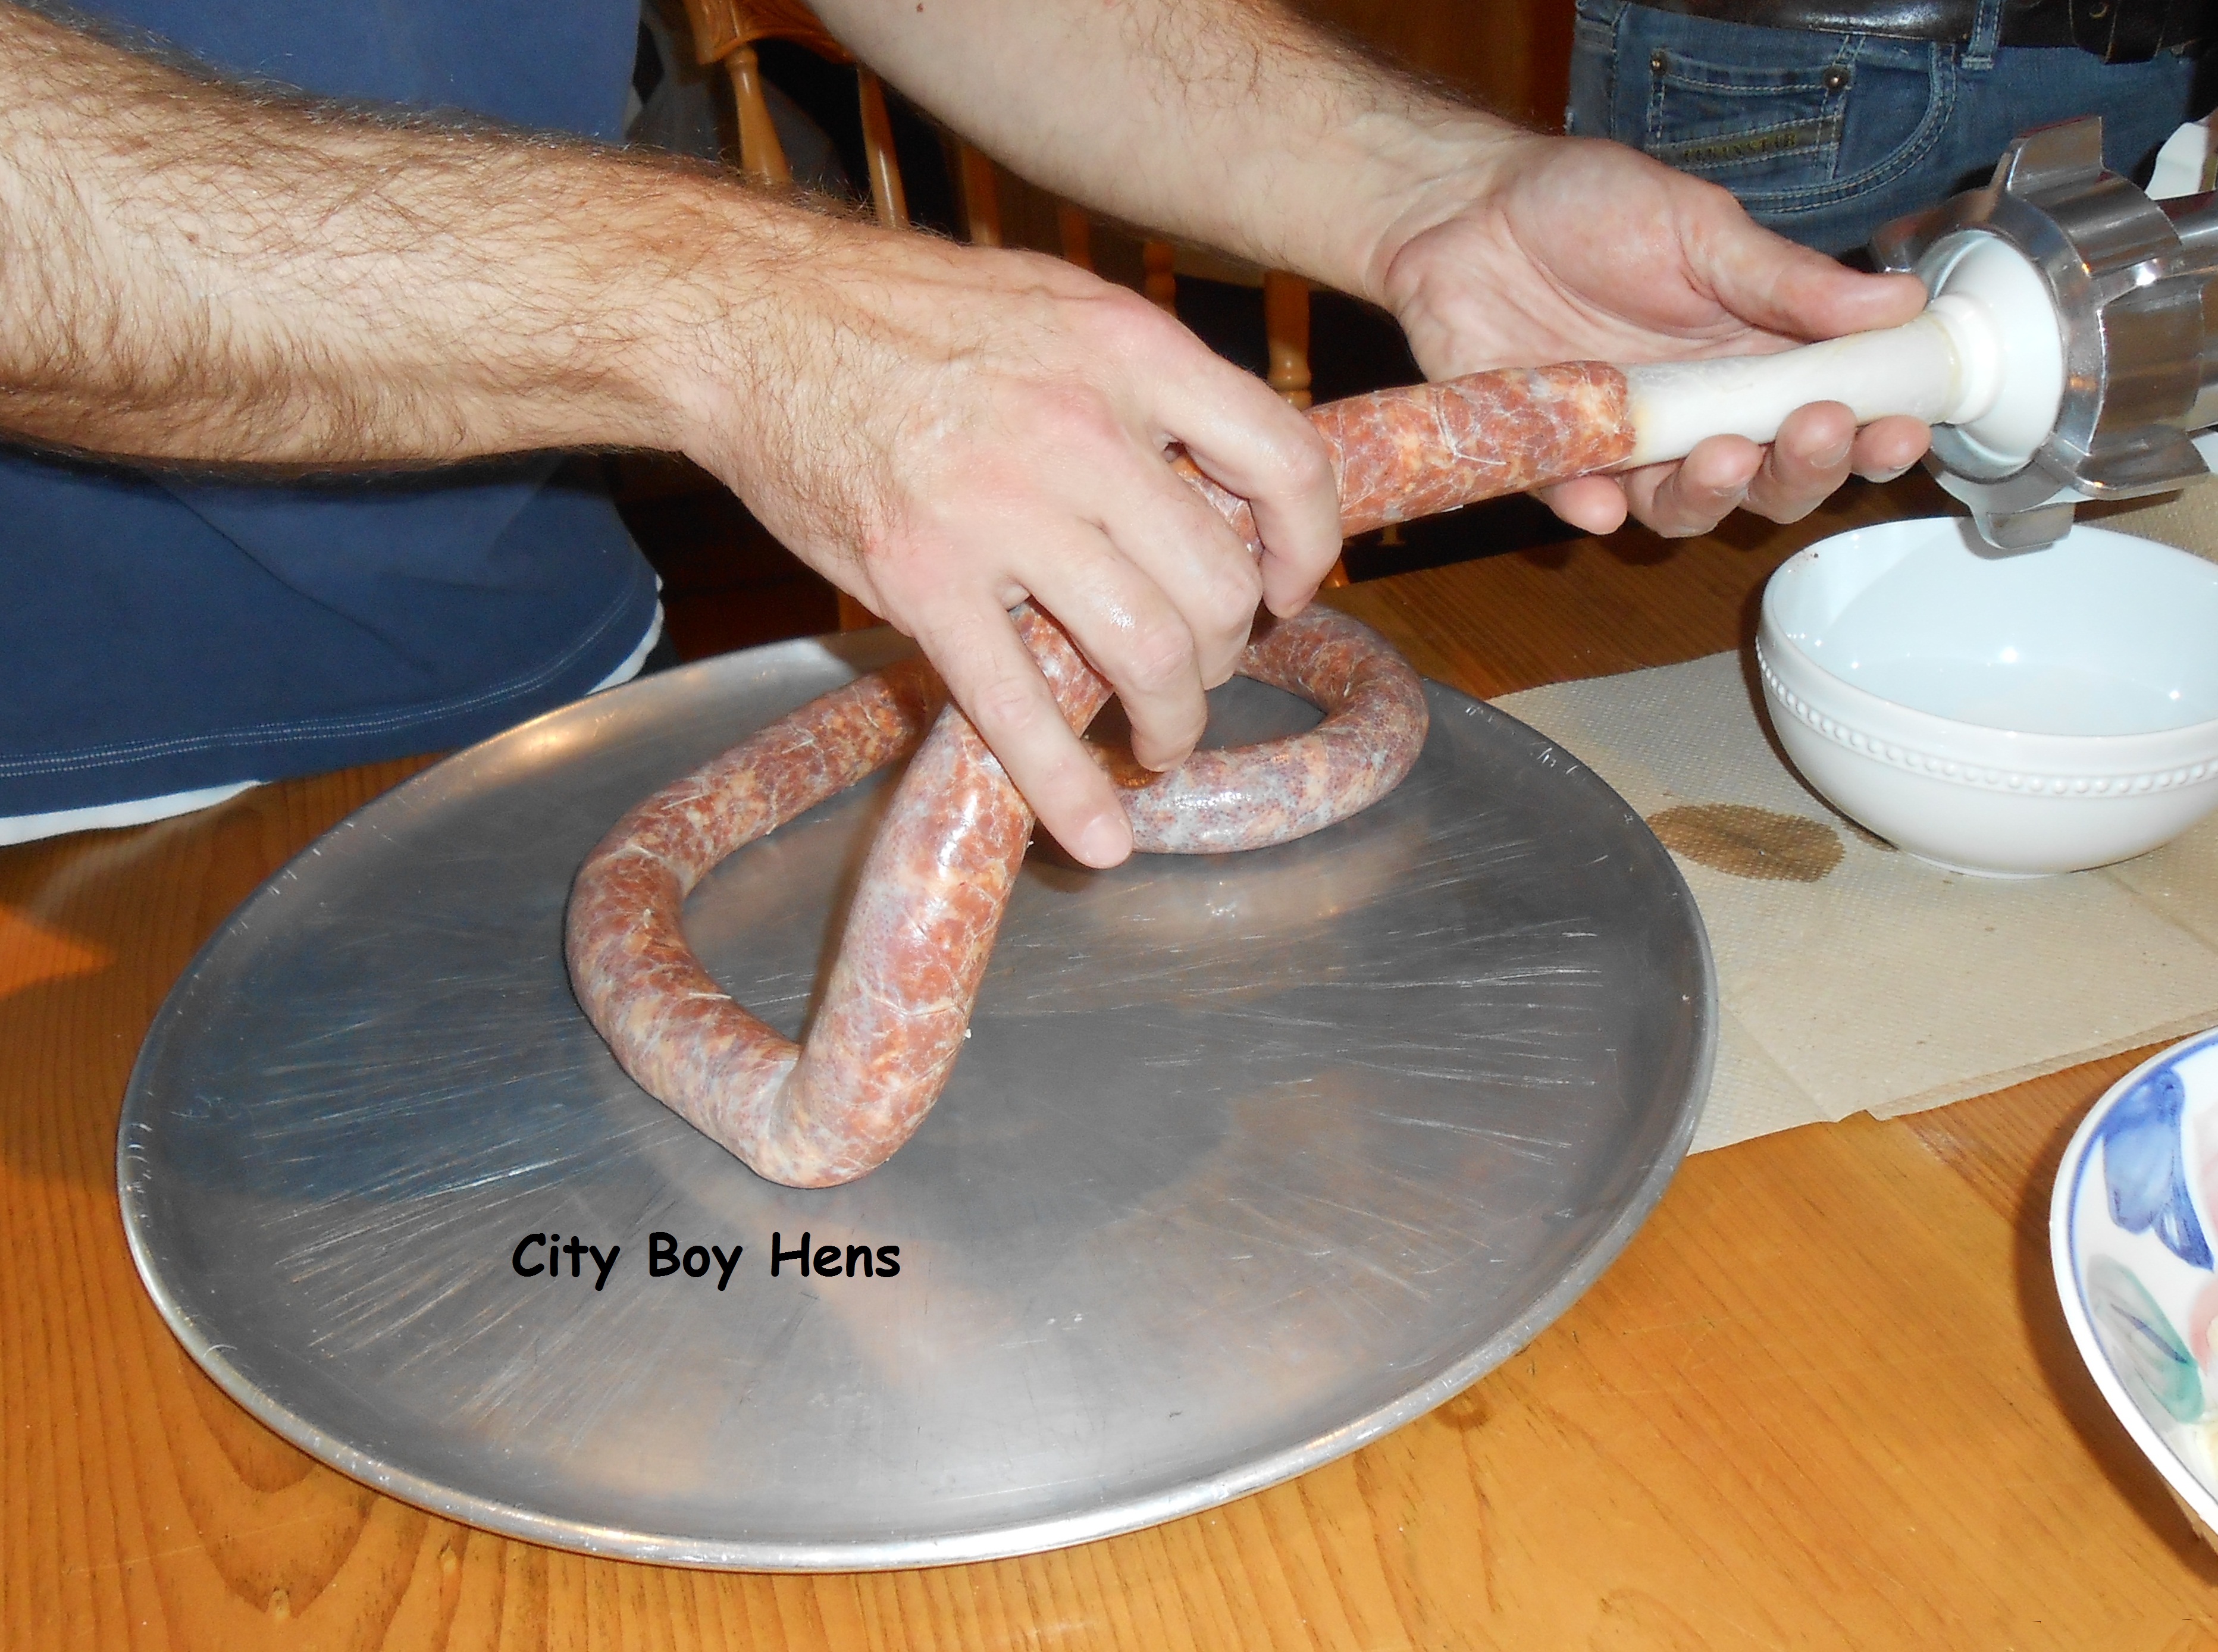
With about 3 inches of casing left on the funnel, the machine is shut off. Mike then pulls the rest of the casing off of the funnel and ties it in a knot. Leave yourself enough room on the end. You don’t want to struggle to tie this knot because you filled the casing up almost to the end. The excess casing is then snipped off past the knot for presentation purposes.
Tying off the casing.
If the casing ruptures somewhere in the process, it is no big deal. Just shut the machine off and squeeze the meat out from before and after the break. Take that meat and put it back into the hopper, cut the casing with a pair of scissors and then tie off the finished casing and what’s left on the funnel. That length of sausages will just have less links.
While I thread the next casing onto the funnel, Mike begins to make links out of the sausage. He is The Master at sausage linking! First, Mike estimates the length of sausage and crimps the end of the length with his thumb and index finger. He then secures than area with one hand and turns the sausage around 3 times to bind the link. Remember, you must turn in the opposite direction for the following link or your previous link will unravel. Continue to do this until you have linked the length of sausage. Once this is done, the sausages are taken down to the “cantina” (cold cellar) until the entire batch is made.

Mike “The Link Man”!
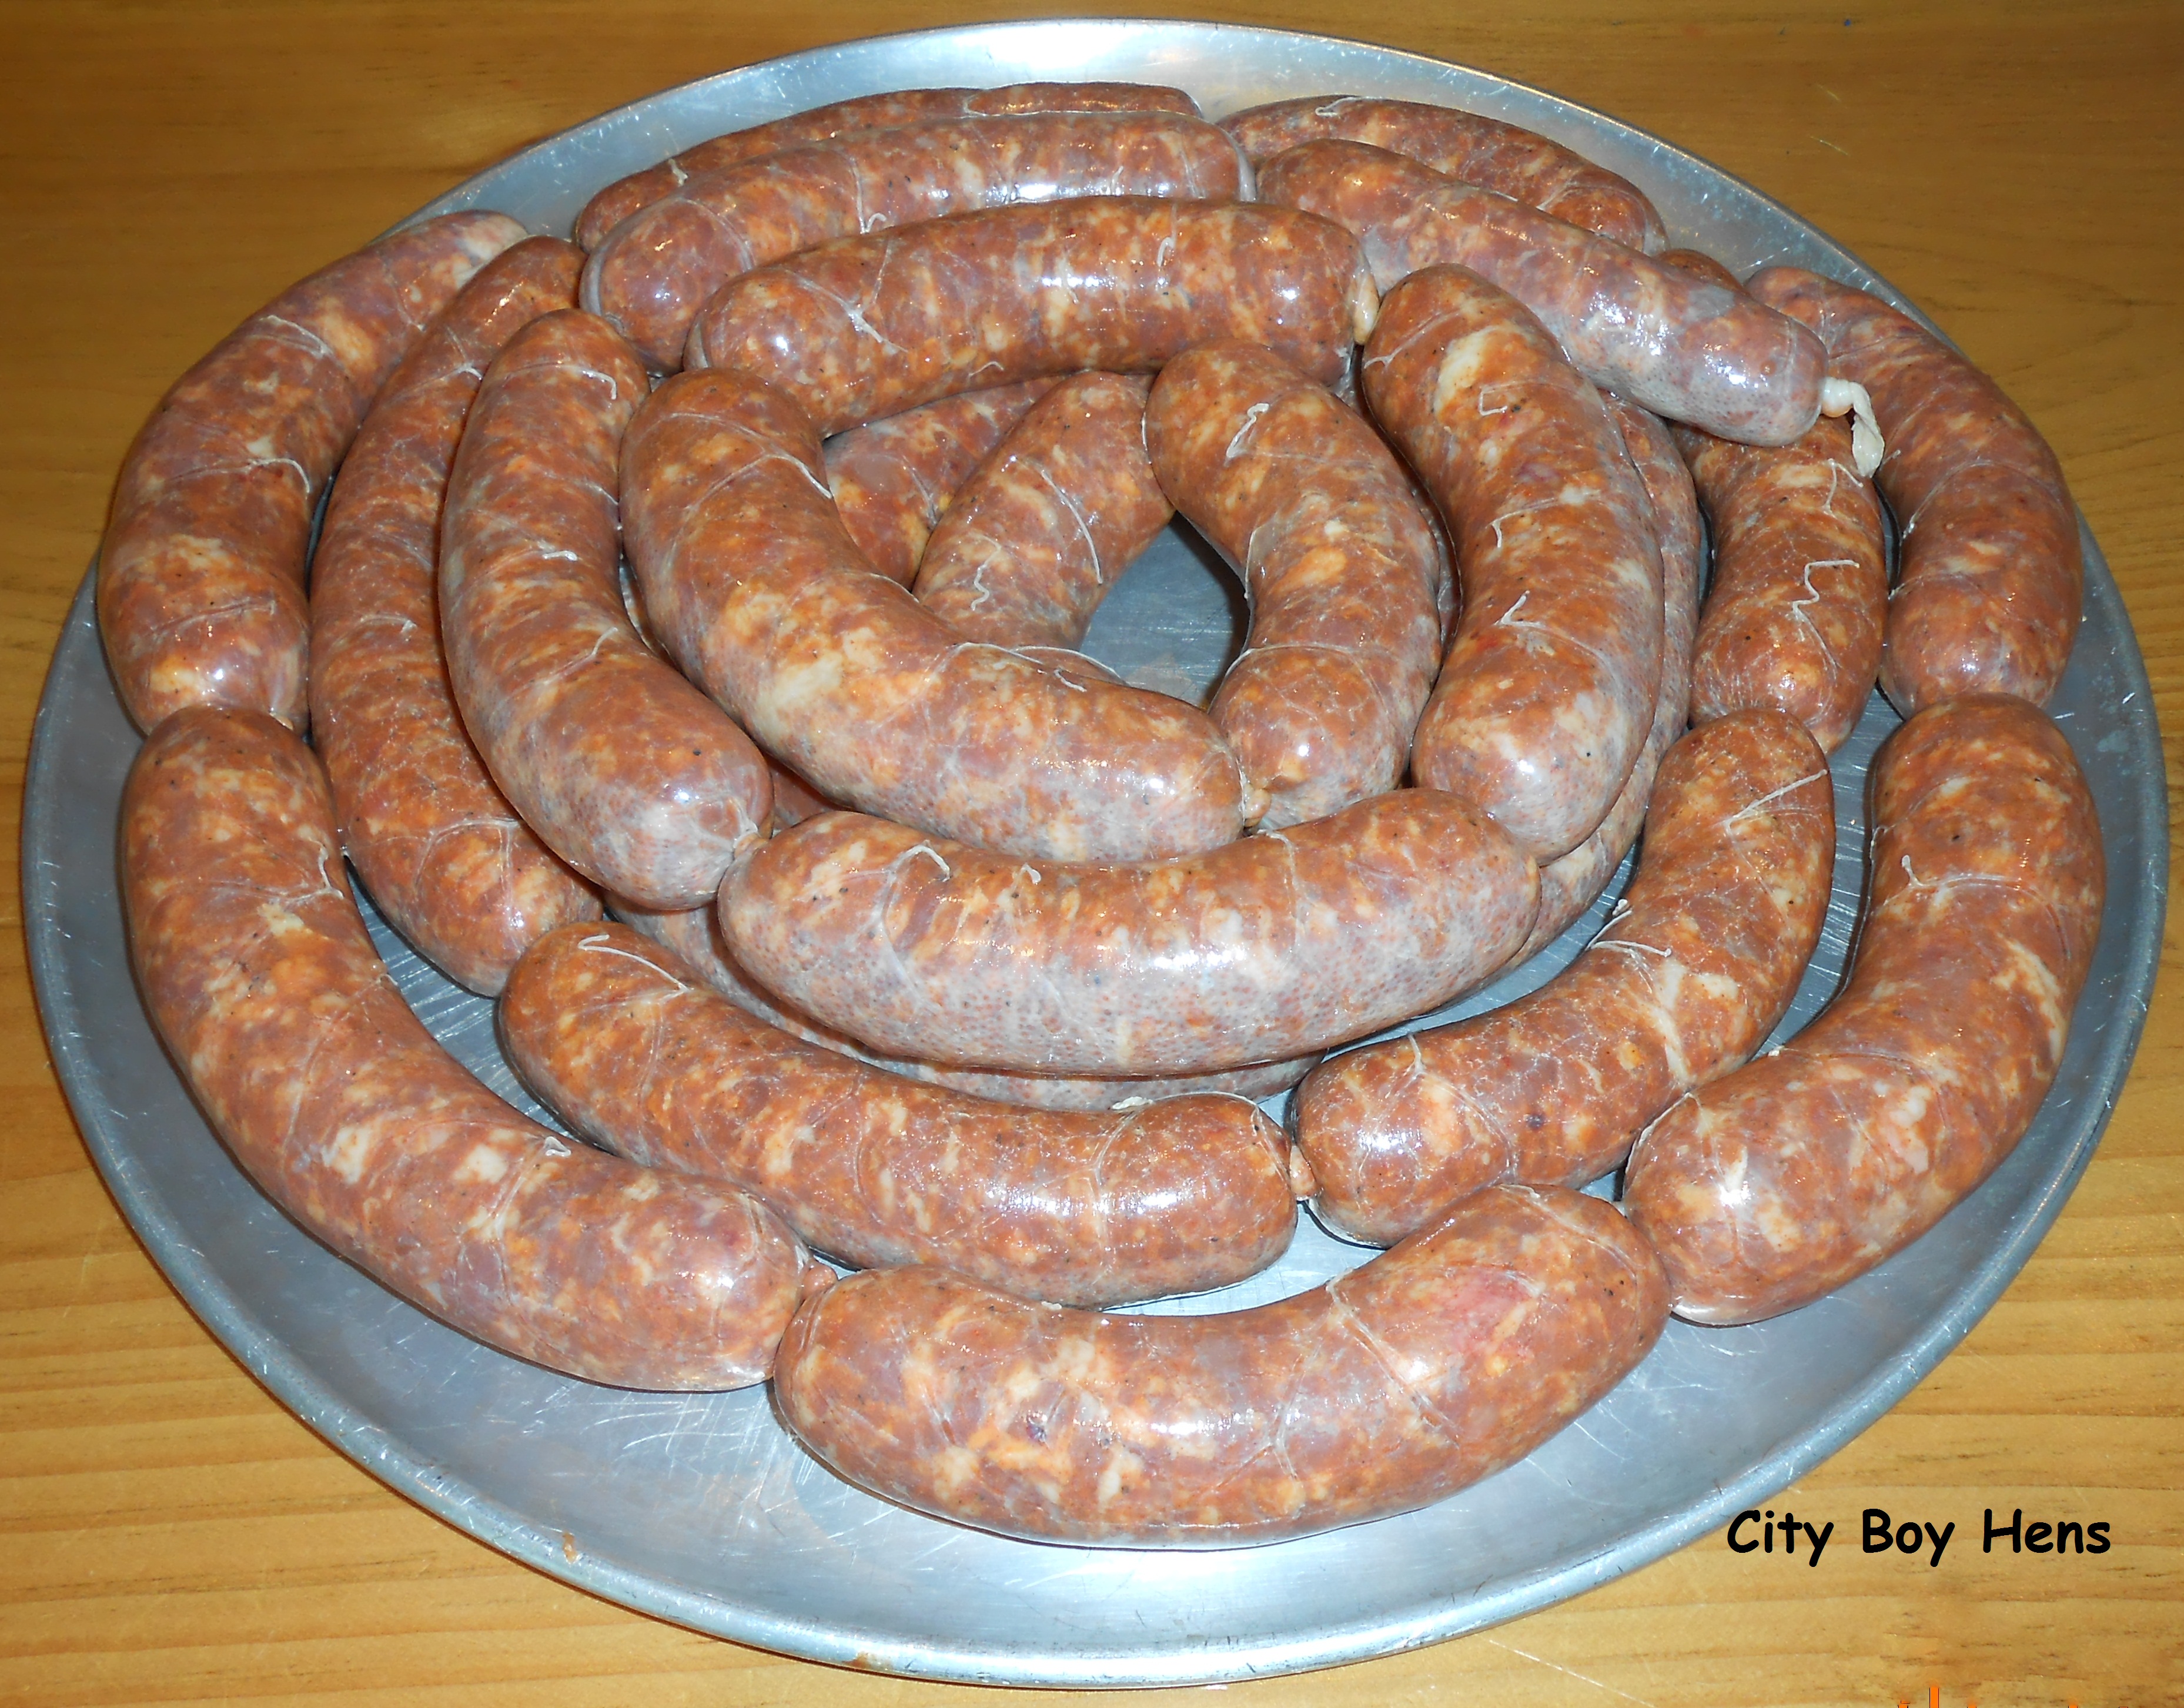
All linked up!
Once the sausage meat is completely used, it’s time to clean the machine and begin packaging. Don’t discard the meat that is left in the auger. Keep it for tomorrow’s sauce.
Mike and I have worked out a good system for packaging the sausage. We package according to the preference between hot & sweet and the quantity that each family will eat for a meal. For my family, it is 5 hot and 3 sweet and Mike goes 2 & 2. We are bigger eaters than Mike’s family and we want leftovers for sausage on a bun in the next day’s lunch. So…to make things fair, Mike only buys the meat every third trip to the butcher!
Mike’s vacuum sealer works great for packaging the sausage. Once again, 2 people make lite of this task. Mike preps the bags, while I snip the required links from the lengths of sausage. Those babies are then gently put into a vacuum sealed “dinner bag” and deposited into the freezer.
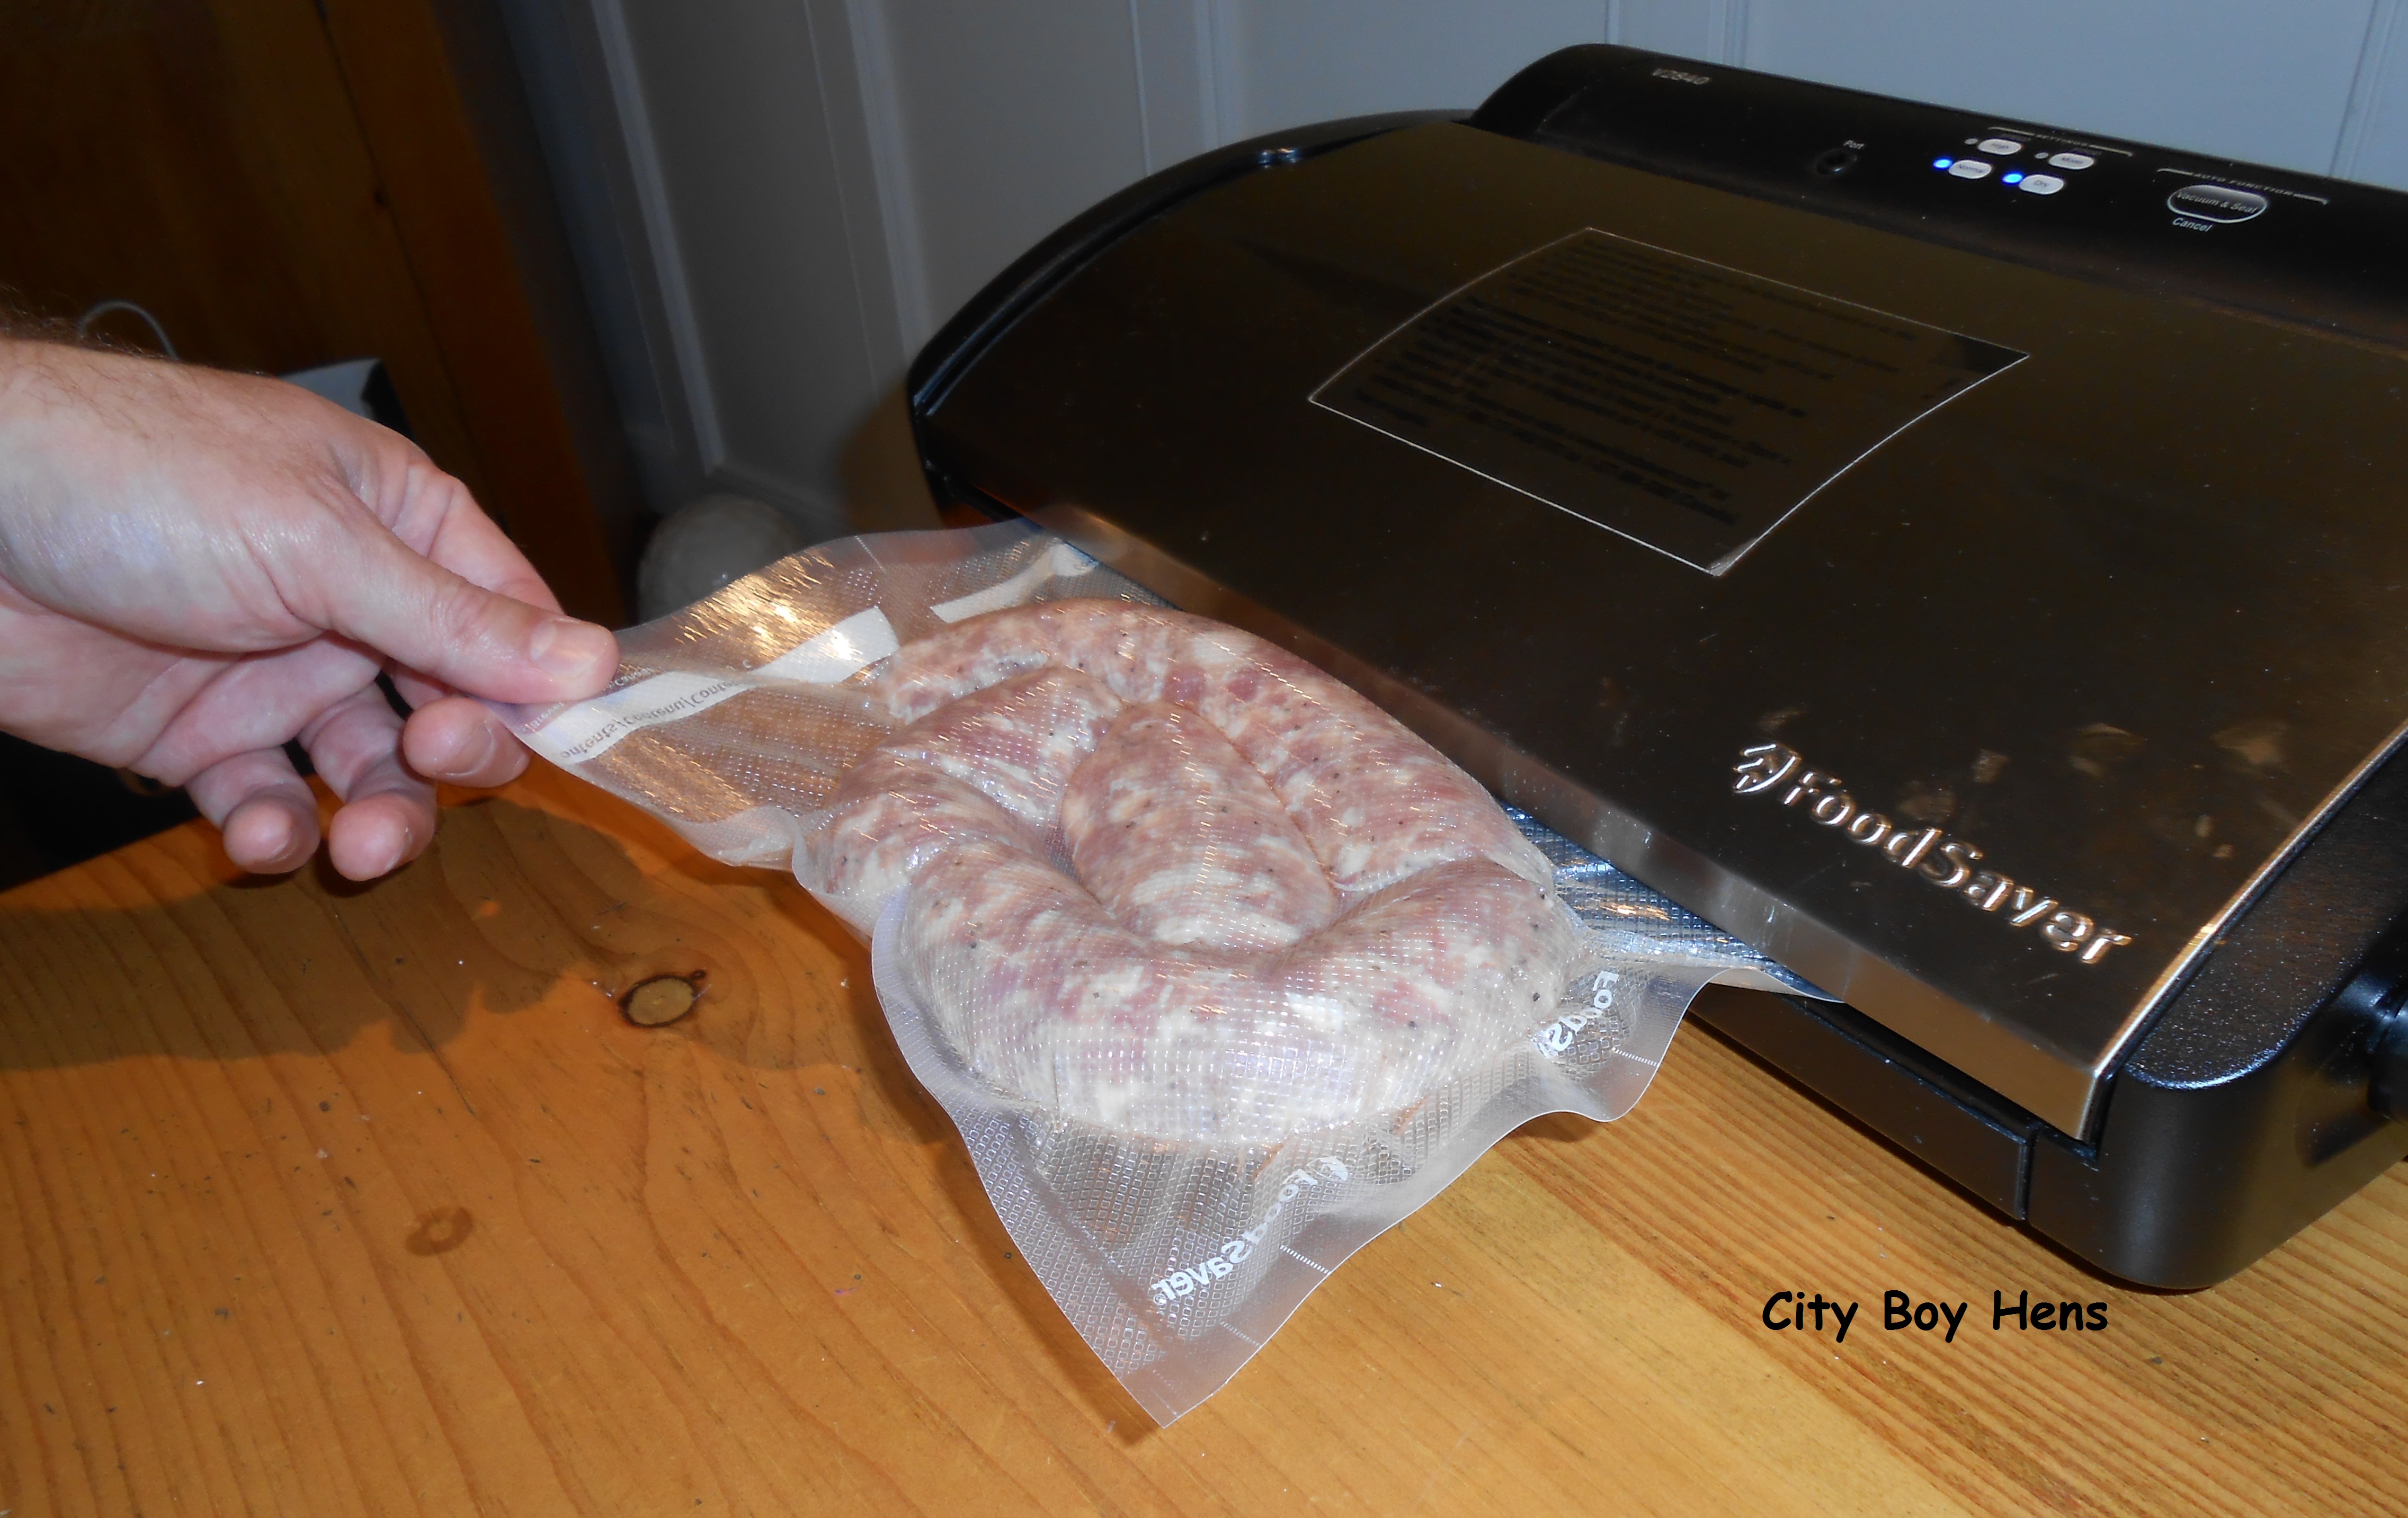
Vacuum sealed! Ready for the freezer.
Like anything in life that is good, there is always an element of labor. I guess it would be easier to just go to the store, but the flavor and satisfaction of making your own sausage should be ample motivation for you to take the leap into sausage making. If this isn’t enough motivation, consider the fact that each of these large sausages costs around 50 cents to make. That coupled with friendship and a communal meal at the end of the day with both families is more than enough reward for us. The only trouble is……always trying to make enough to last!

Job well done!

Yours are the best sausages that I’ve ever had!!!!! Still Waters
Thanks Still Waters,
Now its your turn to become a sausage maker.
Regards,
City Boy
Thanks for all the fine details. This was a thorough presentation of all the key aspects if sausage making. I feel like this is very doable for myself. As soon as my sausage attachment comes in I will be heading to the butcher’s.
Best of luck Mr. B.
Drop us a note when you make your first batch!
Regards,
City Boy
Well documented post CB, I cannot wait to try this.
This is the same way we make our sausage! I’m looking forward to trying your recipes, they sound terrific! One question – we mix our spices etc in with the meat and then let it age in the fridge for 2-3 days before stuffing. Any thoughts on whether or not that’s worth it?
HI Mywesternhome. Thanks for checking out my blog. I’m not sure if it’s necessary to let the meat sit for 2-3 days in the fridge before stuffing. The spices will be thoroughly mixed first by hand and secondly when the mixture is compressed into the auger of your machine. Lastly, I don’t have the refrigerator space to keep this meat for 3 days, considering that we usually make around 100 sausages each time. I hope I’ve helped. Why not try my way on a small batch and see if there’s a recognizable taste difference. I’d like to know your findings.
Hope you’ll drop by again,
Regards,
CB
These sausages look INCREDIBLE! Definitely something I will need to try. Thank you for sharing on Wildcrafting Wednesday! 🙂
Thanks Katherine,
I hope you make sausage!
Hope you’ll drop by again.
Regards,
CB
Pingback: The Creative HomeAcre Hop #19
Fantastic!!! One of my grandfathers was a butcher but we never had a chance to see how the sausage was made. Very cool!
Thanks so much for sharing at the Creative HomeAcre Hop! Looking forward to seeing what you share this week!
http://back2basichealth.blogspot.com/2013/06/join-us-at-creative-homeacre-hop_9.html
Hi Mary,
Hope you will resurrect the torch and try your hand at sausage making!
Regards,
CB
I found this post through the From the Farm Blog Hop. These step by steps are extremely helpful. I’m going to save this link. Making homemade sausage is on my Foodie Bucket Lists. Thanks for sharing!
Michele
Hi Michele,
Hope you give it a try!
Regards,
CB
What a fabulous and comprehensive “How To” Thanks guys! Will try this soon!
Hi Maryanne,
Thanks for stopping by.
Best of luck with making sausage.
Regards,
CB
Most excellent post! This displaced German is missing sausage like crazy, so I might try this as soon as I get some local pork shoulder!!! Found you on frugally sustainable, and happy about it!
Hi Kath,
Hope you give it a try. I’ll guarantee you’ll always put your nose up to store bought sausage after you make your own!
Regards,
CB
Oh my, those sausages look great! My husband has a smoker and I was thinking they would be great smoked and then packaged to freeze. What do you think? Or is this not the right recipe to smoke? Anyway, I just got a sausage stuffer attachment for my Kitchen Aide and I can’t wait to try it out now! Thank you so much for the recipe and tutorial!
HI Vickie,
I am not versed on the smoking part. It is more of a Eastern European process, but I can tell you that the process for making the sausage (prior to smoking) is the same as my post. I’d like to know your results.
Regards,
CB
This is absolutely brilliant! We have not yet ventured into the art of sausage making but I am now completely inspired! Thanks for the wonderful tutorial! I will pin this for later 🙂
Thanks Bee Girl.
I hope you give it a try!
Regards,
CB
Job well done indeed! My neighbor from my previous home makes his own sausage and gave us some for Christmas once. It was delicious! Thanks for sharing with SYC.
Jann
My family does not eat hot sausage. How is the sweet sausage recipe different?
Hi Donna,
The Sweet sausage has white wine instead of red and does not have chili peppers or cayenne.
Regards,
CB
Italian sausage without fennel? Whaaaaat?
HI Ginger,
Not a big fan of fennel, though others do add it to their recipe.
I hope you’ll give sausage making a try.
Regards,
CB
Thank you very much I cant wait until pork shoulder comes on sale again. So I can try both recipes.
HI Rick,
I hope you give it a shot!
Regards,
CB
can you clarify this for me? I would like to try your recipe but am unsure of the weights and amount of casing.
Your article says “This container had 15 pieces and we used 10 for a batch of 85 sausages. Experience has taught us that 15 lengths of casing (around 30 inches) from my shoulder to my fingertips makes for 3 picnic shoulders worth of meat. This would apply more if you purchased your casing in 100 yard increments”
it says you used 10 lengths for 85 sausages. In the article you say you purchase 3 picnic shoulders. but here in your opening you say 3 shoulders and 15 lengths. Is it 10 lengths or 15 that need to be prepped for 3 shoulders?
I am also confused with the weights you give. Your reciped says 10 lbs.. The article says each shoulder is 2.5 lbs. so 3 shoulders is 7.5 lbs not 10 lbs. How much are you purchasing to get 10 lbs?
thanks for clarifying
HI Kathy,
Thanks for your comments. Let me address both of your questions.
Question #1 – The package had 15 casings in it. Those casings are very long. We used 10 of those casings to get 15pcs at thirty inch lengths. In other words, 15 lengths of 30 inches will net you around 85 sausages. We use 10 of those casings to get that amount.
Question #2 -I think you may be confused with some of the weights and wording. In the post, I wrote that we make the Hot or Sweet in 10 pound batches (“We make our sausage in 10 lb. batches”). I also wrote that the butcher removes the bone and skin which equates to 2.5 lbs.(“This includes removing the bone and skin (approx. 2.5 lbs. /shoulder) and grinding the meat.”). So, we still buy 3 picnic shoulders, loose 2.5 lbs. of weight in bone & skin, make the sausage in 10 lb. batches and use 15 pieces of casing that are approximately 30 inches in length.
I hope this helps. If not, fire me off another question and I will due my best to resolve.
Regards,
CB
thanks for your quick response. Just trying to visualize before purchasing raw materials.
HI Kathy,
Let me know how you make out!
CB
I’ve wanted to make sausage for YEARS! Your step by step just convinced me that I can try it! I will be buying the kitchen-aid sausage stuffer attachment unless you guys tell me otherwise! GREAT post! Great blog – can’t wait to explore more!
Hi D.
Glad you’re taking the “plunge”. Please drop me a note and tell me of your success.
Regards,
CB
I was actually excited when I came onto your site, looked interesting and it shows you did your homework. I have to admit a lot of your tips make sense, but you totally lost me when I read your formula for Sweet sausage. I have never in my life tasted an Italian Sweet Sausage that did not have fennel in it. Was that done deliberately or just your personal preference for flavor? I am Polish and by making an effort to get back to my roots I have taken on making homemade sausage. I just purchased a smoker and cannot wait to make my first batch of Smoked Kielbasa and Andouille. I have done breakfast, sweet and hot Italian sausage with great results. Thanks for the site and good luck
Paul P
HI Paul,
Thanks for your comments and it’s great that you are connecting with your roots. With regards to fennel, it’s just a personal preference, though there are lots of recipes that omit this seed. Best of success with the smoker!
Hope you’ll drop by again.
Regards,
CB
My mouth is watering thinking about making these. Look forward to trying your recipe.
Hi Nick,
Thanks for the compliment and best of success with your sausage making journey.
Regards,
CB
I am using a kitchen aid stand mixer with the grinder attachment. How do you keep the air from filling up the casings? I even have air blowing back up the stuffing tbe into the casings. Any help will be gladly welcome. I am tired of buying my sausage from the store. To darn many additives that ones does not know what they are. Is there a way to contact you in email? Thanks
Hi Larry,
The problem should be resolved if you prick the “end” of the knotted casing after it has been completely fed onto the tube. Drop me a line if you have any further questions.
Regards,
CB
Thanks guys for the sausage reciepe,I started making sausage this year,So far Itialian Sweet,Brawtz,smoked summer,and Lap Chong,Boy is this fun and rewarding! I just started making old style home made olive loaf lunch meat,beats bologna anyday and I know whats in it to…I wil try yours next on my list…Take care,Dave
Hi Dave,
Glad you are so immersed in the world of sausage making. Let me know how you make out with my recipe.
Thanks for your comments.
Regards,
CB
Wow! Made your spicy and sweet sausage today with my mother-in-law and couldn’t wait to cook it up so whatever squirted out of the sausage stuffer was fair game for three patties and it was fantastic. We loved your recipe but added some smoked paprika with the regular. Next time NO SMOKED it’s fragrance overtook the regular paprika.
Hi Philip,
Glad you enjoyed the recipe!
Regards,
CB
Great post, guys. Try grinding your fennel seeds into a powder and add to your spiced meat at the very end and let rest in the cool cantina for 24 hrs before stuffing. I think you’ll change your mind. Buon appetito!
Hi Amato,
Thanks for the tip. It’s always interesting to see how other folks practice their food traditions.
Regards,
CB
Hi guys, it’s my favourite time of the year making salami & sopressata . I pretty well use all the same ingredients but the one extra ingredient that I add to the mix is red pepper paste. It just adds some extra flavour and a nice red colour.
Lou
HI Lou,
Thanks for sharing your tip. The red pepper paste sounds like a great addition.
Regards,
CB
Found pork shoulder on sale today for .99 cents a pound! Going to try your spicy recipe! When I buy sausage I always take it out of the casings and make patties (only way my kids will eat it). So my plan is to make half casings and half links!
Hi Chicky,
Glad to hear your gonna’ give it a try! Have a blast. Your family will enjoy your hard work.
Thanks for your comments,
CB
any difference between using pork shoulder and pork butts?
HI Matt,
We buy “picnic” shoulders rather than complete shoulders because it is more economical. This is because the prized meat in a full shoulder is generally removed and reserved for making capicolo. Since we are grinding all of our meat, it would be foolish to pay the higher price to grind this cut as well.
Hope this helps.
Regards,
CB
thanks CB. The cheapest pork I can get in FL is Pork Butt @ 0.99 per pound on sale, the shoulder here is more expensive for some reason. Being Italian, Maybe I need to learn how to make capicolo ( I love it). I just finished making a 20 lb batch of Italian sausage with my 2 boys 17 and 18, hoping to pass on some Italian family traditions. I first learned to make sausage with my 80 year old grandparents we all sat around the table and just used a metal funnel to put the casings on and used your thumbs to push the meat through the metal funnel. Nana tied her sausage with string instead of twisting between links. Recently my sister bought me a Waring Pro MG855. I just used it for the first time today.Would not buy this machine… The plunger it comes with is totally useless, made the job 8X harder bad design no way to grip plunger even with out greasy hands ..Major flaw.. will have to find a plunger that will work with this machine major pain, for the company to save about
$0.75 cents.
Your recipe was perfect!! Thank You for such a good post and great recipe.
Matt
Originally from Boston’s North End Little Italy. Now in FL
Hi Matt,
Great to hear the recipe worked out well for you! Sorry to hear there are challenges with the stuffer. Glad that you are carrying on these traditions with your boys. They’ll remember these great memories. Keep using the Butt unless you want to make capicolo. 0.99/lb. is a good price.
Thanks for taking the time to write your comments.
Regards,
CB
Wonderful instructions!! Been making sausage off and on, I use pork, butt. Trouble getting real casings, told most use a plastic type, bought some look terrible, wont use.
Thanks Margaret,
Try and source out the natural casings. It will be worth the time.
Best of success,
CB
Hi guys, i’m from Australia and am studying how to make sausages and salami, but figured i should try and do some sausages before tackling salami, the curing process with bacteria scares me a little to be honest.
I am so determined to give it a go and see how they come out, just need to source a good local butcher that will help me out with the best meats. I’m pretty sure artificial casings are the norm here, so not sure how i’m going to go getting them, but will try different butchers until i can get some.
I am interested in trying your recipe for the hot sausages, but unsure if they maybe too hot for me, i like hot and spicy, but i would hate to make them too hot and waste all that time making them and then cant eat them. What recipe could you suggest for me to make that makes the mix a little less ‘hot’, would i just reduce the chillies in the mix.
Please let me know anymore recipe blogs you have done, would be keen to try some more. Am still really keen to do some salami, but i think sausages are a good start for now.
Thanks for your help
HI Pete,
The recipe is not too hot, but if you are concerned, than back the spicy ingredients back by 1/2 and then work up from there if you desire a bit more “heat”. As for the salami…..humidity is the real issue. Get that figured out and you’ll have success.
Thanks for your comments,
CB
Hi, I’m Welsh-Italian and have wanted to make my own Italian sausages for a while. Your blog is great, really helpful and I’m heading to the butchers this weekend to start the ball rolling. One question, most Italian sausages I’ve eaten in Italy have ground fennel in them. Your recipes look great but I’ve noticed there’s no fennel, any reason? Thanks.
This is exactly how it is done. Love to see them working and making those sausages.
Noticed no fennel or anise. What quantity would you recommend for the hot sausage?
Hi Clifford,
Try 1/4 teaspoon per pound of pork, fry a bit up in a pan, taste and adjust accordingly to your palate.
Regards,
CB
Thanks for providing a recipe for Hot Italian Sausage and for your explicit directions. My son and I used your instructions and recipe and just made 7 lbs. We will probably eat it tomorrow or Monday – if we can wait that long! Thanks.
Hey Guys, I was inspired a few days ago when I bought a sausage maker in a local store. Then I started hunting for an Italian Sausage recipe on-line. Came across this – and made a batch today. We’ve just finished dinner….and both kids reckoned “It was the BEST sausage ever!”. Just wanted to say a massive thank you for having taken the time to post this recipe and website. Just a note – instead of “just” a glass of white wine, I also added half a glass of red. Immense! Thank you…mille grazie!!