

What follows is a DETAILED chronicle of our salami making experience. It is detailed for 2 reasons. First, I am driven by detail because I have seen that it generally makes a satisfying finished product, though this personality trait has sometimes been difficult for my family to bare. Second, that meat is RAW when you make salami and it “cures” with time. The thought of botulism is a strong motivating factor for me to produce a safe edible product!
Making salami, or dry cure sausage is similar to making fresh sausage. The main difference is that you freeze fresh sausage and you leave air cured sausage to hang in a cool, humid environment for a lengthy period of time. The other difference is in the substitution or removal of certain ingredients. Examples of this are the omittance of liquid and the addition of “curing salts” in air cured sausage, but I will get into that in greater detail as this page unfolds. If you need a refresher or have not made fresh Italian sausage before, click HERE
Before I go any further, I think it’s important to talk a bit about the science behind the curing process of these meats. I like to think of it as an aggressive battle between good and bad bacteria.We all know that raw meat should not be left at room temperature for any great length of time. This is because bad bacteria begins to rapidly multiply at room temperature and it will spoil raw meat. As a result, we refrigerate raw meat. Refrigeration does not stop the multiplication of these bacteria, but slows their rate of growth. Hence, we can not leave raw meat in the fridge for an indefinite length of time because it, too, will spoil. Secondly, we generally cook our meat to an acceptable internal temperature which destroys these bad bacteria.
So, how come air-dried sausage, which is not cooked or refrigerated does not lose the battle to the bad bacteria? You would think that the scale is tipped in favor of these bad bacteria, especially when you consider that we stuff this raw moist meat into a hog intestine and leave it for weeks to hang in a cool and humid environment. You would think that these meats would succumb to these bad bacteria (who seem to have everything in their favor) and spoil these meats. Something else is obviously at play which keeps the scale from tipping in favor of these bad bacteria.
Curing Salt
Our first line of defense in this battle is the use of salt with a small amount (1%) of sodium nitrite. This comes in a pre-mixed package and is recommended at a 2% ratio to the weight of meat. I use READYCURE which can be purchased at your local grocery store. The use of nitrites is debatable, especially when you consider that large amounts have been linked to cancer. With that said, there are high amounts of nitrates found in lettuce, spinach, celery and radishes. Furthermore, deli-meats that are listed as “nitrate free” use celery juice or celery juice concentrate, or other vegetable powders and concentrates, which converts their nitrate to nitrate when these natural sources are exposed to certain types of bacteria in the meat. So …why not just skip the nitrite and just use salt. The bottom line is that nitrite prevents spoilage and stops the growth of botulism-causing bacteria.
The use of salt is the second ingredient in the first line of defense for the safe consumption of salami. Salt has been used for a very long time as a preservative in meats, fish and vegetables. You will notice that there is a lot more salt that is used in our salami recipe than in our fresh sausage recipe. Here we are using 7 Tablespoons for each 10 pounds of meat. In our fresh sausage recipe, we only use half of this amount. This is because the salt is not only used for flavour, but also as a preservative. As the salami continues to dry, the salt concentration/ weight increases because the salt does not evaporate. This makes for an environment that is not hospitable for bad bacteria like Salmonella to continue growth.
Humidity
Our second line of defense in the production of safe “curing” of meat is humidity. At first thought, you would think that the humidity should be low in order to quickly draw the moisture out of the salami. We know that bacteria needs moisture in order to multiply. Hence, if we quickly get rid of the moisture, than the bacteria can not grow. This theory works for processes like jerky where the meat is completely dehydrated, but it WILL NOT work in the production of salami. This is because the salami meat is in a casing and it is much thicker than a slice of jerky. In other words, if we hung our fresh salami in a low humidity environment, we would dry out the casing and the immediate area around the casing. By drying out this area, the center of the salami would not be able to expel the moisture within this meat and continue to live in an environment that PROMOTES the growth of bad bacteria. As a result, a high humidity will allow for the slow removal of moisture throughout the entire salami.
I measure the temperature and relative humidity with a portable weather station that I purchased at Lee Valley Tools.http://www.leevalley.com/en/garden/page.aspx?cat=2,42191&p=70127 It is the same one that I use for the chicken coop, but it has a separate sensor in my cantina. By using this product, I can get an accurate measurement for both temperature and humidity. I think it’s a must if you want to ensure that you are making a safe and stable product.
So.. with that said how do you increase humidity in your cantina for salami when the relative humidity is much lower than the recommended 75%- 80%? A week before Mike and I made our salami, the relative humidity in my cantina was 55%. I increased it over the week by placing a bucket filled with cold water on the floor of the cantina and hanging a clean wet towel from the ceiling to the water line in the bucket. This allowed for the water to continue to “wick” up onto the wet towel. The towel was saturated twice a day and replaced every few days.
By the day of production, relative humidity was at 75% in the cantina. The humidity climbed to 81% over the next two days after the salami were brought into the cantina. The 6% increase in humidity proved that the moisture in the meat was beginning to exit and enter the surrounding air. In a few days, the relative humidity would dip back down to 75%.
Air Flow
Air circulation is also essential in the cantina. Too much air flow will causing the casings to dry out prematurely and prevent the moisture in the salami from escaping. Too little air flow could produce a layer of slime on the surface of the salami in the first few days, which could also inhibit moisture from exiting the salami. I remedy this situation by placing a small computer fan on the floor of the cantina and positioning it 4 feet away from the salami. The breeze from the fan is not strong enough to move the salami, but slow enough to pass gently between each one. I also put a plate filled with water in front of the fan to help maintain the proper humidity in the cantina.
Temperature
Cool temperature is also an important factor for making good salami. It is important to keep the cantina cool so that the exterior of the salami does not dry out to early. This would inhibit an even consistency in the finished product. For the purpose of this page, the temperature in my cantina stayed at around 7C for the 4 weeks of curing. We were also lucky this year to have a colder March than typical years. Next year, we will make our salami earlier in the Winter in order to rule out higher daytime temps that are characteristic of late March.
Ingredients
10 pounds of pork shoulder (coarsely ground and kept cold)
7 Tbsp. curing salt
1.5 Tbsp. coarse black pepper
1.5 Tbsp. garlic powder
1 Tbsp. crushed chilli pepper flakes
2 Tbsp. paprika
2 tsp. cayenne pepper
Directions
Weigh out 10 lbs. of coarsely ground pork shoulder and place it in a large bowl. Make sure that the pork is very cold. This will help in the stuffing process. Mike adds the spices while I continue to mix.

Seasoning Mix
It is very important to thoroughly mix all of the spices into the pork. This is not only for flavor, but will ensure that the curing salt is evenly distributed into the meat.

Bbbrrrrr!
Once the ingredients have been mixed, it is time to begin stuffing the mixture into the casings. Salami is stuffed the same as fresh sausage except for the following points:
After feeding the casing onto the funnel and tieing a knot, it is essential that the end of the casing is pricked in order to ensure that air can not get trapped in the casing. We use a fork that has 2 missing tines in the center and 2 that have been sharpened with a grinder. This tool will also come in handy when the salami are later pricked.

Make sure that air is not trapped in the end of the casing.
Unlike fresh sausage, we are only making 2 links at a time. This is because the salami must hang from a rack while they cure. Because the “hanging space” is only 20″, the salami can not be any longer than 8″. This will allow for a bit of stretching that will happen in the first few days of hanging. As well, the salami must be tied with a string where they are linked because they will become “unwound” if they are just left to hang. Lastly, the second link of salami must be knotted at its end and firmly tied with string so that it can hang from the rack. We learned the importance of firmly tying the hard way by finding a few of our sausage slipping out of the knotted string and falling on the floor in the first few hours of curing. That’s the reason the newspaper is on the floor in the pictures.


Once the salami are made, they must be pricked in order to create exit points for the moisture. We use our homemade fork tool for this job and puncture the casing about 10 times (5 times on each side) per salami.

Piercing the sausage.
Now its time to hang the salami and bring them downstairs to the rack in the cantina…..but first…one picture of the proud makers. 
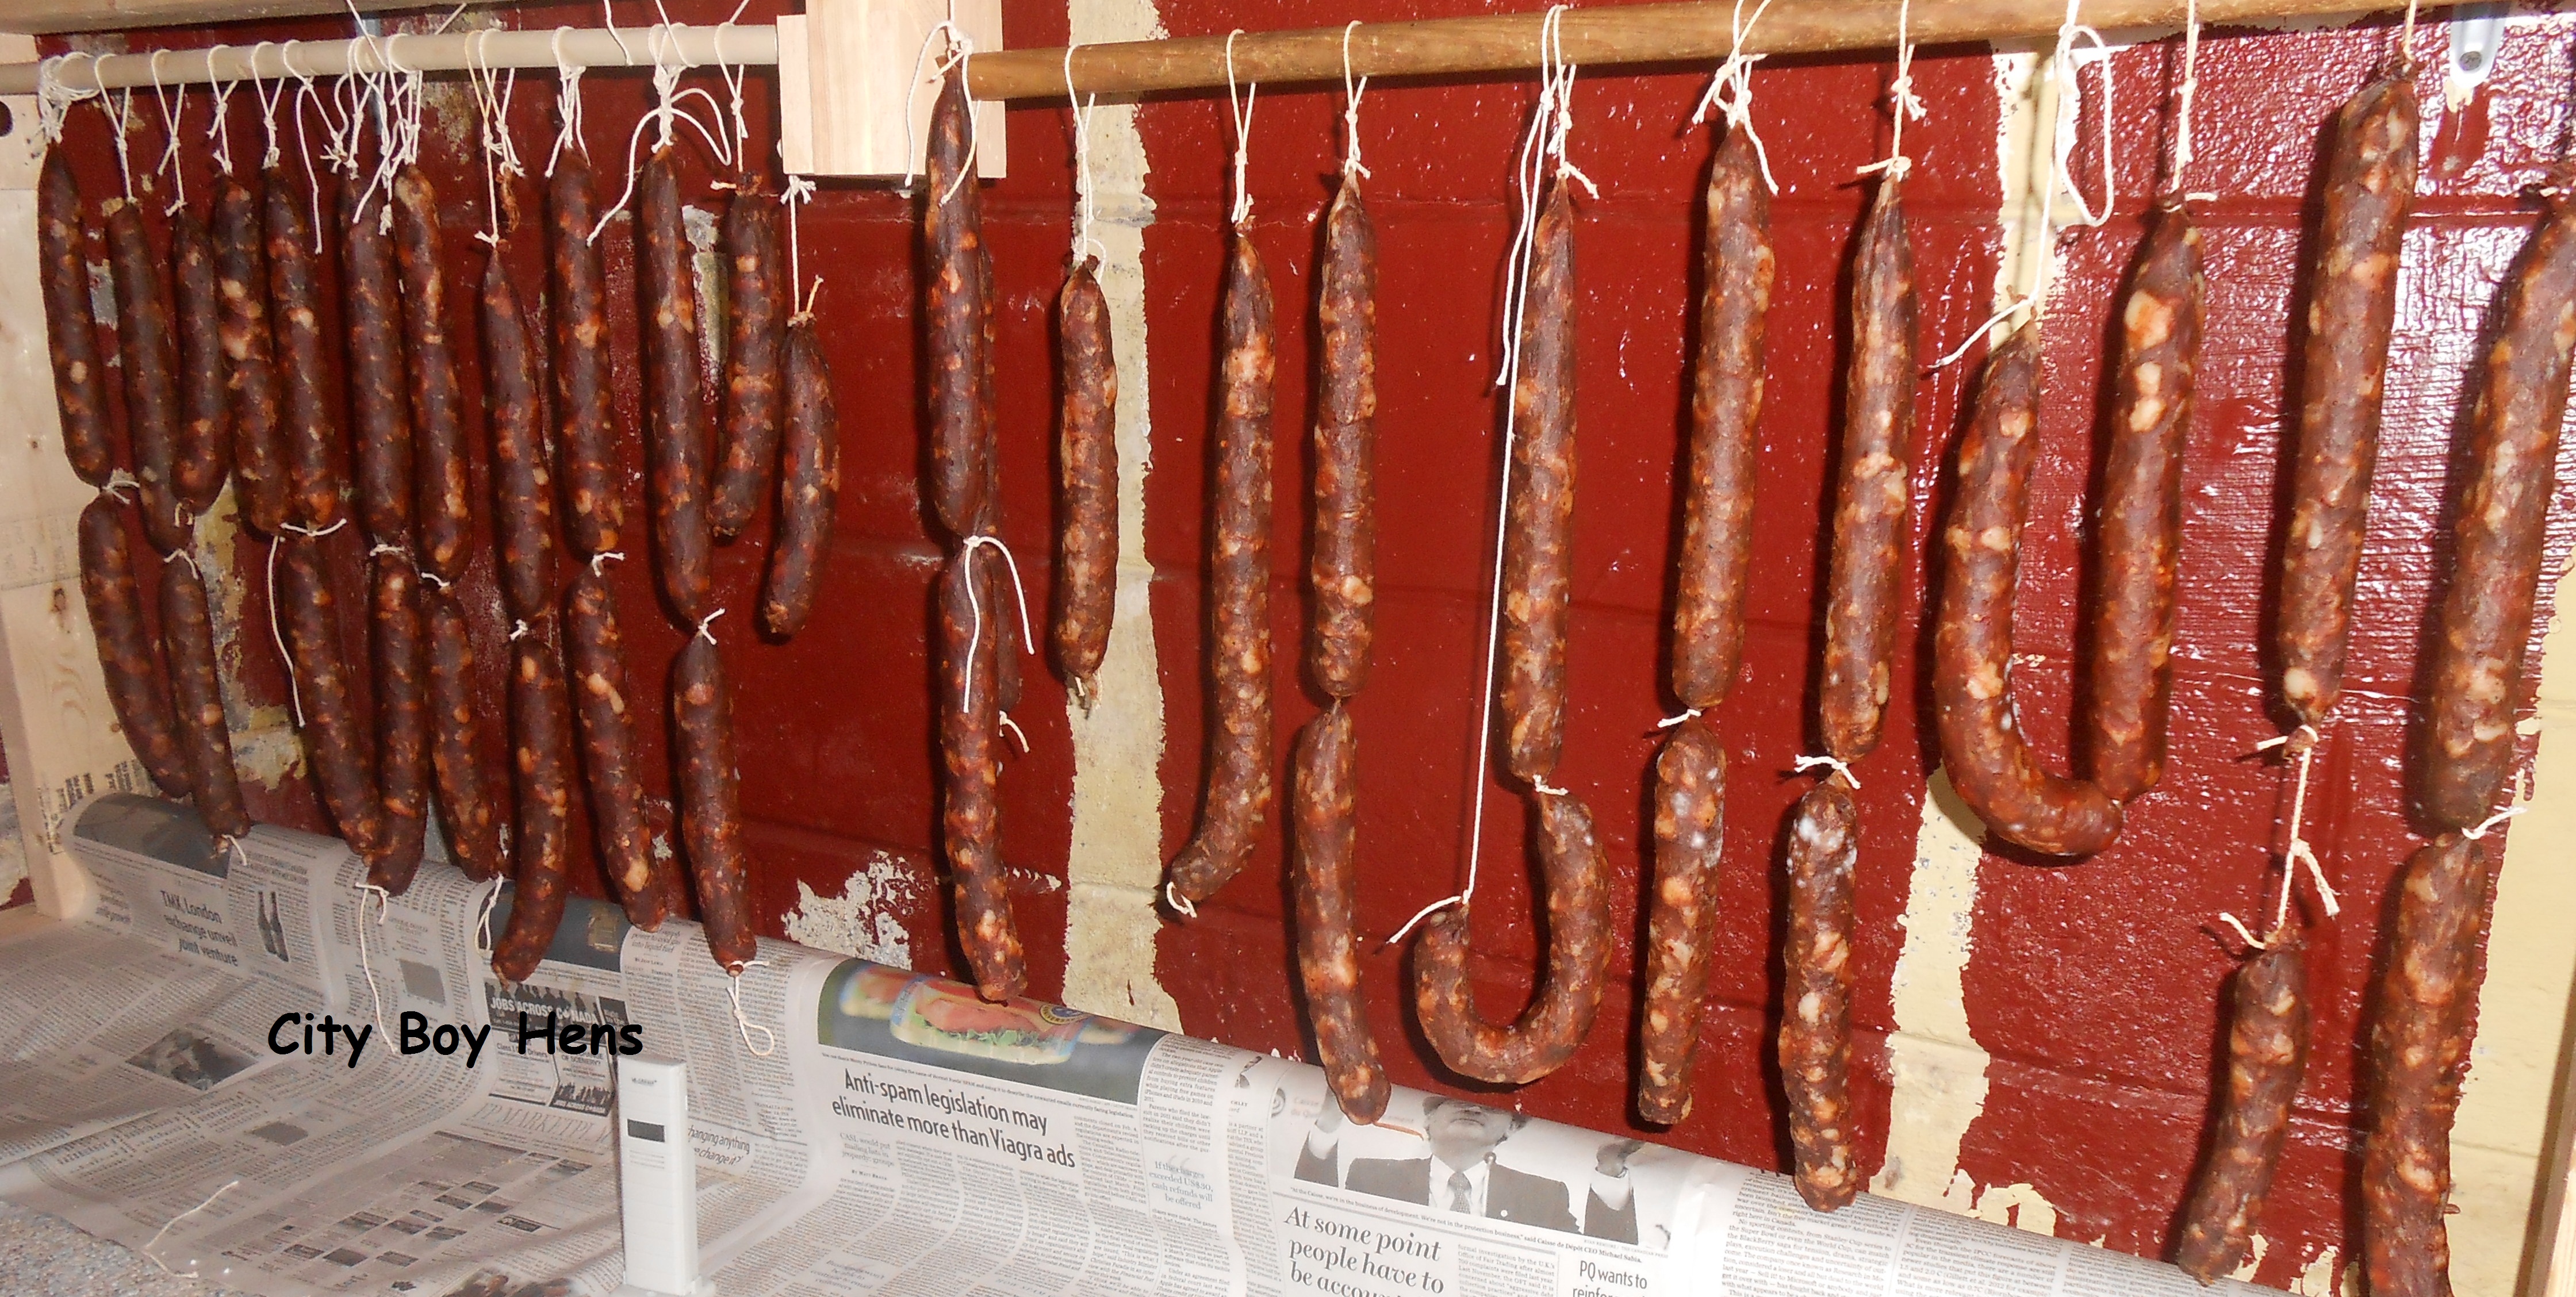
The drying rack that I made for the salami is built from 2x4s. Mine is 5 ft. long, but you can custom fit yours to your cantina. Two dowel rods hang at 20″ above the floor. The “old school” guys that I have spoken with recommend that the salami stay close to the floor. They insist that the salami should hang near “belly height”. You gotta’ love the old school ways! This has to do with temperature because heat rises. It is also important that the salami hang freely and do not touch each other. This will allow for air circulation and promoting even drying for each salami.

Drying Rack
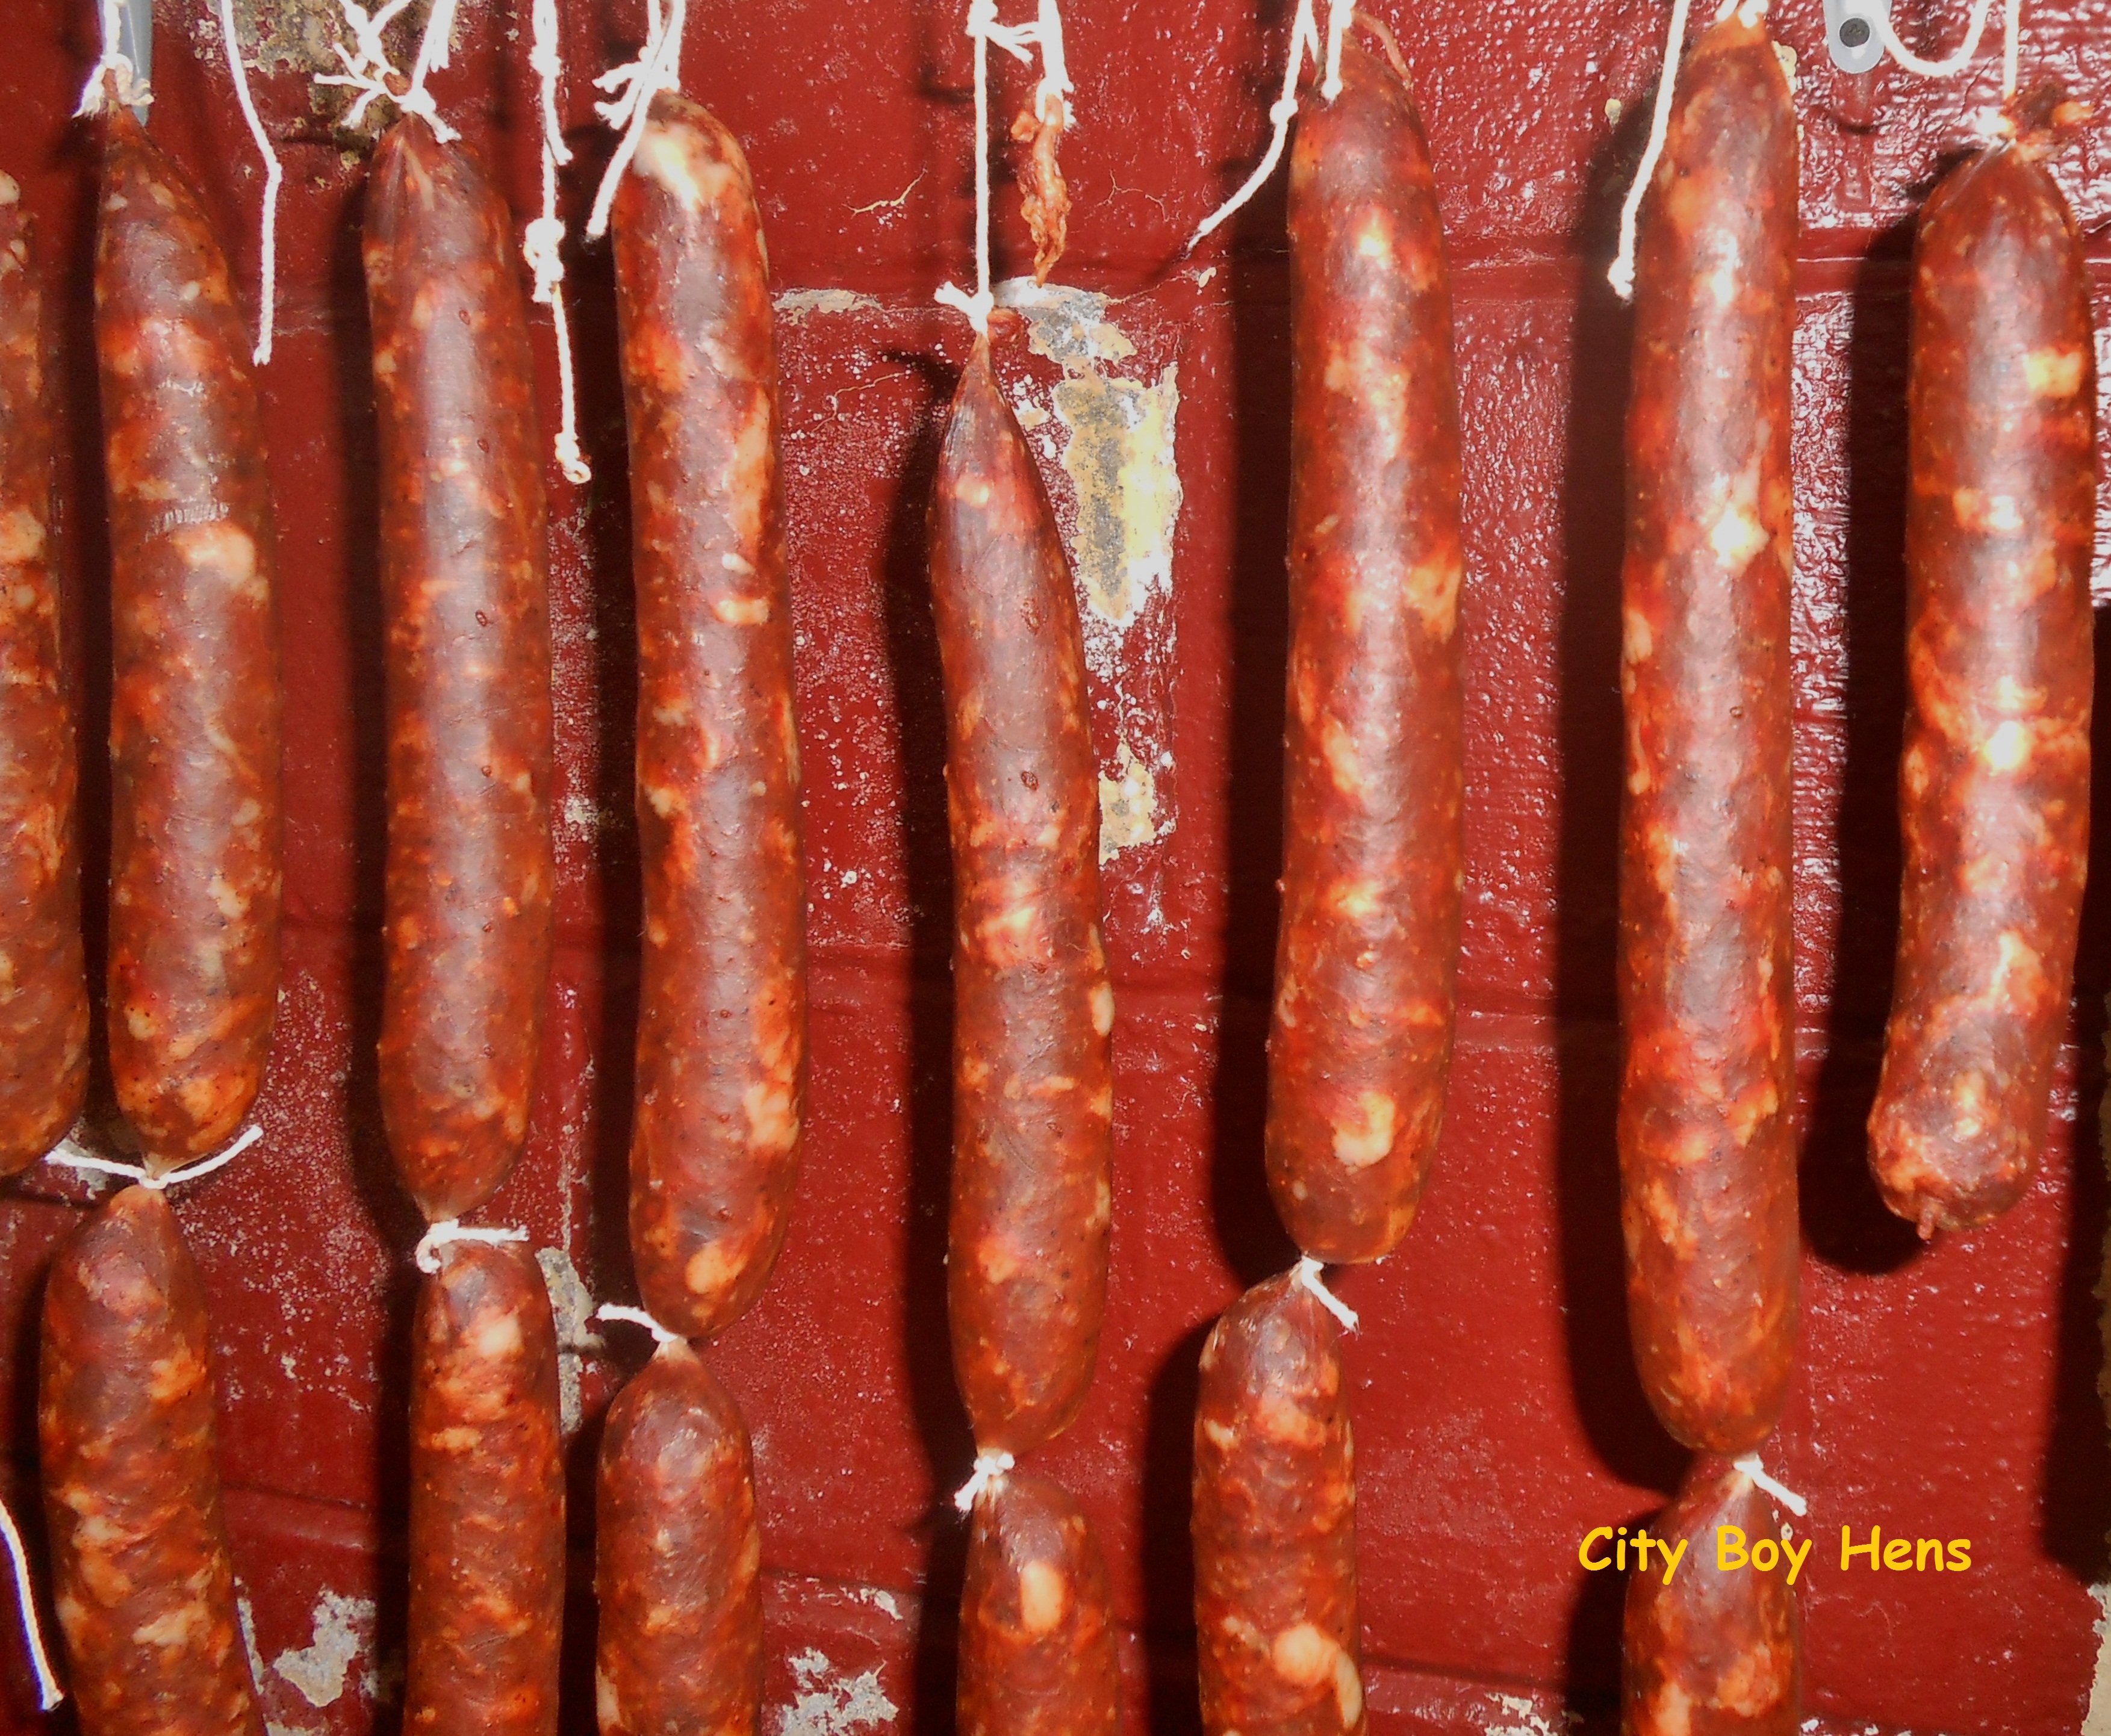
Below are a group of pictures that will give you a good visual of the changes in the salami as they aged over 4 weeks. I hope this will help you stay on track.

Day 2 7 C 82% RH

Day 4 8 C 78% RH


Day 8 6C 74%RH
Day 8

Day 11 6C 76 RH

Day 11
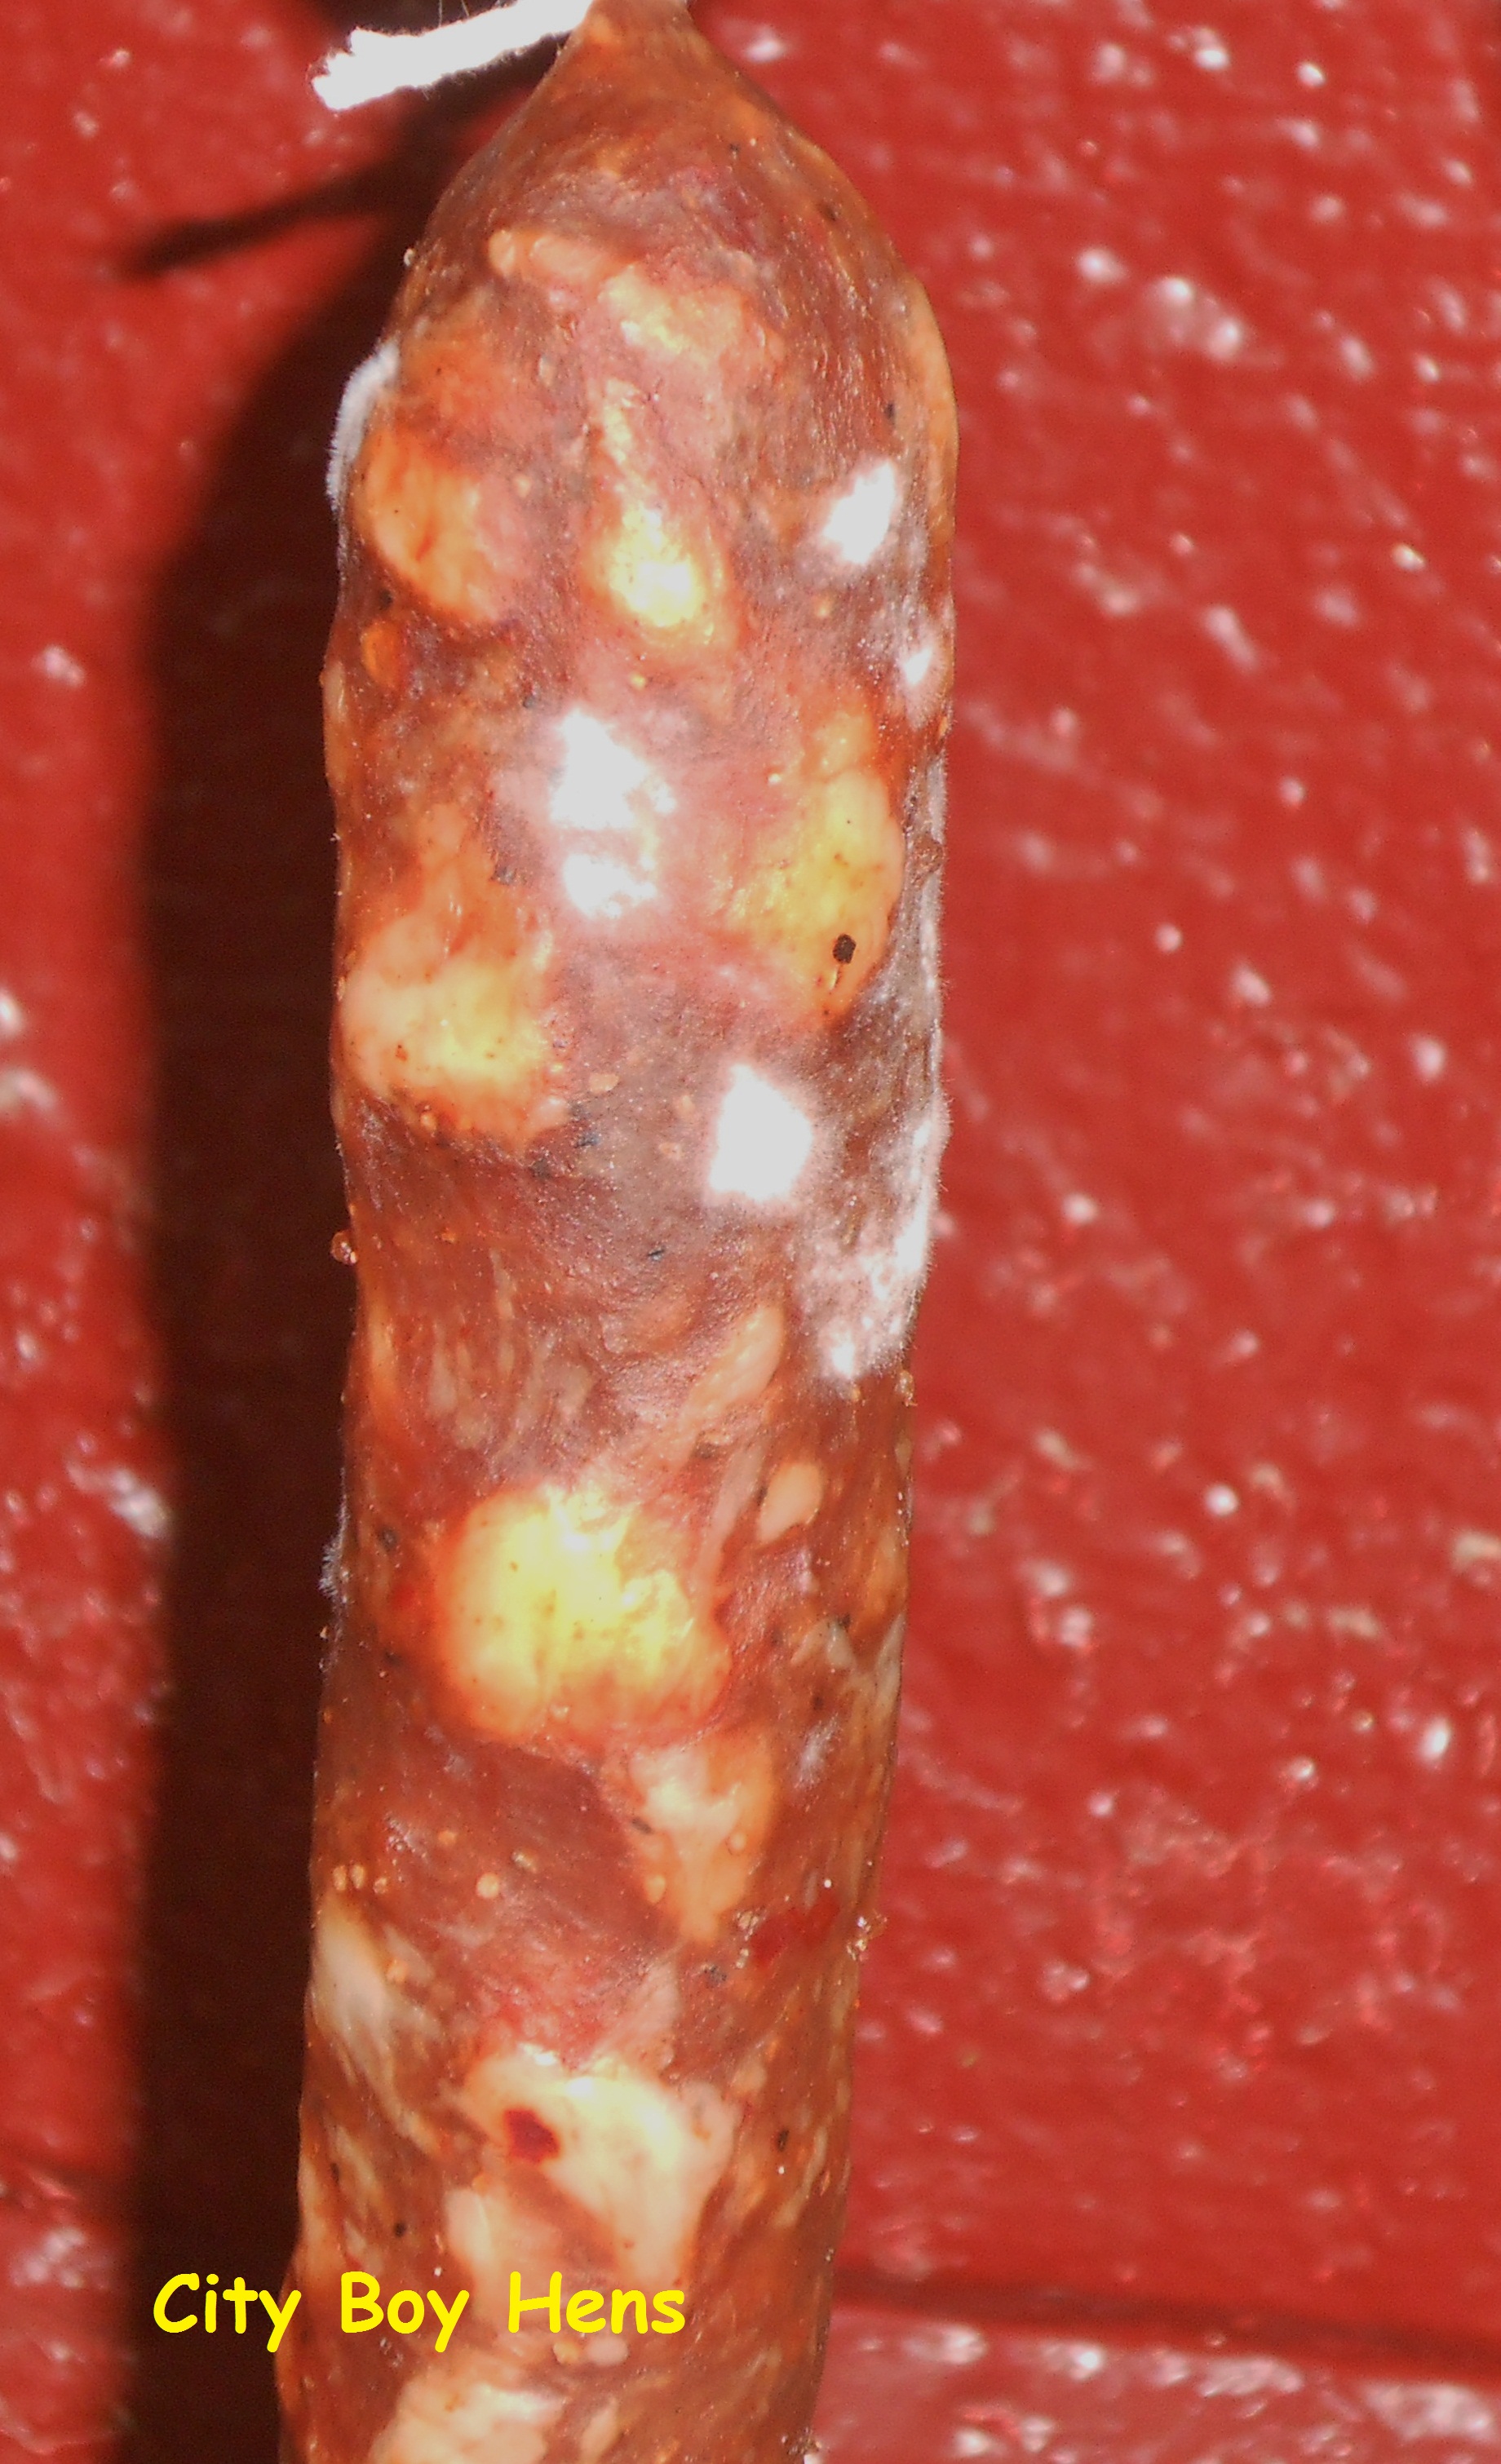
By Day 14, white fluffy mold began to appear on the salami. My first reaction was to panic,but then I remembered pictures of salami as a child and remembered that they all had a chalky exterior. I wanted to make sure and contacted a fellow salami maker, Don, and he assured me that this was good. I followed Don’s recommendation and left the mold on the salami until they were ready to be packaged.
Week #2
6C 74% RH
Week #2

Week 3 8C 74RH
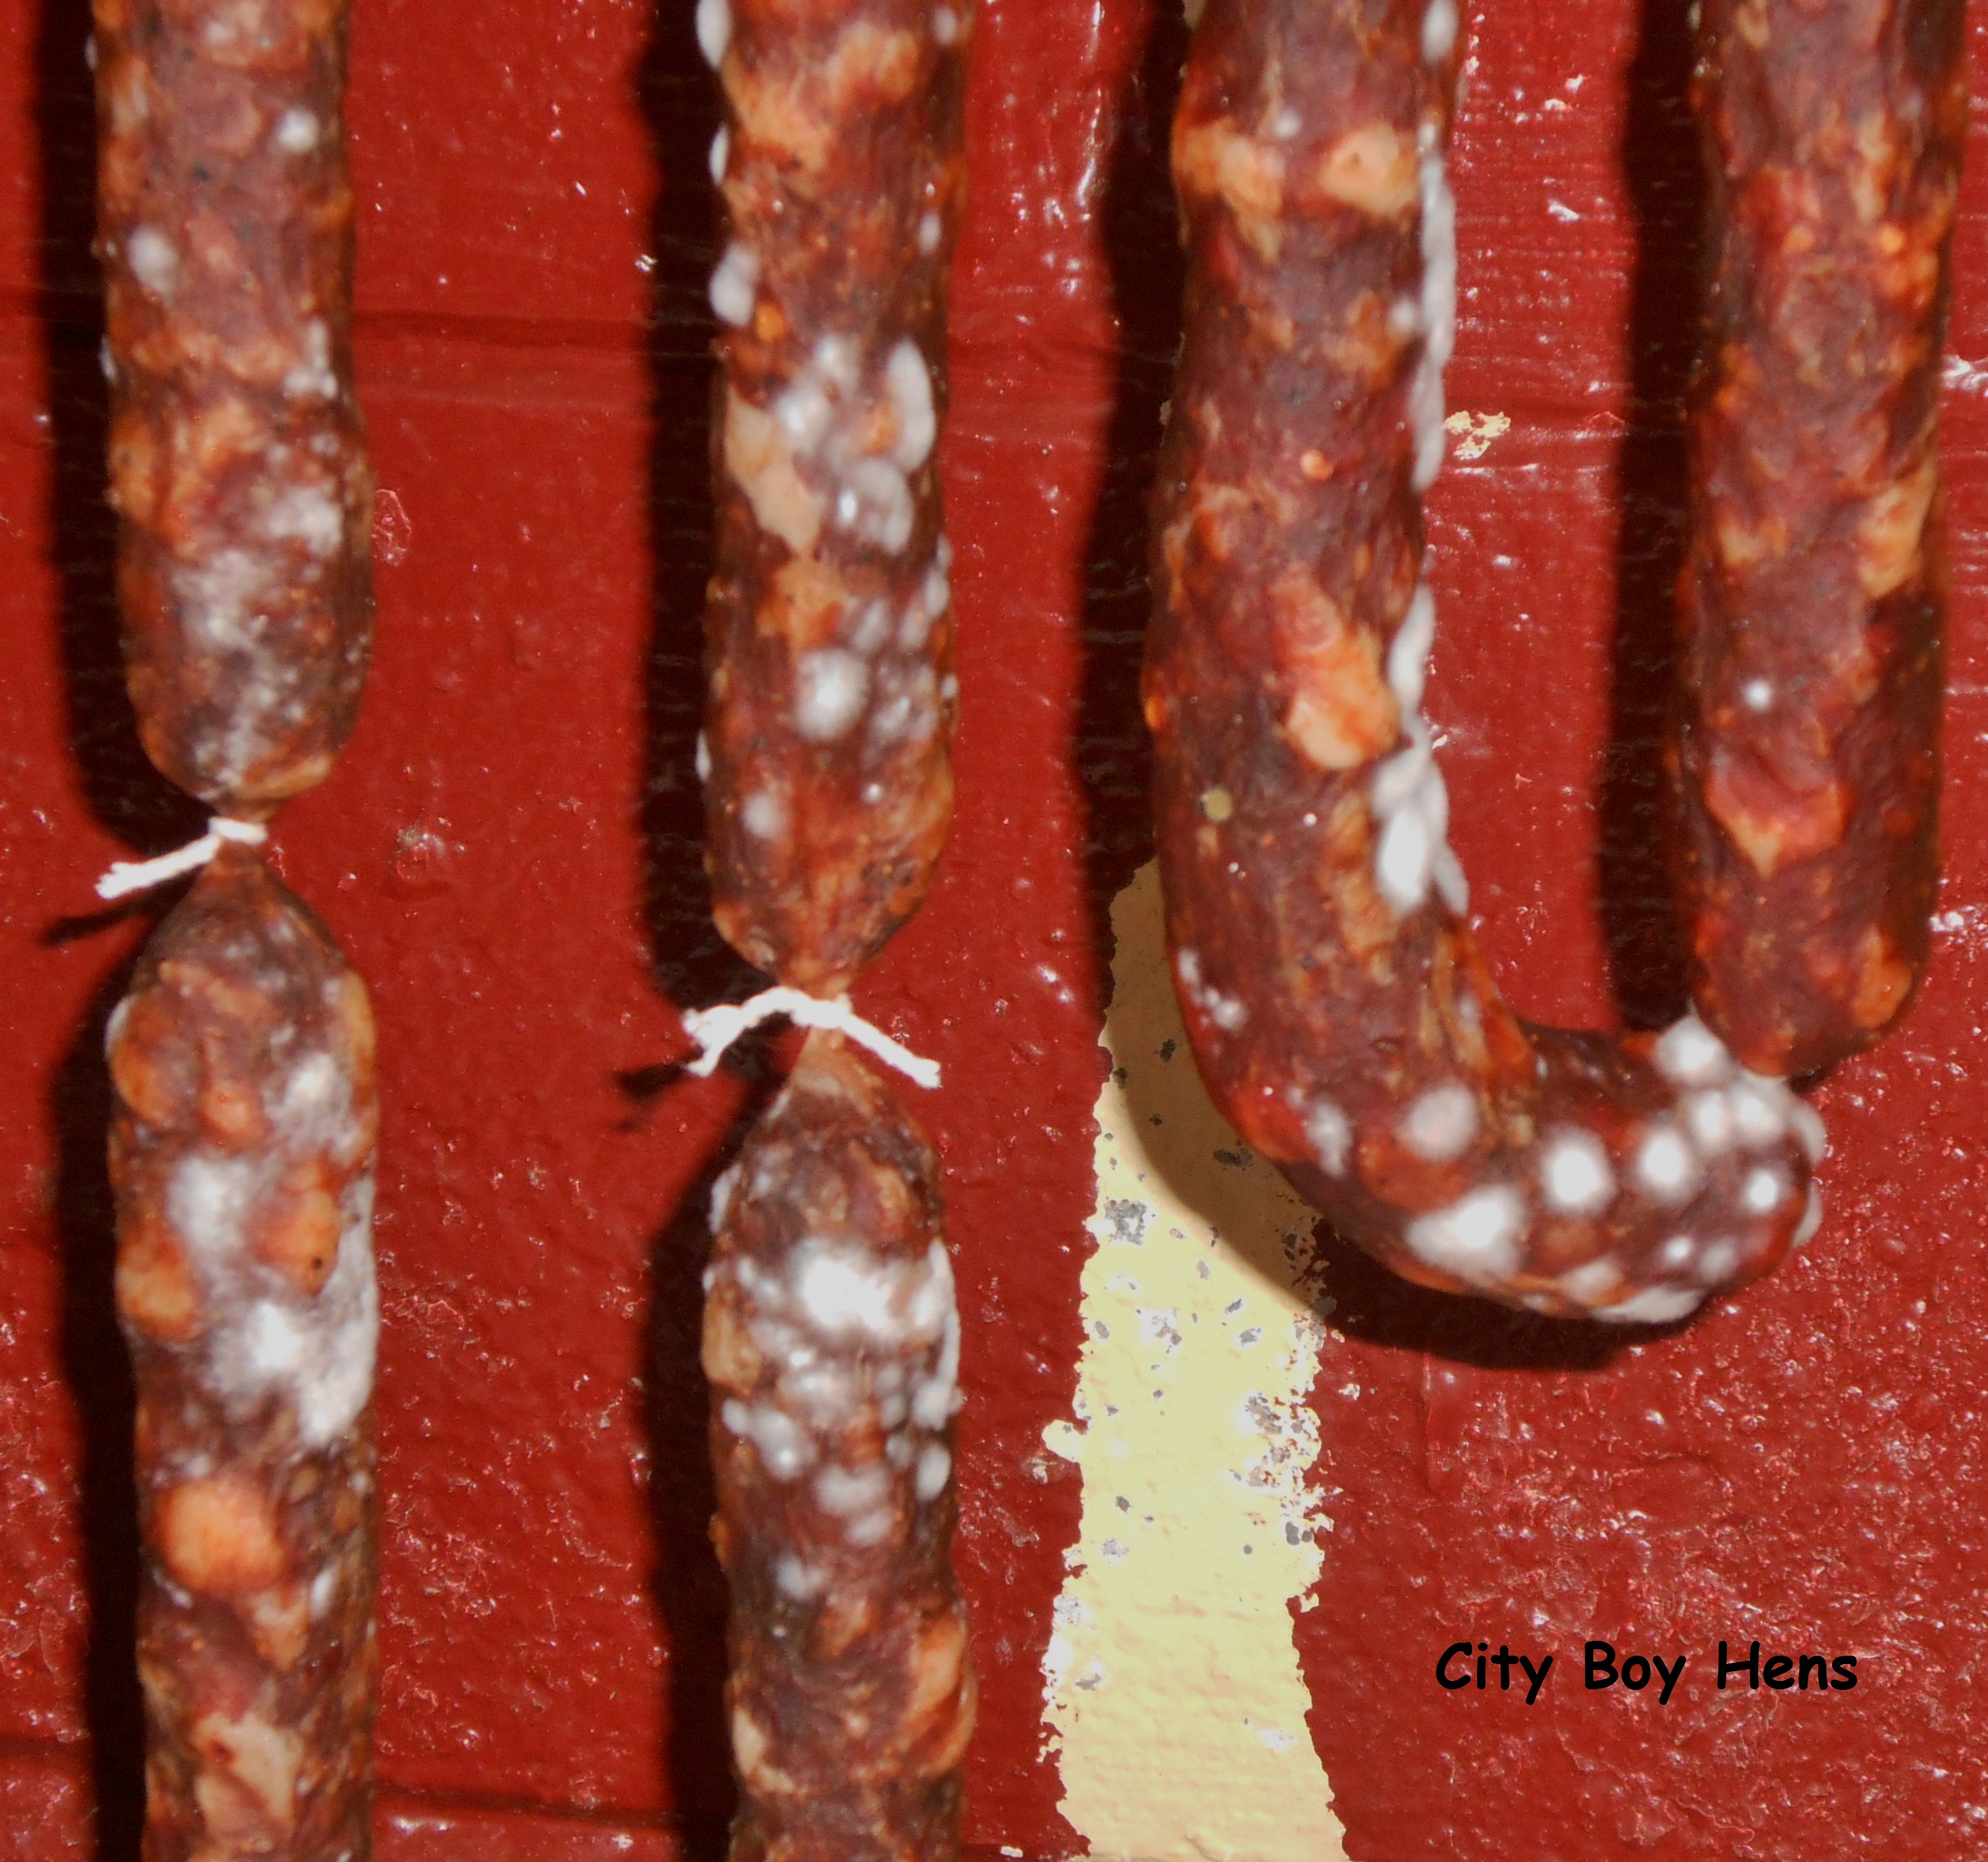
Week 3

Week 4 8C 72RH

Week 4
4 weeks later, the salami were ready to eat. They were firm, but could still be slightly bent if enough pressure was applied. They were then washed in order to remove the mold and left to dry in the cantina for one more day. They were then vacuum packed in order to maintain freshness and stored in the cantina to be later enjoyed with family and friends over a glass of wine with some homemade olives and cheese!
We made a great “batch” of salami this year and I need to thank Don for all his patience and expertise in the world of charcuterie. As you fellow bloggers know, we do meet some great people on our roads to discovery. Thanks Don for all your help!
Well….I can now tick off salami from my list of things I want to make! Maybe next year, we’ll try our hands at capicola or prosciutto. Why don’t you give it a try and let me know how you made out with this great tradition from our past.

I’ve always found smoking and curing of meats fascinating, but I’ve yet to try these old world arts. Thanks so much for sharing your details on Wildcrafting Wednesday! Hope to see you back again today at:
http://www.theselfsufficienthomeacre.com/2013/06/wildcrafting-wednesday-24.html
Hi Lisa Lynn,
I hope you give it a try!
Regards,
CB
Great post. But whats a cantina? A cold room?
Hi Rob,
You are correct.
Thanks for your question.
Regards,
CB
City Boy, that was an awesome lesson and that salami looks delish! I shall have to enjoy vicariously since I don’t eat meat, but if I did I would sure want me some of that!
Hi Chicken Mama,
Glad to hear from you. You now know where to go if you ever want to come on over to the “dark side”. MMMMMMMMMMMMMMMMMMMMMMMMMM!
Thanks for your comments.
Regards,
CB
Wow, that is a lot of salami and looks delicious. Must confess, at this point in my life I probably won’t try making my own, but I love a slice or two! Thanks for sharing with SYc.
hugs,
Jann
That’s awesome! Life without salami is empty. I’m bookmarking this excellent examples. I use to make homemade sausage with my Italian grandmother when I was a kid so this should be fun! She’s be so proud! -Carole
Hi Carole,
Thanks & I hope you’ll give it a try. Nona would be proud!
Regards,
CB
i know you said it was a cold room but you did not say what size or if it was an enclosure of a smaller dimention.i’m old and slow on the recceptive ways tounderstand .please reply via email.thank you.
HI Leo,
My cantina is 8’x8′ & is attached to the house with access from the basement. Hope this helps. Thanks for following.
Regards,
CB
I was excited about this process until I read it had to be cool and humid. Here in Louisiana it would never work, but maybe I can sneak by and get some of yours. Thanks for sharing on Tuesdays With a Twist, would love for you to share this on Real Food Fridays later in the week.
Thanks for the tips, guys. That salami looks great. My buddy and I are about to embark on our own salami making project and this was very helpful.
HI Paul,
Glad you stopped by. I wish you successs on your salami making journey. Happy to be of help.
Regards,
CB
I’m featuring this post on Thursday’s HomeAcre Hop; I hope you stop by and check it out.
Kathi at Oak Hill Homestead
Hi Kathy,
Thanks for the “feature”.
Regards,
CB
Thank you so much for this! I’m Italian and I’m ashamed to say that I’m not well versed in the art of salami making…I know – ‘che vergogna’! But my mom just gives me guidelines of a handful of this to a scoopful of that…hang for however long it takes…and eat it. I almost gave up on making salami on my own…I’m more of a recipe tested kind of girl.
Just have one question – is this the same basic recipe if I wanted to make sopressata – larger sized salami? When is the best time to start making them? I was always told that it can’t be too cold and you can’t wait too long or the weather will get warm…or am I being a bit pazza with all the details?
Great that you live in TO as well!
GO CANADA GO…I’m in Olympic mode right now…LOL
HI Mina,
Thanks for your comments. As you are aware, sopressata is a larger salami which has been pressed to make it more flat. It was on my radar to make this year, but I just have too many other “irons in the fire” this year. Hopefully, next year. As my post indicates, humidity is more important than temperature. Back in Italy, the best salami making regions never experience the cold temperatures that we have in TO, but they DO HAVE high humidity. Best of success with your journey. Hope you’ll drop by again. Enjoy the game tomorrow!
Regards,
CB
TKS for the recipe . DID YOU USE 7 Tbsp CURING salt or 7Tbsp regular table salt?
cb
Hi Claudio,
You will need curing salt. Have a look again at the post and see why you need this ESSENTIAL ingredient. Thanks for dropping by.
Regards,
CB
After making our Haus Wurst (smoke house sausages) today I was inspired to research Salami recipes, which led me to your site, thank you for your detailed recipe, It is to late in the year to make salami here in the Southern Alps of Austria I will however have a go next late Winter, early spring.
Hi CITY BOYS,,,
I enjoyed reading your site it was very interesting I love to hear about the different ways everyone uses to make salami and its great. I say to everyone that you never stop learning because you hear different ways from the oldies.
It was forced into me when I was a kid growning up by my parents. I said Quote “Would never go to all this trouble of making salami” Here I am at 34 years of age making salami remembering the recipe my parents used to do. I’m really eating my words now!! First year of making italian salami & enjoying every bit of it and gona do the same to my two little kids..
Awesome job guys
Kind Regards
Antonio
Your salami looks yummy, am thinking of making it, have the cold, room but need the mincer and sausage tube, have tried camel ones and they are yummy, camel has no fat, same as wallaby, so am thinking of making them from wallaby as they are hopping around here by the 100s
In your blog you washed the mold from the Salami but in the butcher shops the Salami is covered in mold. What is the difference. Oh, by the way I made your sweet and spicy sausages 5lbs each and it came out great! The old Italians took most of their recipes to their graves and would always say “oh just put a little of this and little of that while you helped them. Unfortunately it did us no good.today. I am extremely interested in the flat sausage. My uncle made it and used a wine press to make it flat. He too died early and we never got his recipe but your’s so far seems bullet proof. Phil
HI Phil,
I only wipe the mold off for “appearance”. No other reason.
Glad you gave the sausage a try and it worked out well. Let me know how the salami goes.
Regards,
CB
Funny enough I was talking about trying to make salami the other day. My friend who makes breakfast sausage said I needed culture, preservatives etc…..
My son in laws mother in Sardinia only puts salt in hers.
I have a shed outside with no door and a broken window!!!! Can I hang mine in there as the air will flow, it’s not warm here in England, but always raining, does that mean the moisture level would be ok?
Great to read your blog, thanks….
Depending on your reply I will attempt to make some sooooon!!!!
HI Marialina,
I can only go by the process that I did on my blog. I wouldn’t be comfortable using ordinary salt rather than curing salt. I also wouldn’t cure my salami in an open air environment.
Thanks for your compliment on the blog.
Regards,
CB
Question. I am like you guys who like to carry on old traditions from father and grandfather of making home made sausage. The process is basically the same as yours. After making the fresh pork sausage. I smoke the sausage for about 1 hour. My question is, after all is done I hang a “stick” or two in the garage to “dry cure”. And after a few weeks it becomes so hard the it gives a new meaning to the term “Hard Salami” . What I am doing wrong?
Hi James,
I’m thinking there is not enough moisture in your garage. I don’t know where you live, but in my post, I emphasized the need for a high humidity so that the salami does not dry too quickly. As well, think about where salami originated…….coastal (high humidity) areas. Hope this helps,
Regards,
CB
Thanks I’ll try the basement next time!
Jim
Great looking sazeech!!! and great tutorial!
Thank god and old Italian woman took me under her wing about 10 years ago and taught me how to make these. She only used salt to preserve, but after my first batch i realized how important using the cure is. I have one tweek to your recipe that i believe sends the salami over the top. Try using fresh garlic at a rate of one head for ten pounds of meat. Thats the original old school recipe and i think it outshines the dried garlic.
Its time to get the grinder out ( :
I wonder how to make a cold, wet environment in a tropical country. I thought to cure inside my electronic adega but it is too small for the fan and humidity control. 😦
Hi Vitor,
Though I have not tried this, I have read about some people using an old fridge for this purpose. There is plenty of info out there on this topic.
Best of success.
Regards,
CB
I remember making these with my father and grandfather and have decided this is the year I do it on my own. Your tutorial is what I needed. I guess the hang time would be longer if I make mine 3″ in diameter?
Hi Maria,
Glad you are going to make your own salami!
The curing time will definitely be longer because of the size. Make sure to keep your humidity up! Sorry I can’t give you a time for cure. I never make salami that big.
Best of success,
CB
First, great recipe and details with pictures! Job well done! Now my question….Not sure what process my husband and his friends used but it sounds very similar to yours. Our question is after vacuum sealing the salami, how do you store it for future use? Our daughter is getting married in late September and we want to share it at the reception. Any suggestions? Thank you for your help!
Hi Dana,
Thanks for your comments. I just leave them in my cantina until I open the vacuum sealed bag. My rational for this is folks have been curing meat long before the invention of refrigeration. But, once opened and not completely consumed, I refrigerate what is left.
Hope this helps.
Congrats on your daughter’s upcoming wedding.
CB
Hi guys , Do you hang them at room temperature for 3-4 hours before putting them in the cantina or do you put them in the cantina directly after you stuff them.
Hi Kirk,
They go right into the cantina. They will “sweat” for a few day after and I put some newspaper down under the rack in order to catch the drips.
Regards,
CB
Thanks,
My cantina is 85% humidity and at 2c .
This is the first time at this I will let you know how they turn out.
Best of success. Sounds like you are on your way!
Regards,
CB
Hi CB
Do you have any input doing this with venison.
Pork fat to meat ratio and would I follow the same procedure.
Cheers Kirk.
HI Kirk,
I do not have any experience with venison. My concern would be the amount of fat that would be lacking in this meat. With a quick search on the Web, I did see that others are doing this salami. They are either cooking it in the oven or adding pork fat for a dry cure. Unfortunately, I do not have any experience with using this meat and can not recommend a fat to meat ratio, but I can tell you that the fat / meat ratio on a pork shoulder is around 15%-20%. I hope this helps.
Regards,
CB
At what temperature did you hang your salami. The text above says 7C?
Hi C.
The text is correct. Thanks for following.
Regards,
CB
Food history over the last few years has become a passion and this article is a fantastic insight to cured meats. Have tried the jerky and will now try this. Look forward to more from you guys.
Clive UK
Hi Clive,
Best of success!
Thanks for following.
Regards,
CB
Hello from cool 100 Mile House.
We Swiss city slickers up here butcher about 20 Porcos a year. Our Sausages are purely from old Swiss recipes. Bratwurst, Leber. Blutwurst, Rauchwurst amongst some others.
For sure we will now try to make Salami by following your excellent advise.
But i have a question as i am assuming your term for a Cantina is, as in the Italian Lingo a room or a Bar,, how big or small does it has to be??
Per la instruzione molto grazie.
Gary
HI Gary,
Cantina can also refer to a cool (temp.) room where wine and curing meat is stored. The size of the room is not that important. I would put more emphasis on obtaining the proper humidity for the space. Hope this helps.
Best of success with the salami.
Regards,
CB
Brilliant, thanks for the detailed info, I look forward to my first attempt as I adore salami😃
Thanks Ken,
Best of success.
Regards,
CB
Made our first batch of salami here in sunny Sydney, built a simple curing chamber from a large foam cooler, found in food distribution outlets. Stand it upright on it’s end with hanging rod at top. Control temp with ice bricks and occassionly leave cover off, small weather station to check temp & RH. So far, so good. End of first week and seeing small white mould spots growing. 2 – 2.5kg batch easily fits in chamber. Hope this is of help to others. Len
Hi Len,
Thanks for taking the time to pass that on. Best of success.
Regards,
CB
Thank you very much for all this info. Very keen to try it out. Living in South Africa (Cape Town) and currently making some of the delicious ‘boerewors’ we eat here. Basically coarsely ground beef, mixed with spices like coriander, cloves, nutmeg etc. You should try it! Great on a barbecue.
Regards
Mandrid
Hi Mandrid,
Thanks for your comments. Best of success with the boerewors! It sounds delicious.
Regards,
CB
Would a refrigerator work as a cold, humid room in Florida for making hard sausage? This one I have does not have a freezer section. I have Cure #2 already purchased and am anxious to start my first attempt.
Hi Jim,
You will find that a working fridge will dry out the salami too fast on the outside. The cold temperature is not the only issue, it is high humidity that is most beneficial. Maybe have a search for folks who are using old fridges (that are not working) as a way to cure salami. There are some interesting ideas out there.
Best of success.
CB
Looks really good, can you tell me how much weight they lose from making till they are cured as im trying to work out how much meat to buy to make 120 eight in salamis with my family
Hi Barry,
I’ve never done this calculation, but if I was to guess I’d say around 1/3 loss in weight throughout the process.
Why not just take some ground pork and make up the shape of an 8″ sausage and weigh it and then multiply by 120. That may be a more accurate way to determine the starting weight of meat that is needed.
Best of success,
CB
Thanks
Hi Great info … I am getting conflicting advice regarding the need for a starter culture… Is it essential? I note you don’t use it or dextrose… I’m making mine this weekend …
Hi Jimmy,
I do not use a starter.
Best of success this weekend!
Regards,
CB
Mine are ready to wash, do i use red wine, vinegar or olive oil?
HI Barry,
I just washed with a bit or water and pat dry.
Sorry for the late reply.
Regards,
CB
This recipe was so helpful as it is one of the few I could find that did not call for starter culture AND proved that it could make a perfectly safe and tasty product. Thanks for sharing.
I made my first batch and unfortunately had my fan running in my curing fridge most of the time so I got some case hardening. Had to toss it but doing another batch today, looking forward to seeing how it turns out after fixing the fan issue. Cheers!
Hi Andrew,
Glad to have helped. Let me know how you make out with your next batch.
Regards,
CB
Best article I’ve seen on making sausage. I like that you didn’t use starter culture, as surely the first sausage maker COULDN’T. I wonder if tossing a sausage you enjoy in the grinder could alleviate any worries about that. I plan to wait until summer and use a chest freezer with an external temperature control (available from beer brewing suppliers). Chest freezers won’t dry out the meat. Again, thanks for the DETAILS. I brew beer, which requires you drink a home brew while brewing, but I really need a home-brew sausage to nibble while brewing to complete the experience.