
Backyard Run & Coop
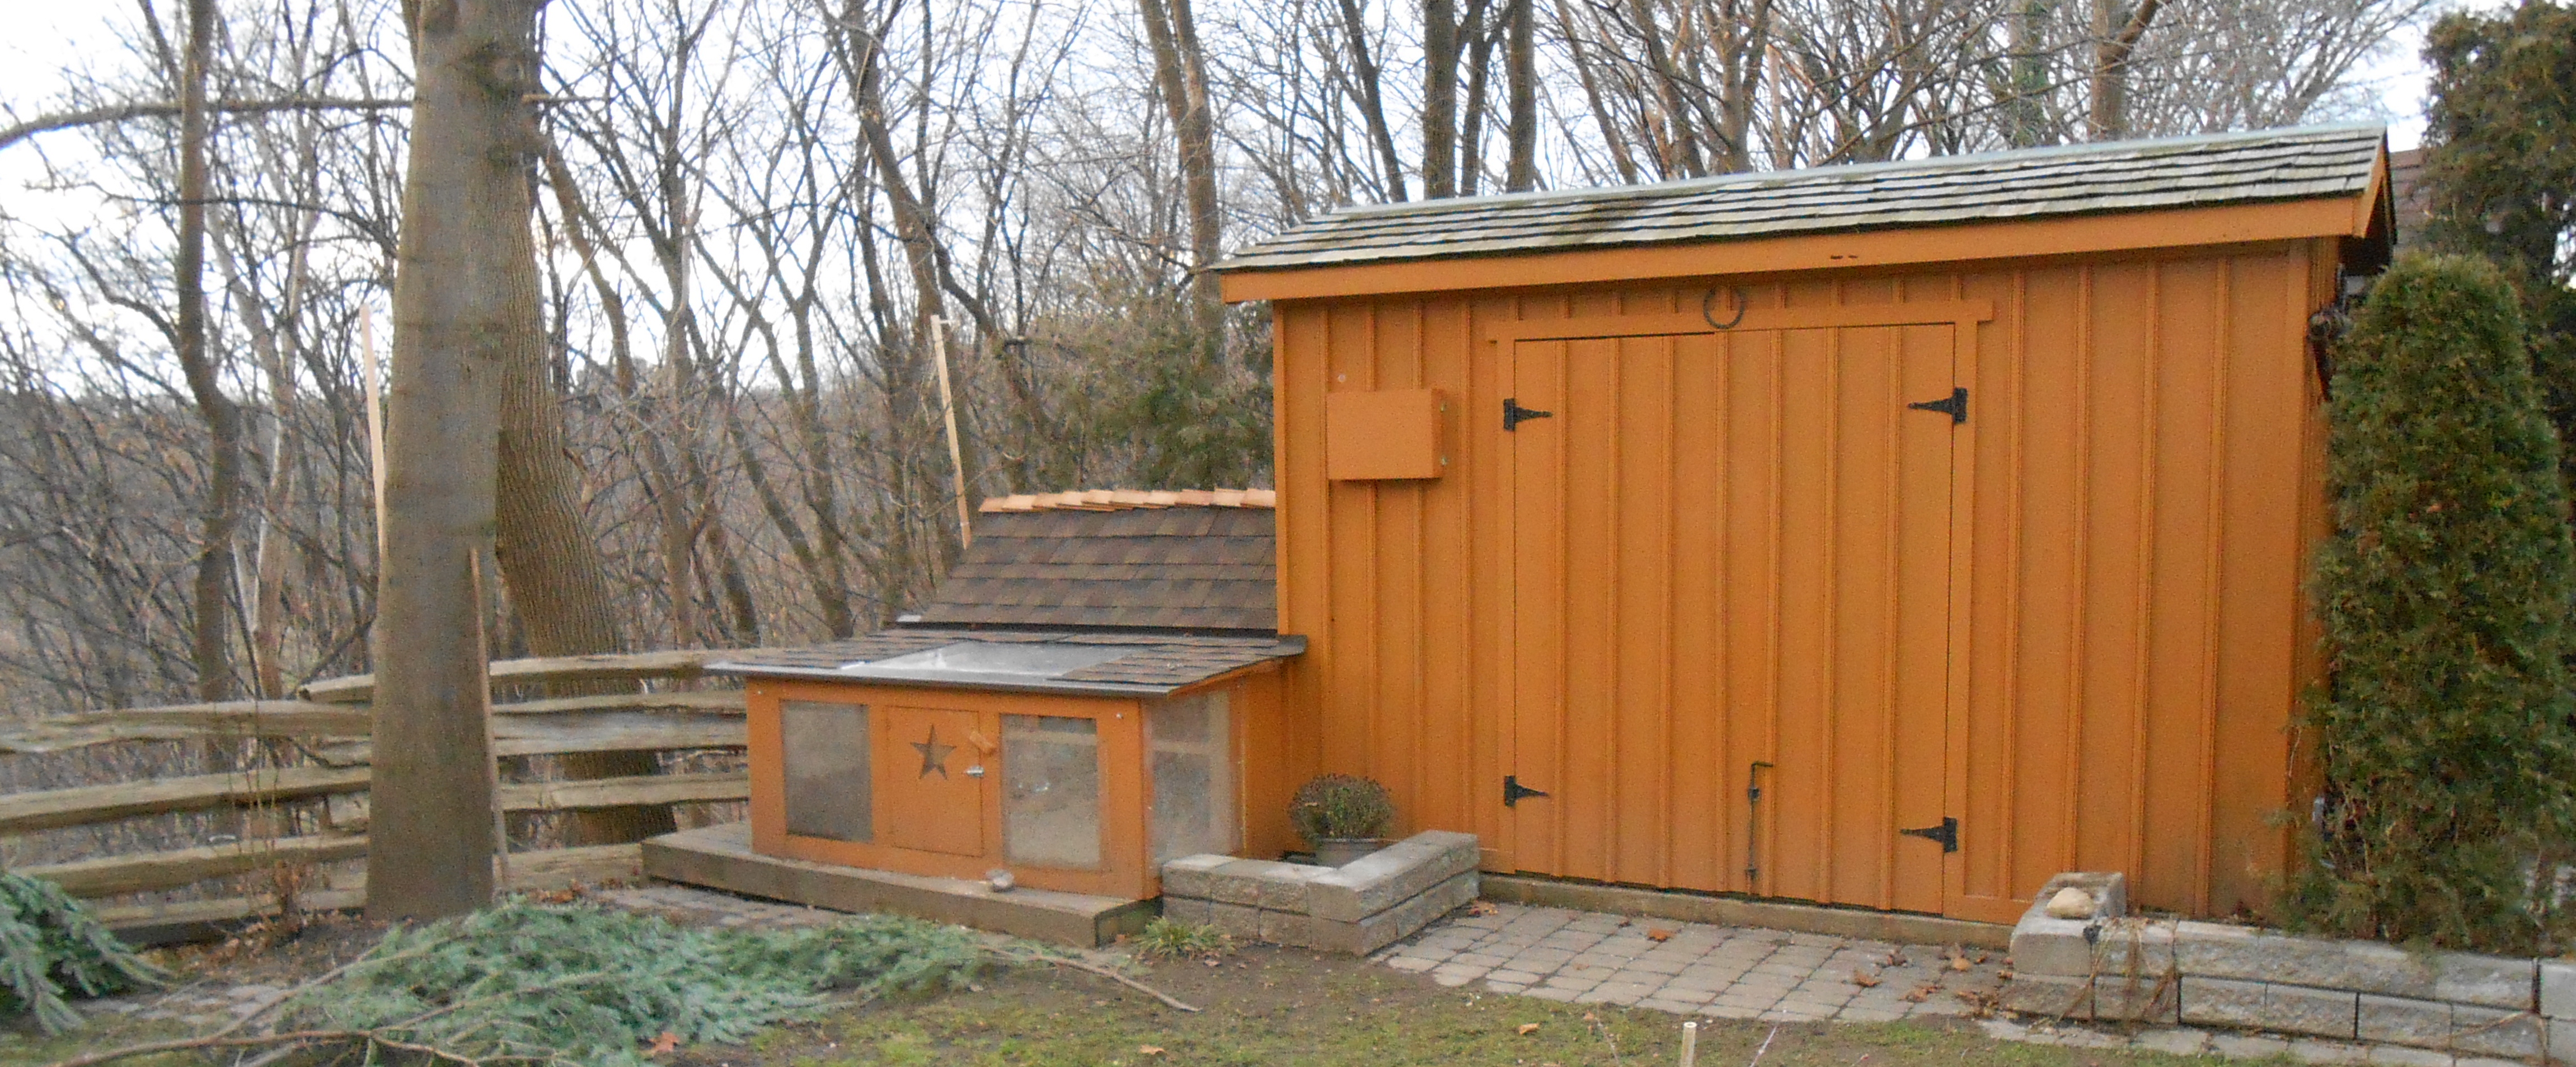
I did a lot of research before I built the coop/run that my hens now reside in. I scoured the Internet looking for ideas and found the process to be a lot of fun. What I came up with was a run that attached to my shed and a coop that was constructed within my shed.
Whether you plan on making your coop/run or buying it, you must consider size, safety, ease of clean out and ways to combat extreme heat and cold.
The Run

The Run
Our run is 50 square feet and more than adequate for my 3 hens. I think you are making a big mistake if you can’t provide at least 10 square feet of run for each bird. It is always better to over-build and allow yourself the opportunity to expand your flock in the future. Lots of room will also benefit your hens in the winter when it may be more difficult to free range.
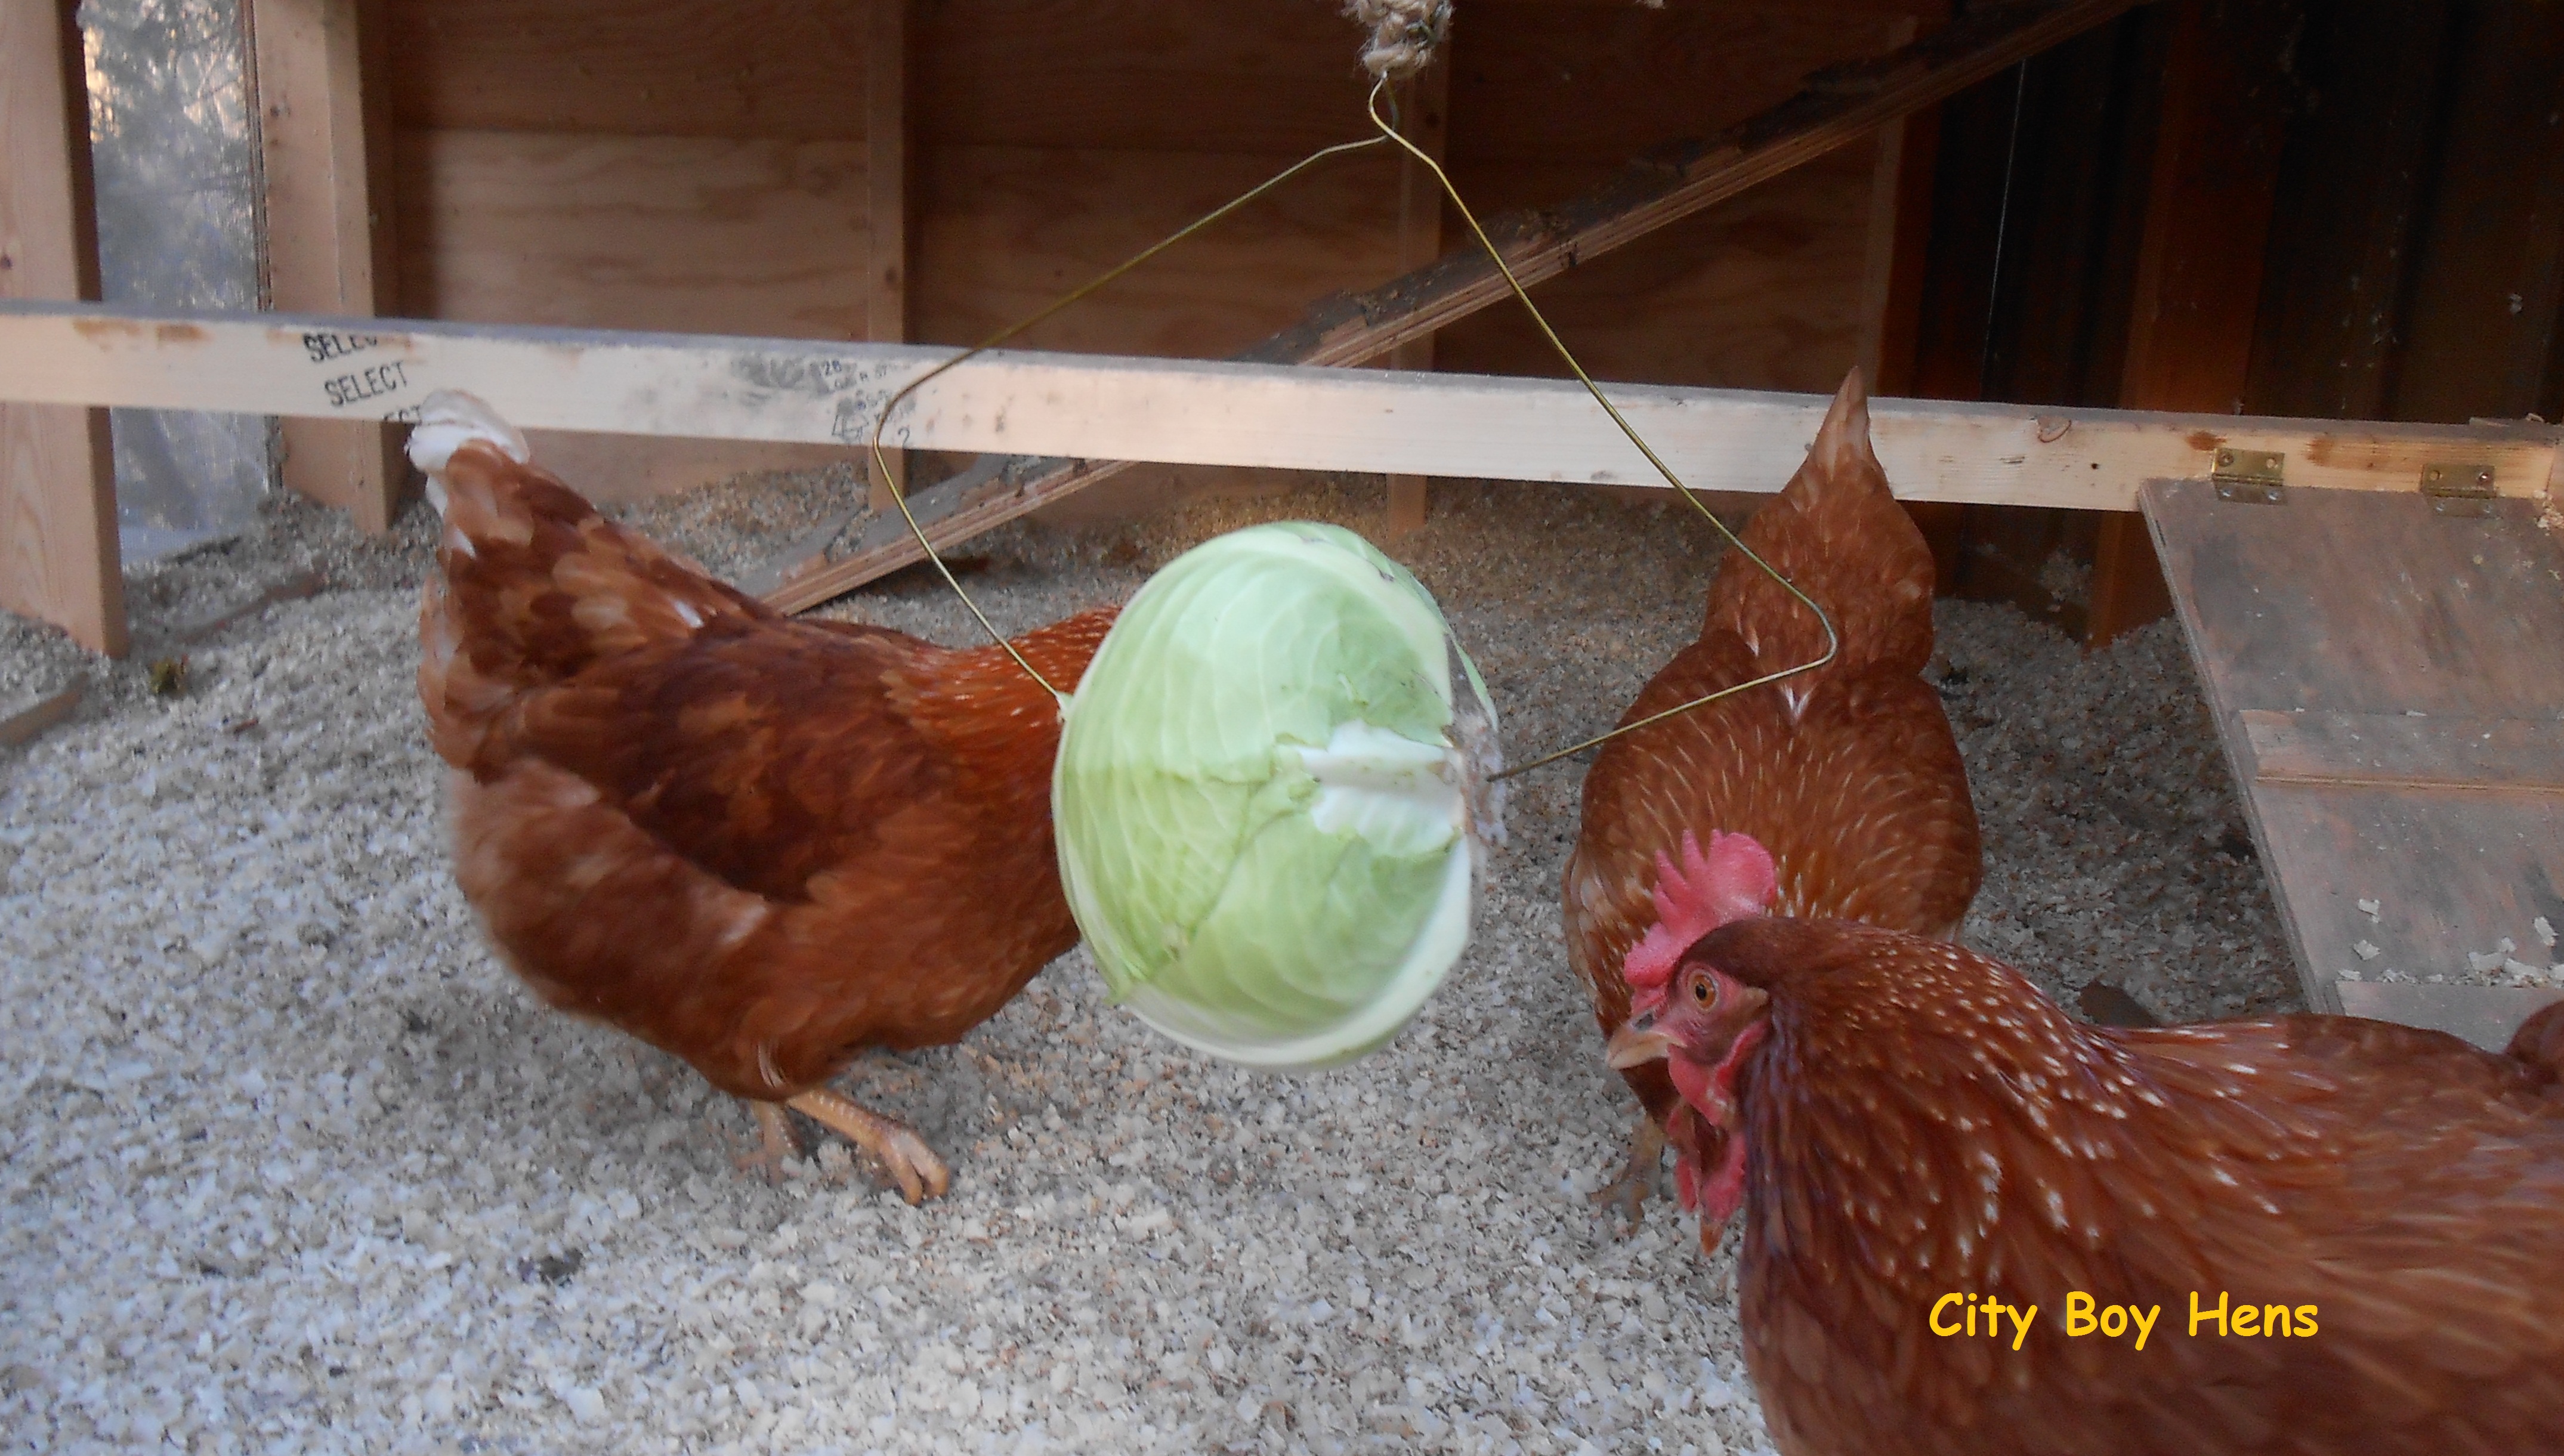
Snackin’ on a cabbage in the run
Our run is constructed from 2x4s with a shingled roof and ¼” hardware cloth covering the sides. This makes for a dry environment where air can easily circulate throughout the run.
Note: Don’t skimp with the hardware cloth and substitute for chicken wire. It is not a safe predator or vermin barrier for your girls. Sure…it’s a lot cheaper, but you’ll be kicking yourself in the butt when a fox, raccoon or coyote has easily managed to get into your run and dine on your girls while you were at work or asleep.

Side view of run
Our run is also raised off of the ground. It was not intentionally built that way, but turned out to be a great feature. I had previously made a 64 sq. foot deck off my shed for a place to sit and read or snooze. I simply built a run on top of the previous deck and covered the bottom with ½’ plywood. In doing so, I prevent vermin from squeezing through the gaps in my deck and pine shavings (what I cover the floor with) from falling through those same gaps. As well, the floor of the run is always dry because it is raised off of the ground.
There is also a small door at the front of the run. It is large enough that I can get a snow shovel or large leaf rake into the run to clean out the dirty litter and easily access feed, water, grit and dust bath containers.
BY late November, it starts getting cold in Southern Ontario and daytime highs are around 2 to 4 degrees Celsius (35-39 degrees F). At that time, I cover most of the hardware cloth with Plexiglas. I do not completely seal the run because I want to provide for ventilation and air circulation in the run. I have also seen other people use plastic polytarp (vapor barrier) for this purpose and it does a good job as well. The advantage to Plexiglas is that I can sit in my house and still watch my hens in the winter while I couldn’t see through the less expensive vapor barrier.
This is also a good time to think about your neighbor’s view of your run. I don’t recommend using an orange or blue tarp secured with bungee cords to winterize your run. Maybe it would be ok if you were on some acreage and you only had to look at it, but it might not be the best choice for the city. Remember: Happy neighbor…Happy hen owner!
The run is completely cleaned out every two weeks in the winter and every week in the summer. New pine shavings are then used to cover the floor of the run and Diatomaceous Earth (DE) is sprinkled over the shavings and turned over with a pitch fork. See more on Diatomaceous Earth below.
The COOP
Access to the coop from inside the shed
My coop is 12 square feet and sits 40” up from the shed floor.

From inside the coop
By constructing it this way, the hens are forced to go up a gang plank within the run and enter the coop.

Entrance to the coop from the run
This works well for all of us. For the hens, they have an additional sense of security because they are genetically wired to roost up in a tree. It also works for me because it is a comfortable height for cleaning and egg collection.
The entire coop is insulated with 2”thick Styrofoam which provides an R value of 10. The insulation works to keep the coop cool in the summer and above zero in the winter. It is also heated during the colder months with a 100 watt light bulb that is screwed into a brooder fixture. I set this on a timer from 7am -7pm. My goal in using the light bulb is not to keep the chickens warm, but rather to prevent their water and the eggs that they lay from freezing during the day. Hence, I move their drinker from the run to the coop in the winter. This works for all of us because I don’t have to be schlepping water out to the coop 2 or 3 times a day because it keeps freezing and the hens won’t stop laying because they are denied access to water.

4 days of work!
By the way, did you know that each egg contains between 4-5 tablespoons of liquid. Last time I checked the feed was pretty darn dry! Hence, the NEED for water.
It’s a good habit to wipe down the light bulb and fixture every week. By using diatomaceous earth and wood shavings in the coop, there is an accumulation of dust. The goal is to minimize fire probability for you, your neighbors and the hens. ALSO PLEASE NOTE TO NEVER USE Teflon-coated light bulbs in your coop (the ones that don’t shatter). In a small coop, the heated light bulbs will asphyxiate your hens. For a more detailed account: http://www.backyardpoultrymag.com/issues/7/7-5/warning_teflon-coated_light_bulbs_toxic_to_chickens_the_full_story.html
Ventilation is crucial in the coop. I have 3 widows that are situated near the top of my coop.

Closed window to coop
Closed windows in back of coop.
Each of these windows is 8” x 12” and covered with ¼” hardware cloth to prevent vermin and predators from entering the coop. One window faces east and the 2 others face south. By having windows located in 2 different directions, the hens will have a steady volume of fresh air circulating in and out of the coop and some sunshine in the months when the light bulb is not in use.
In the winter months, ventilation is a bit of a juggling act with humidity and heat. As I said before, I need my coop to stay above 0 degrees Celsius during the day because I don’t want my drinker or eggs to freeze. But, chickens in their coop from 5pm until 7am the next morning create a lot of moisture through breathing and pooping. This leads to a high humidity which can cause frostbite on combs, wattles and feet if the temperature falls below freezing. As well, high humidity in the winter can also make your chickens more susceptible to respiratory diseases. So the goal is to have an acceptable humidity level in the coop while allowing for fresh air, but retaining heat. According to commercial egg producers, optimum humidity in a poultry house should be between 60% -70 %. Of course, this is on a huge scale compared to my 3 hens in their suburban coop, but it is a reference point and I do try to keep the humidity in the coop within that range. So…. Here’s what I do to try and stay in that percentage or close to it:
First, the bottom of my coop is covered with a deep bed of pine shavings. 
Shavings are way more absorbent than straw and the poop really sticks to it. This is collected with a cat litter scooper and removed EVERY morning from the coop.
- I don’t think I need a caption!

I don’t think I need a caption!
In doing so, the coop remains clean, harmful ammonia levels are never reached and the excess moisture from the poop is removed from the coop.
Second, all 3 windows are covered with Plexiglas in the winter, but one pane has ten ¾” holes drilled through the glass. This equates to an opening with a 7 ½’” diameter. The good thing about drilling a bunch of small holes is that it will not allow a steady breeze/gust that would be created by one large hole. In doing so, fresh dryer air can be exchanged with some of the stale damper air if the humidity level gets too high. * UPDATE: So far I have not opened this window in the winter. Humidity levels at night are around 55% with a coop temperature of -3C and -20C outside!
Third, I monitor my coop temperature & humidity level by way of a wireless weather station.
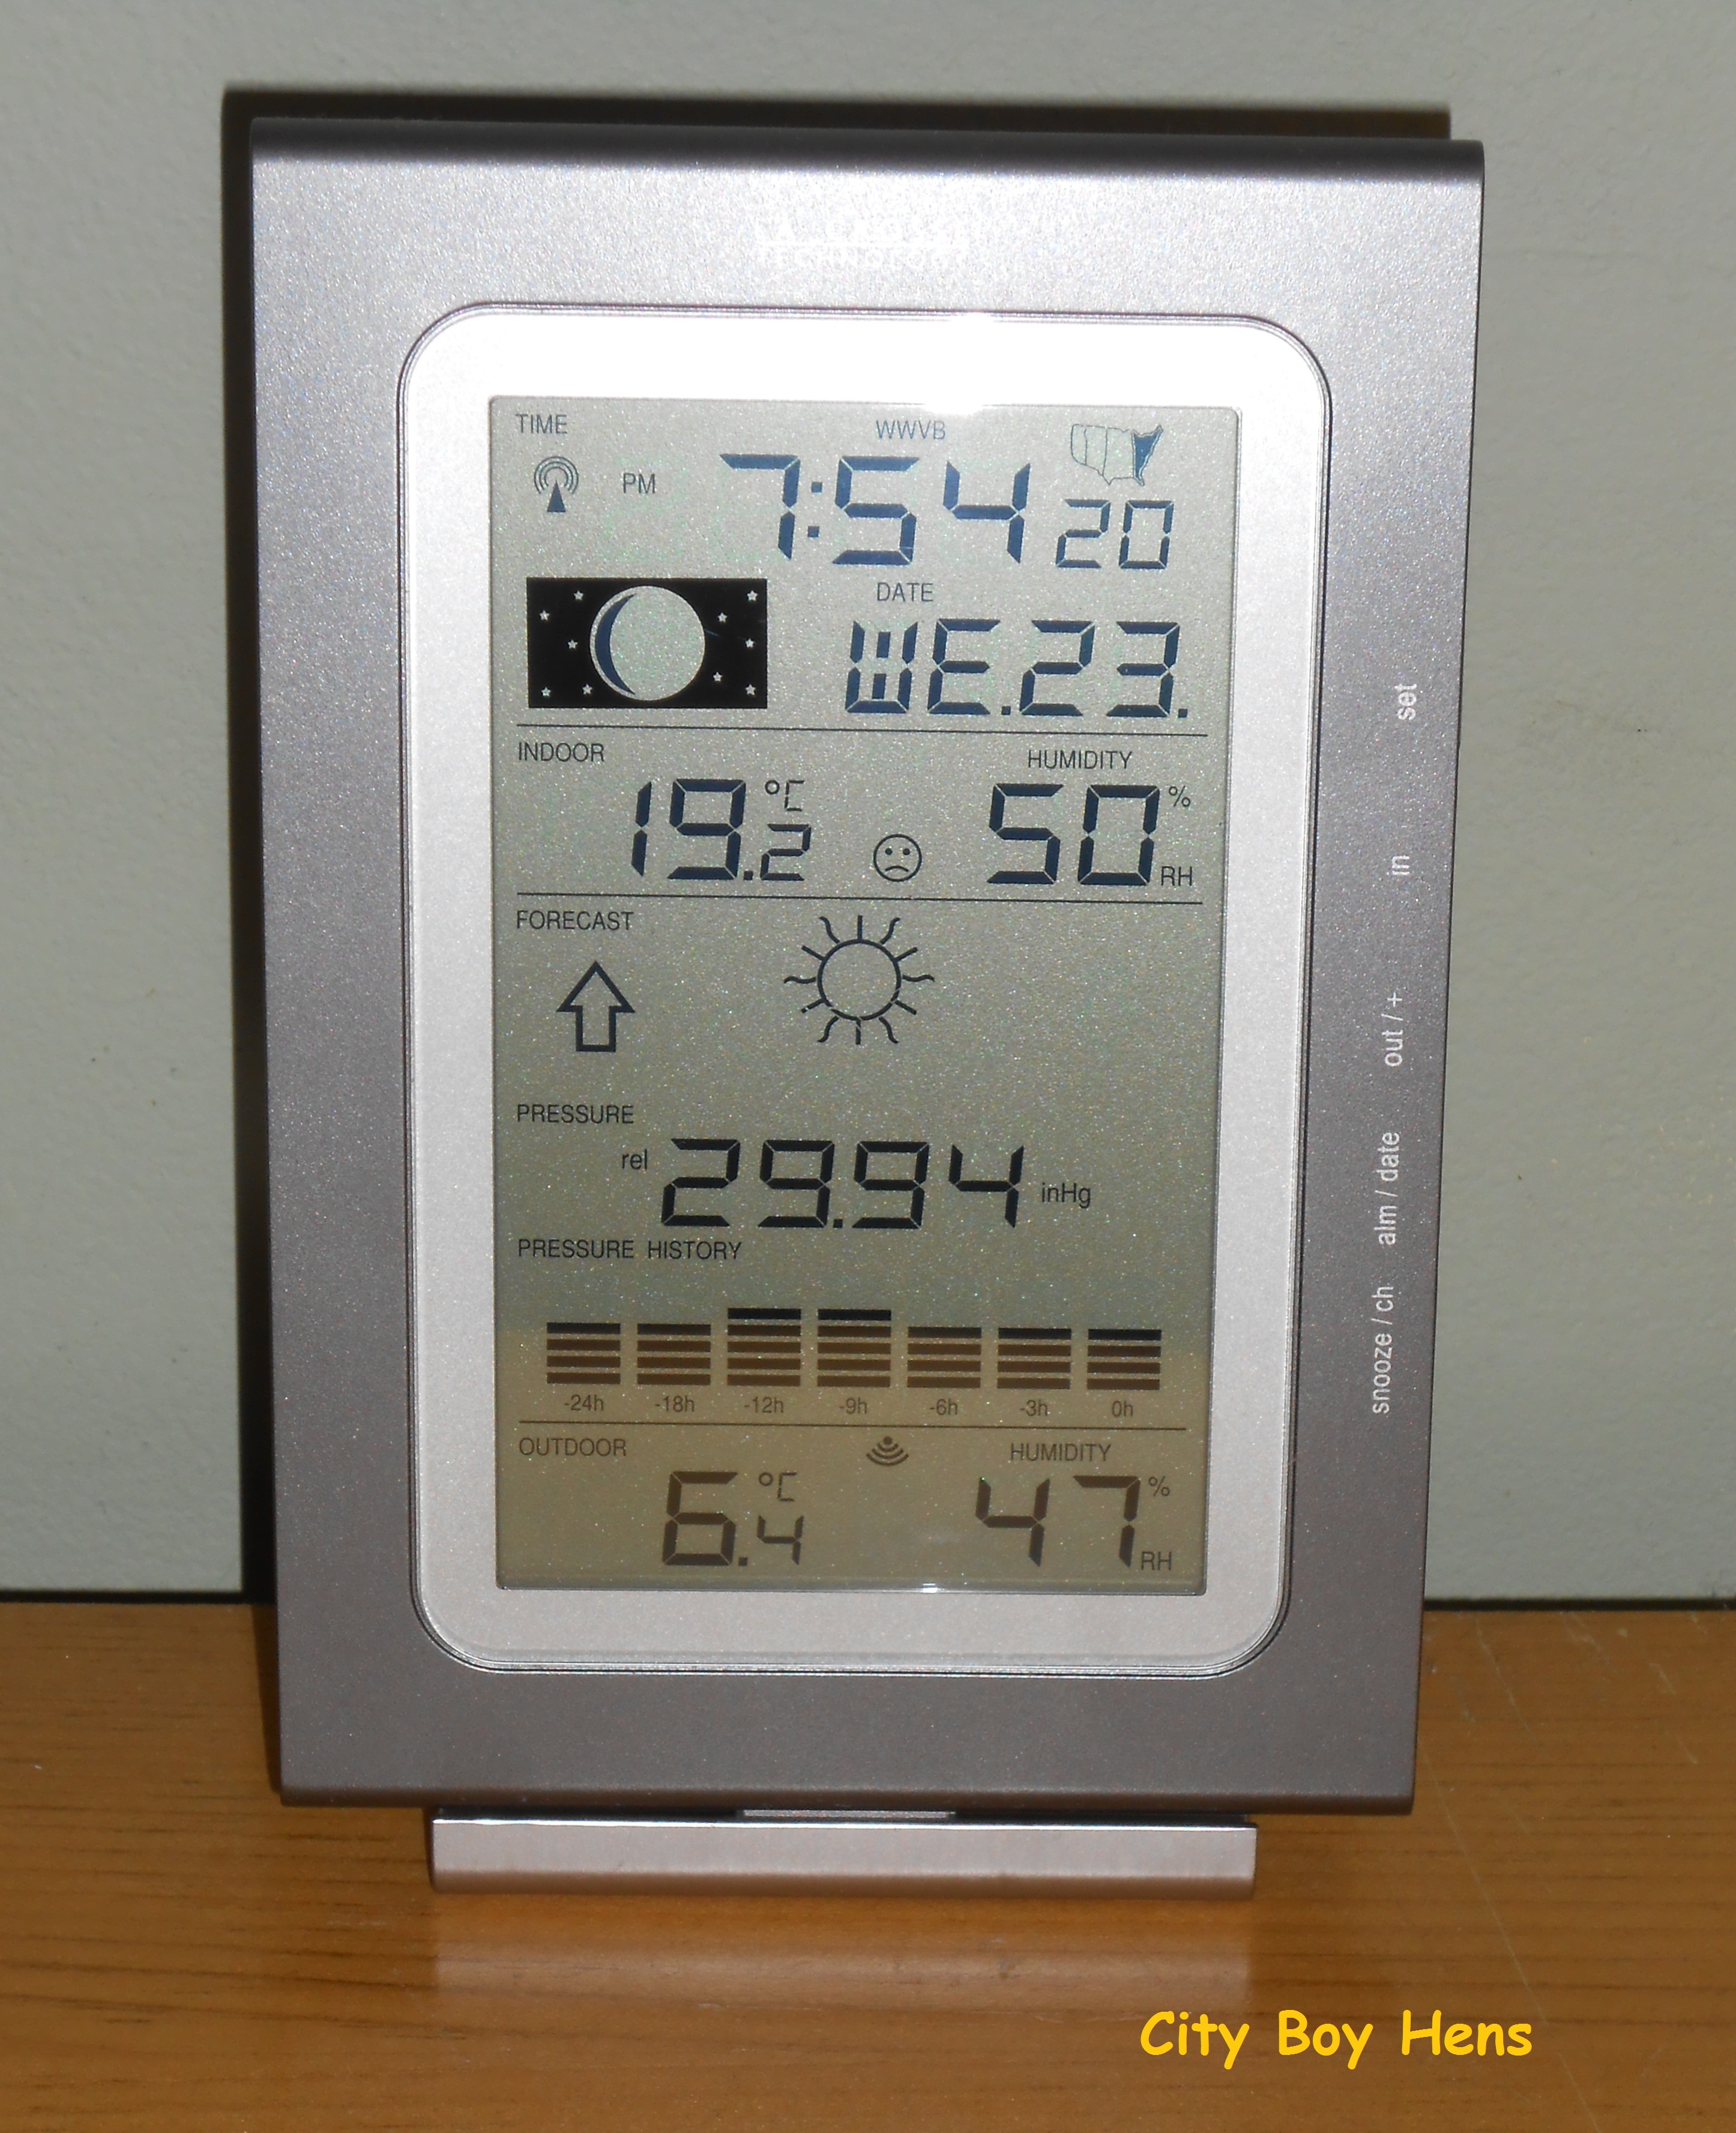
-10C outside and 6.4C inside the coop at 7:54pm. Nighty night girls!
Maybe it’s a bit excessive, but I’ve worked really hard in raising these chickens and the data reassures me that I have constructed a solid coop for my hens! Besides, now I instantly know the coop humidity and temperature levels with a quick glance of the screen and I don’t have to go out to the coop to read a thermometer.

Love the thermometer, where did you purchase it from?
HI Jill,
Ck out Wireless Weather Station at Lee Valley Tools http://www.leevalley.com/en/garden/page.aspx?p=70127&cat=2,42191
Regards,
Rick
What a great coop and run set up CBH. I live in Australia and so never have to deal with frostbite worries but I learned a few important new things from your post about humidity and ammonia levels- so thank you.
Hi Fiona,
Thanks for your comments.
Regards,
CB
Do you have any problems with mice under the deck? If so, try basil plants. My local nursery had a terrible problem with mice last winter. When a freeze came along (I’m in Tucson AZ so that doesn’t happen often) they put a newly arrived batch of basil plants in the office to keep them from freezing. The result? No more mice! I’ve read and used peppermint plants for the same purpose.
Hi Sally,
I don’t have problems with mice because there is a solid floor in the run & coop.
Thanks for your tip & your comments.
Hope to see you again.
Regards,
CB