
 Canning season officially starts at City Boy Hens with pickled asparagus. Around here, it is included in our antipasto, the “topper” to ”special events” salads, a great addition to any sandwich or just as a pickled treat with dinner.
Step 1: Sterilize your jars, lids and rings.
You can use the dishwasher on the high temperature setting, your canner (big pot) for 15 minutes at a “rolling boil” or your oven at 225 degrees Fahrenheit for 20 minutes to sterilize your jars. Whatever way you choose, remember to keep the jars warm after the required length of time and do not sterilize the lids in any of these ways. The rubber seal may become compromised do to the extended length of heat and may prevent a good seal for your canned goods. For me, the oven is my method of choice.
For the seals and bands, I find it easiest to put these in a small pot of water and keep them just below a boil. Make sure that you separate all of the lids. They can easily become stuck together and appear as one. The last thing you are going to want is to go through the entire process below and find that you are short one lid because you put two on one jar without knowing!
Step 2: Fill your canner up with water.
I know it sounds like an easy step, but it is worth mentioning that you need to find the right volume of water. Too much and the water will overflow when you add your jars that are heavy with their contents. Too little and the jars will not be completely submerged which will not allow for proper sterilization of contents. I fill my canner to around 2/3 full in order to accommodate 6 large canning jars. Note: Use hot water to fill the canner. This will help to speed up the process of bringing the water to a boil. Even with doing this, it will still take some time to get this water to a boil so start now!
Step 3: Wash and cut your asparagus.
Asparagus spears are quite long and a good portion of the vegetable must be cut off in order for it to properly fit into your canning jar. I have found that the easiest way to do this is to cut one piece to its designated length and then position each bunch beside your one piece and “chop”. Follow up with a good wash for the asparagus in the sink. Note: Don’t discard the remaining stem of the asparagus. Bend each piece until it snaps and keep the tender end. This can be canned, cooked for the next few meals or made into soup!
Step 4: Make your brine.
6 cups of pickling vinegar (5% acetic acid)
9 cups of water
9 tbsp. of pickling salt. Iodized salt will leave your brine cloudy.
Bring this to a boil.
Step 5: Pack your jars.
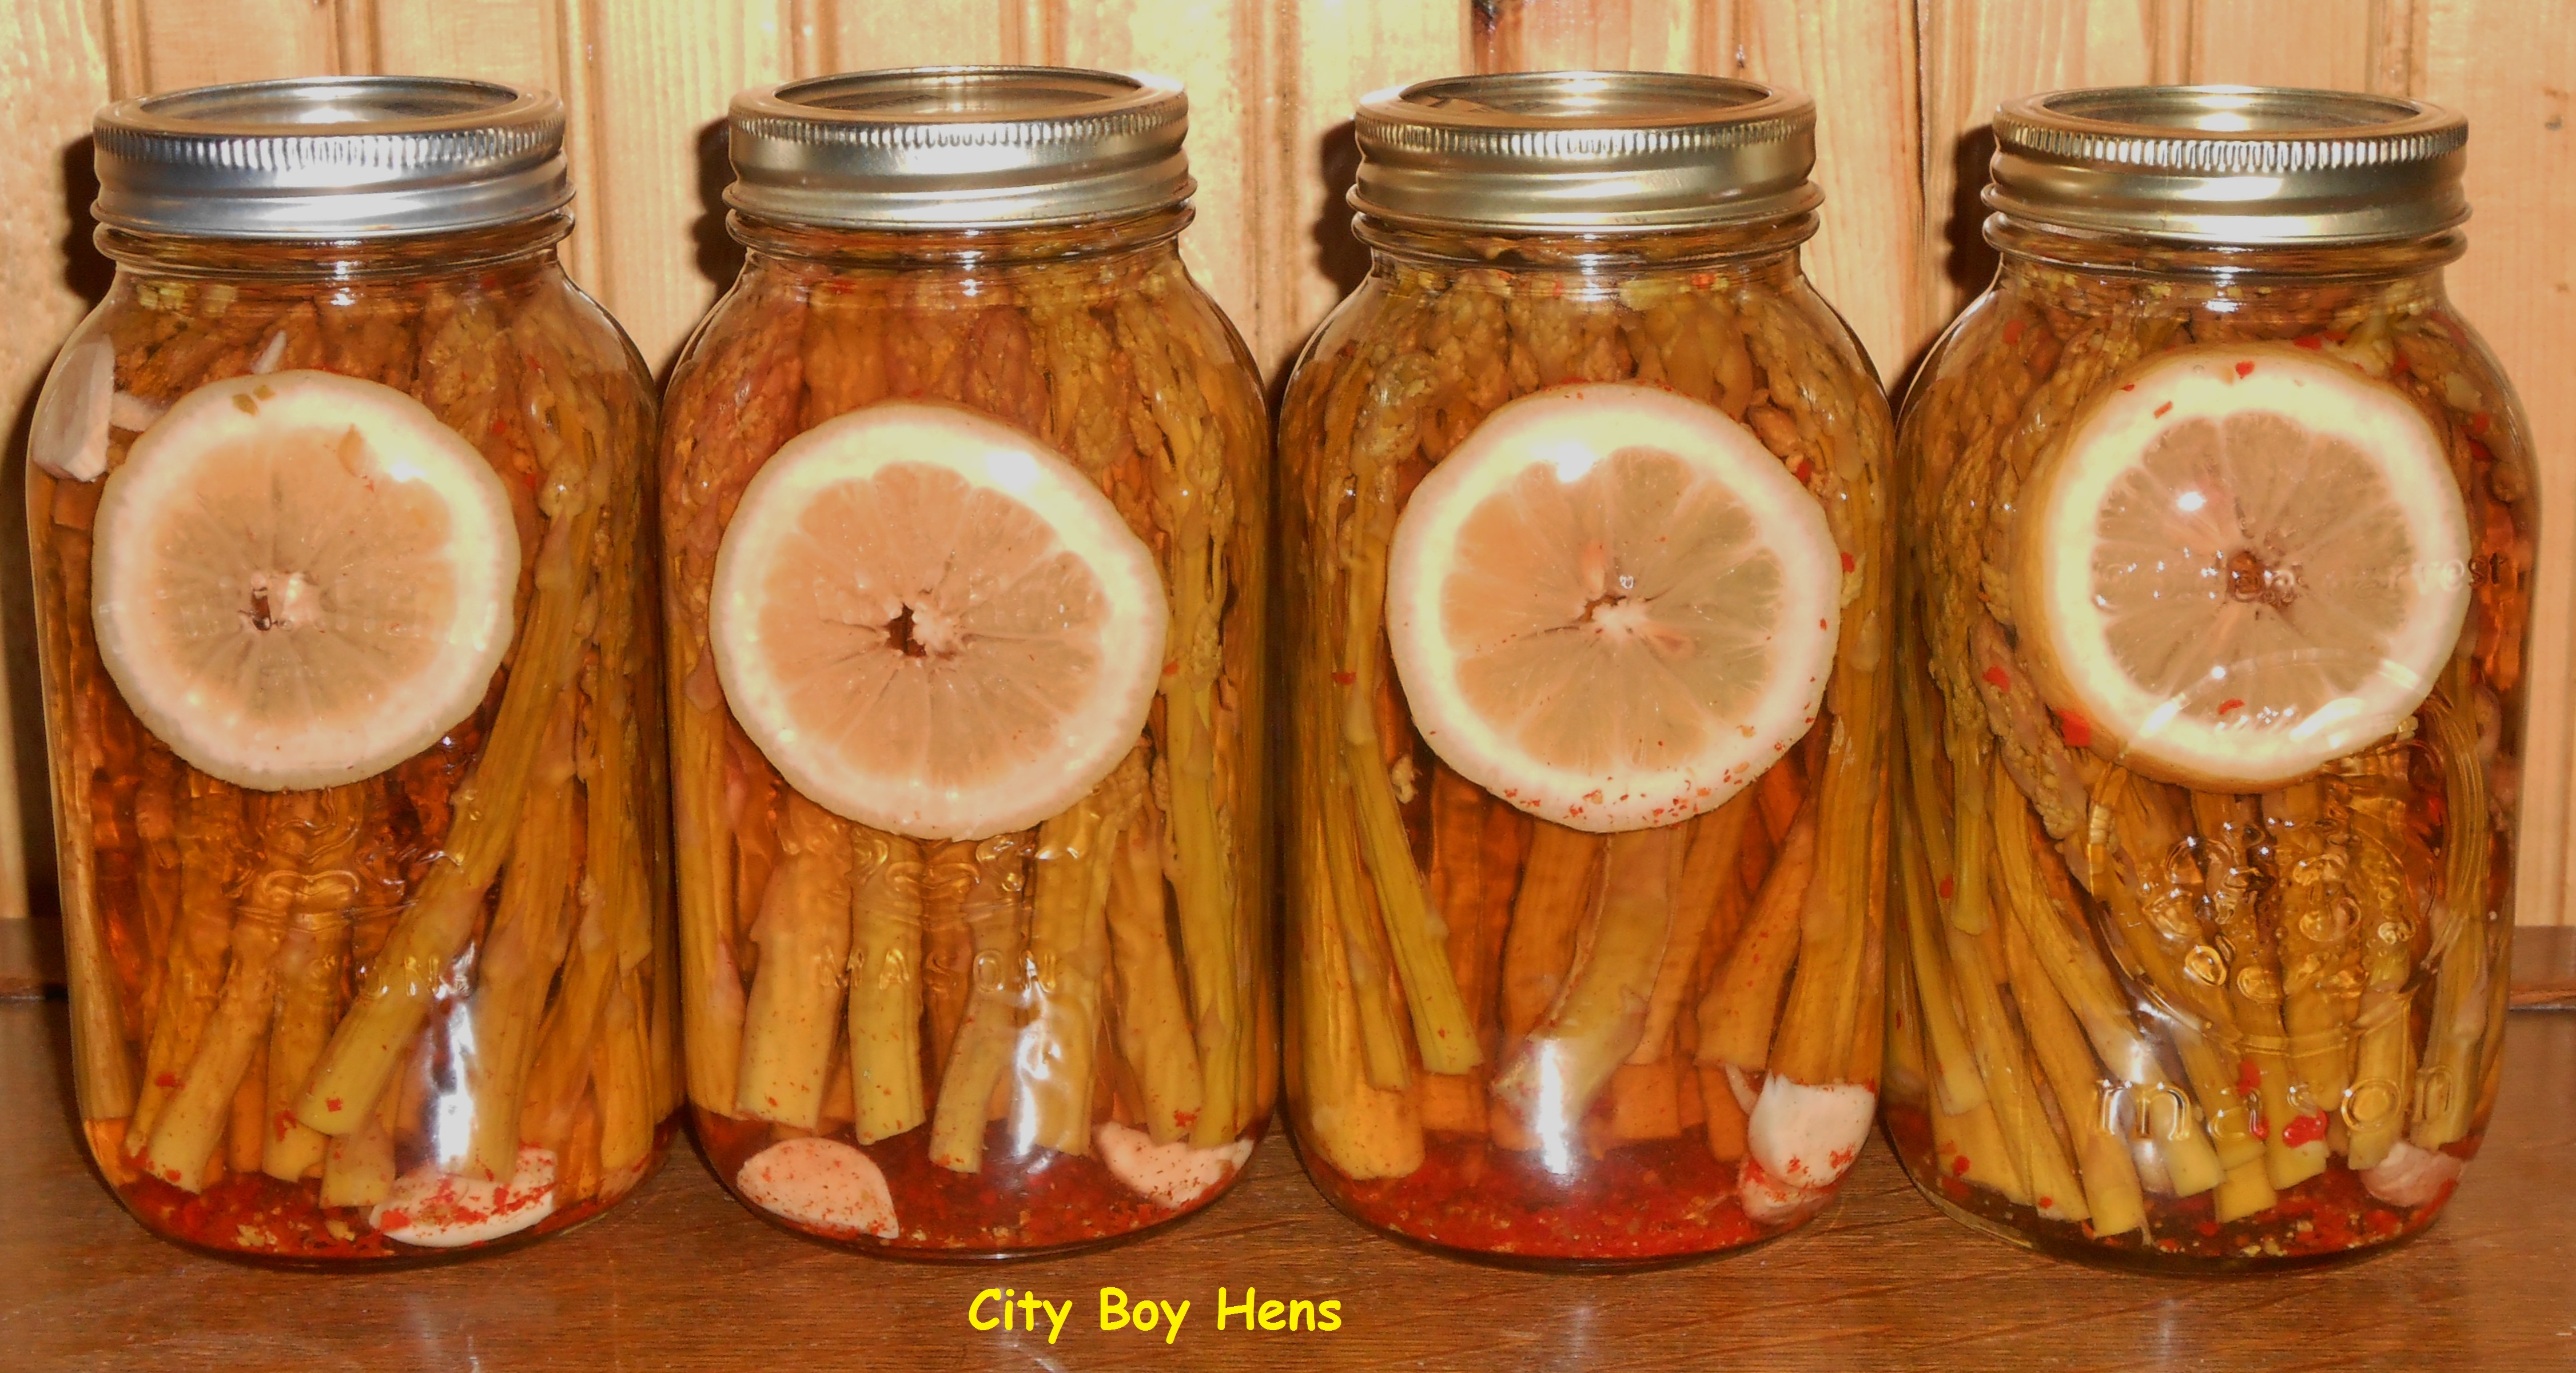
Before I begin packing my canning jars with asparagus, I add 1 clove of garlic (cut into 3 pcs.), 1/2 tsp. of chili peppers and 1 slice of lemon. Feel free to omit any of these ingredients though I highly recommend them all. Now it’s time to pack your jars. I find that it is easiest to lay the jar on its side when it is time to pack the asparagus into the jars. You may be surprised at how many spears you will be able to pack into each jar. I averaged around 35 per jar. This number will vary on the thickness of the asparagus stalks. It is important to pack your jars as tight as you can without breaking off the tips of the asparagus. I find that a table knife works well to help move the asparagus from side to side in order to make room for a few more spears.
Step 6: Add the brine and seal your jars.
Now it’s time to add the brine to your jars. A large ladle and a canning funnel makes easy work of this step. Make sure not to fill the brine up to the top of the jar. Once this is done, take one of your sterilized seals out of your pot with a pair of tongs and place it on the lip of the jar. Note: make sure to wipe the lip of your jar before placing the seal on the jar. This will ensure that nothing is trapped on the lip which could prevent a tight seal and spoil your asparagus as it sits in your cantina (cellar) for up to 1 year. Once this is done, tightly screw the canning ring onto the jar.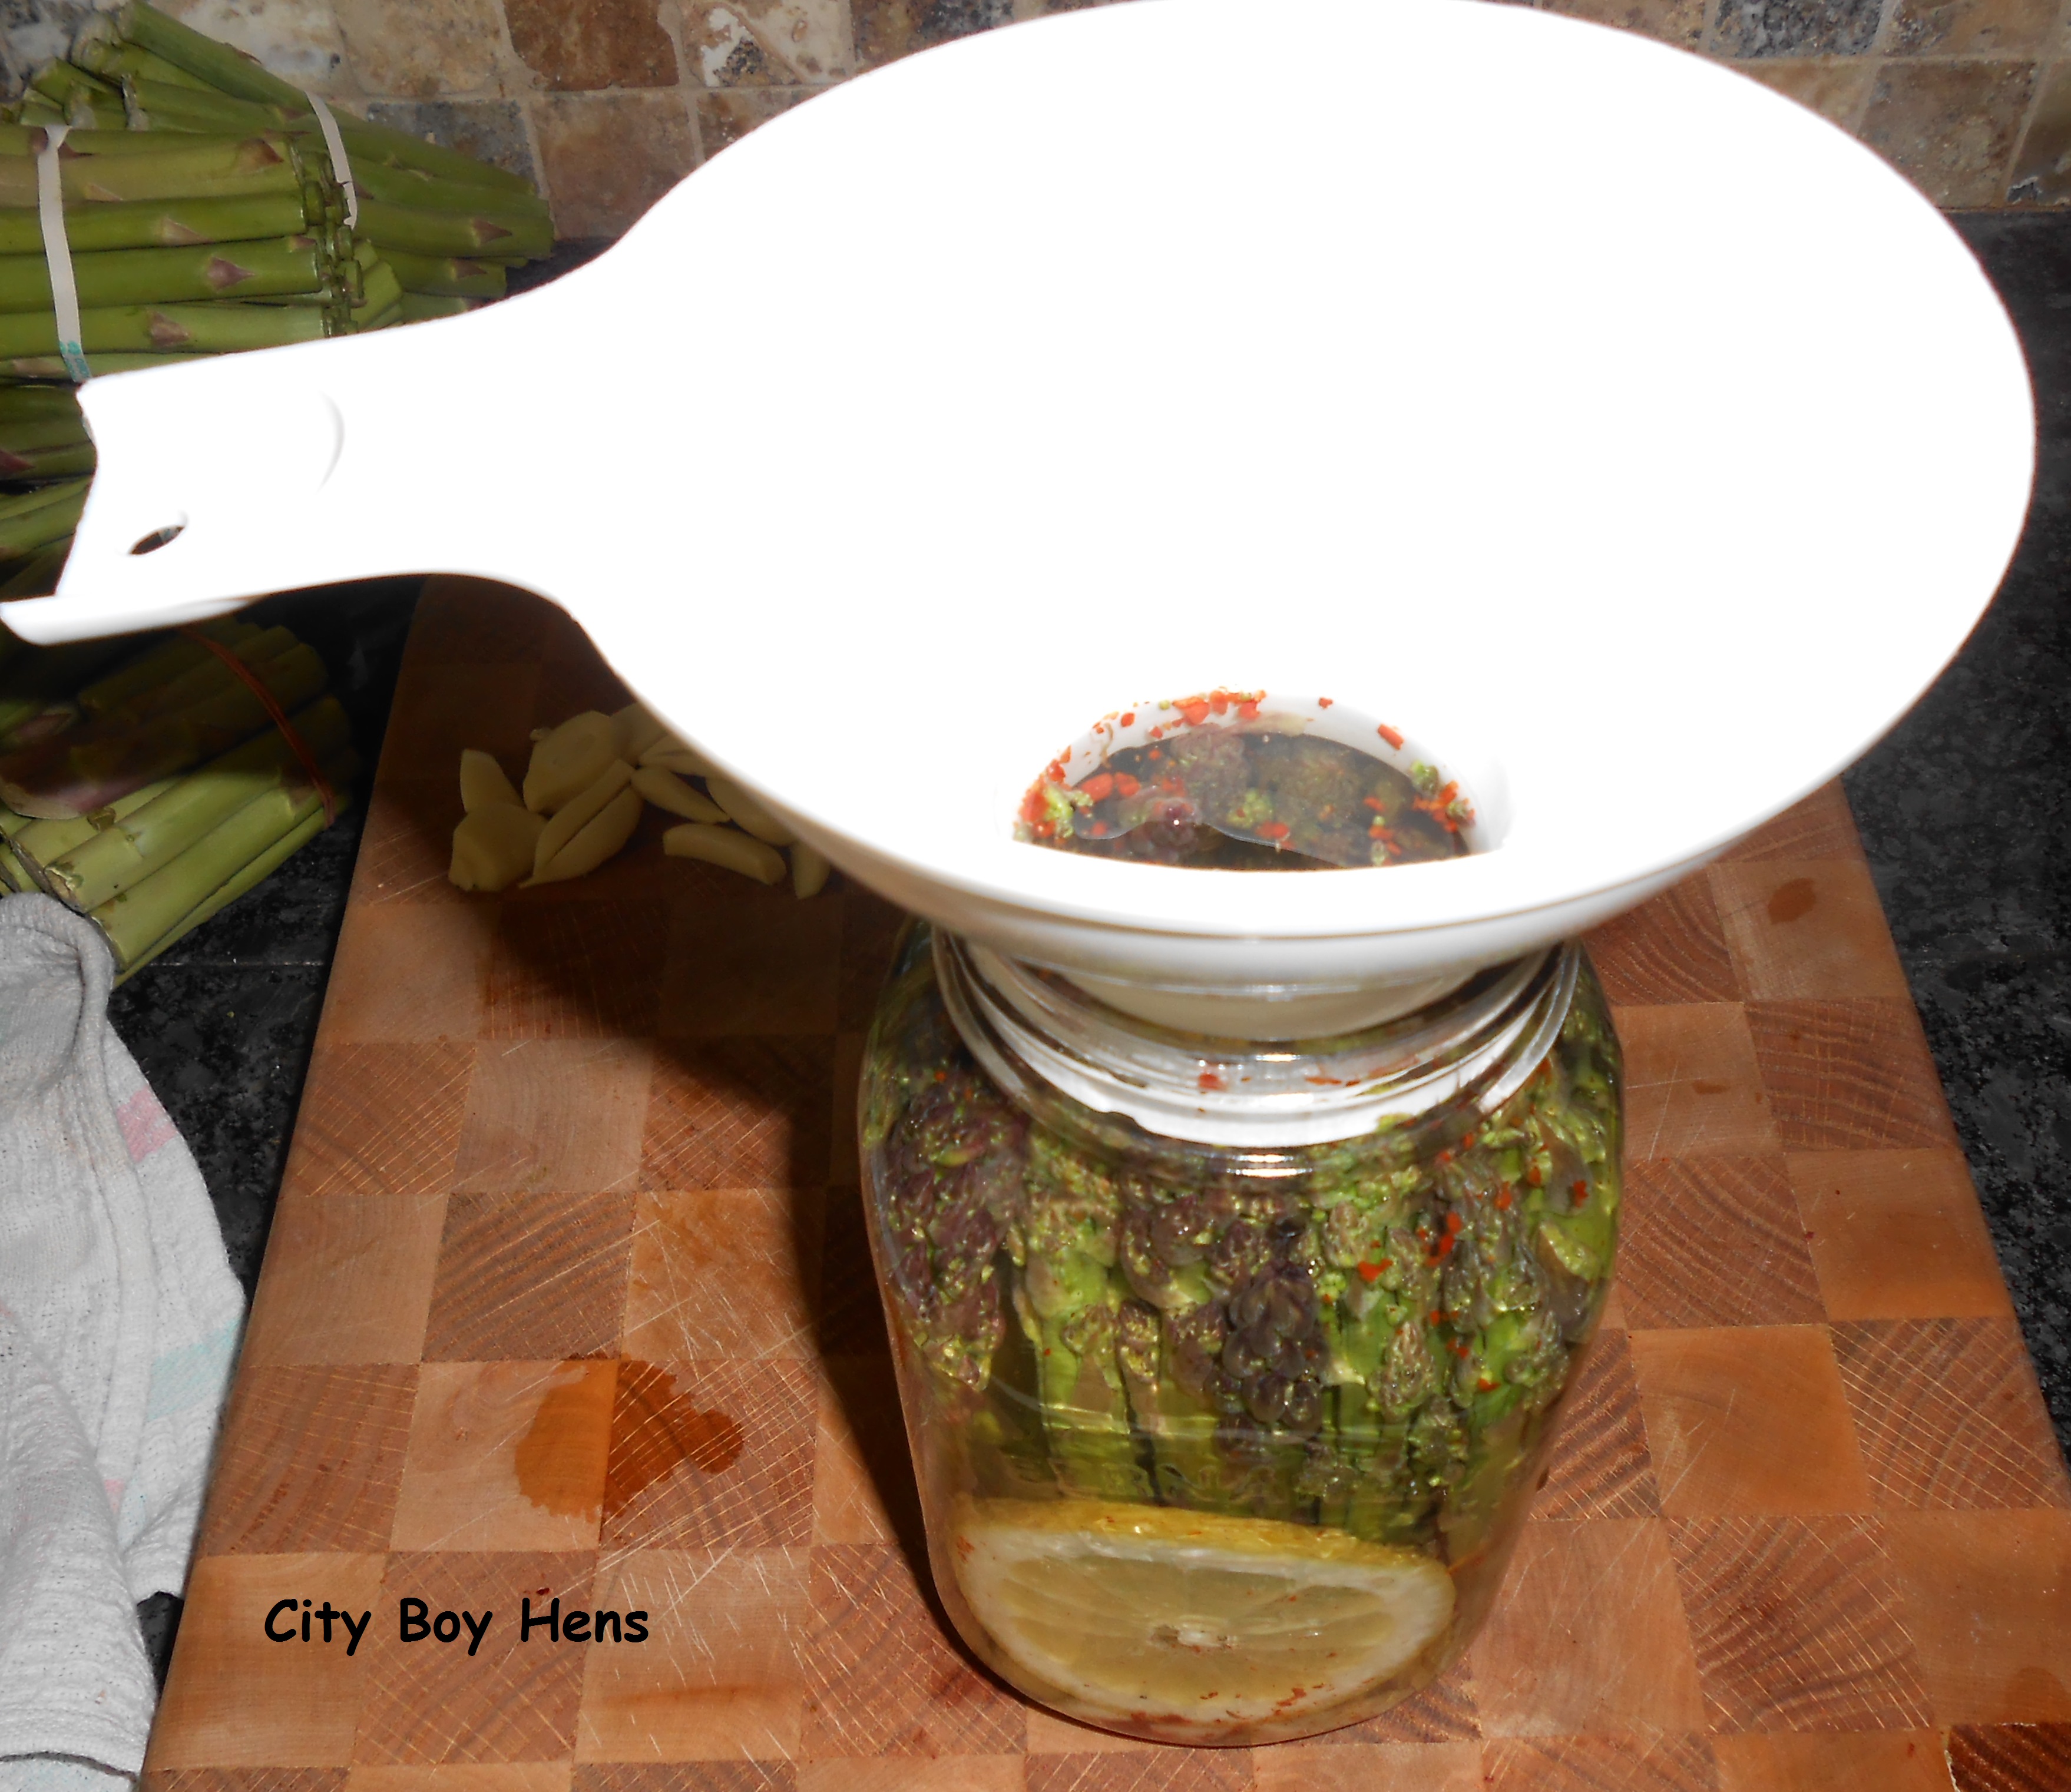
Step 7: Water bath.
The water bath is debatable and many people omit this step. Some rationalize the omittance by claiming that the boiling brine is enough to kill any bacteria that may be left on the asparagus. I also recognize that this step is a pain in the butt and can be quite dangerous because you are transferring a relatively heavy jar into and out of boiling water. With that said, I feel better eliminating my family’s chance at botulism and using a canning tongs to work the jars into and out of the boiling water. This process should be done for 15 minutes.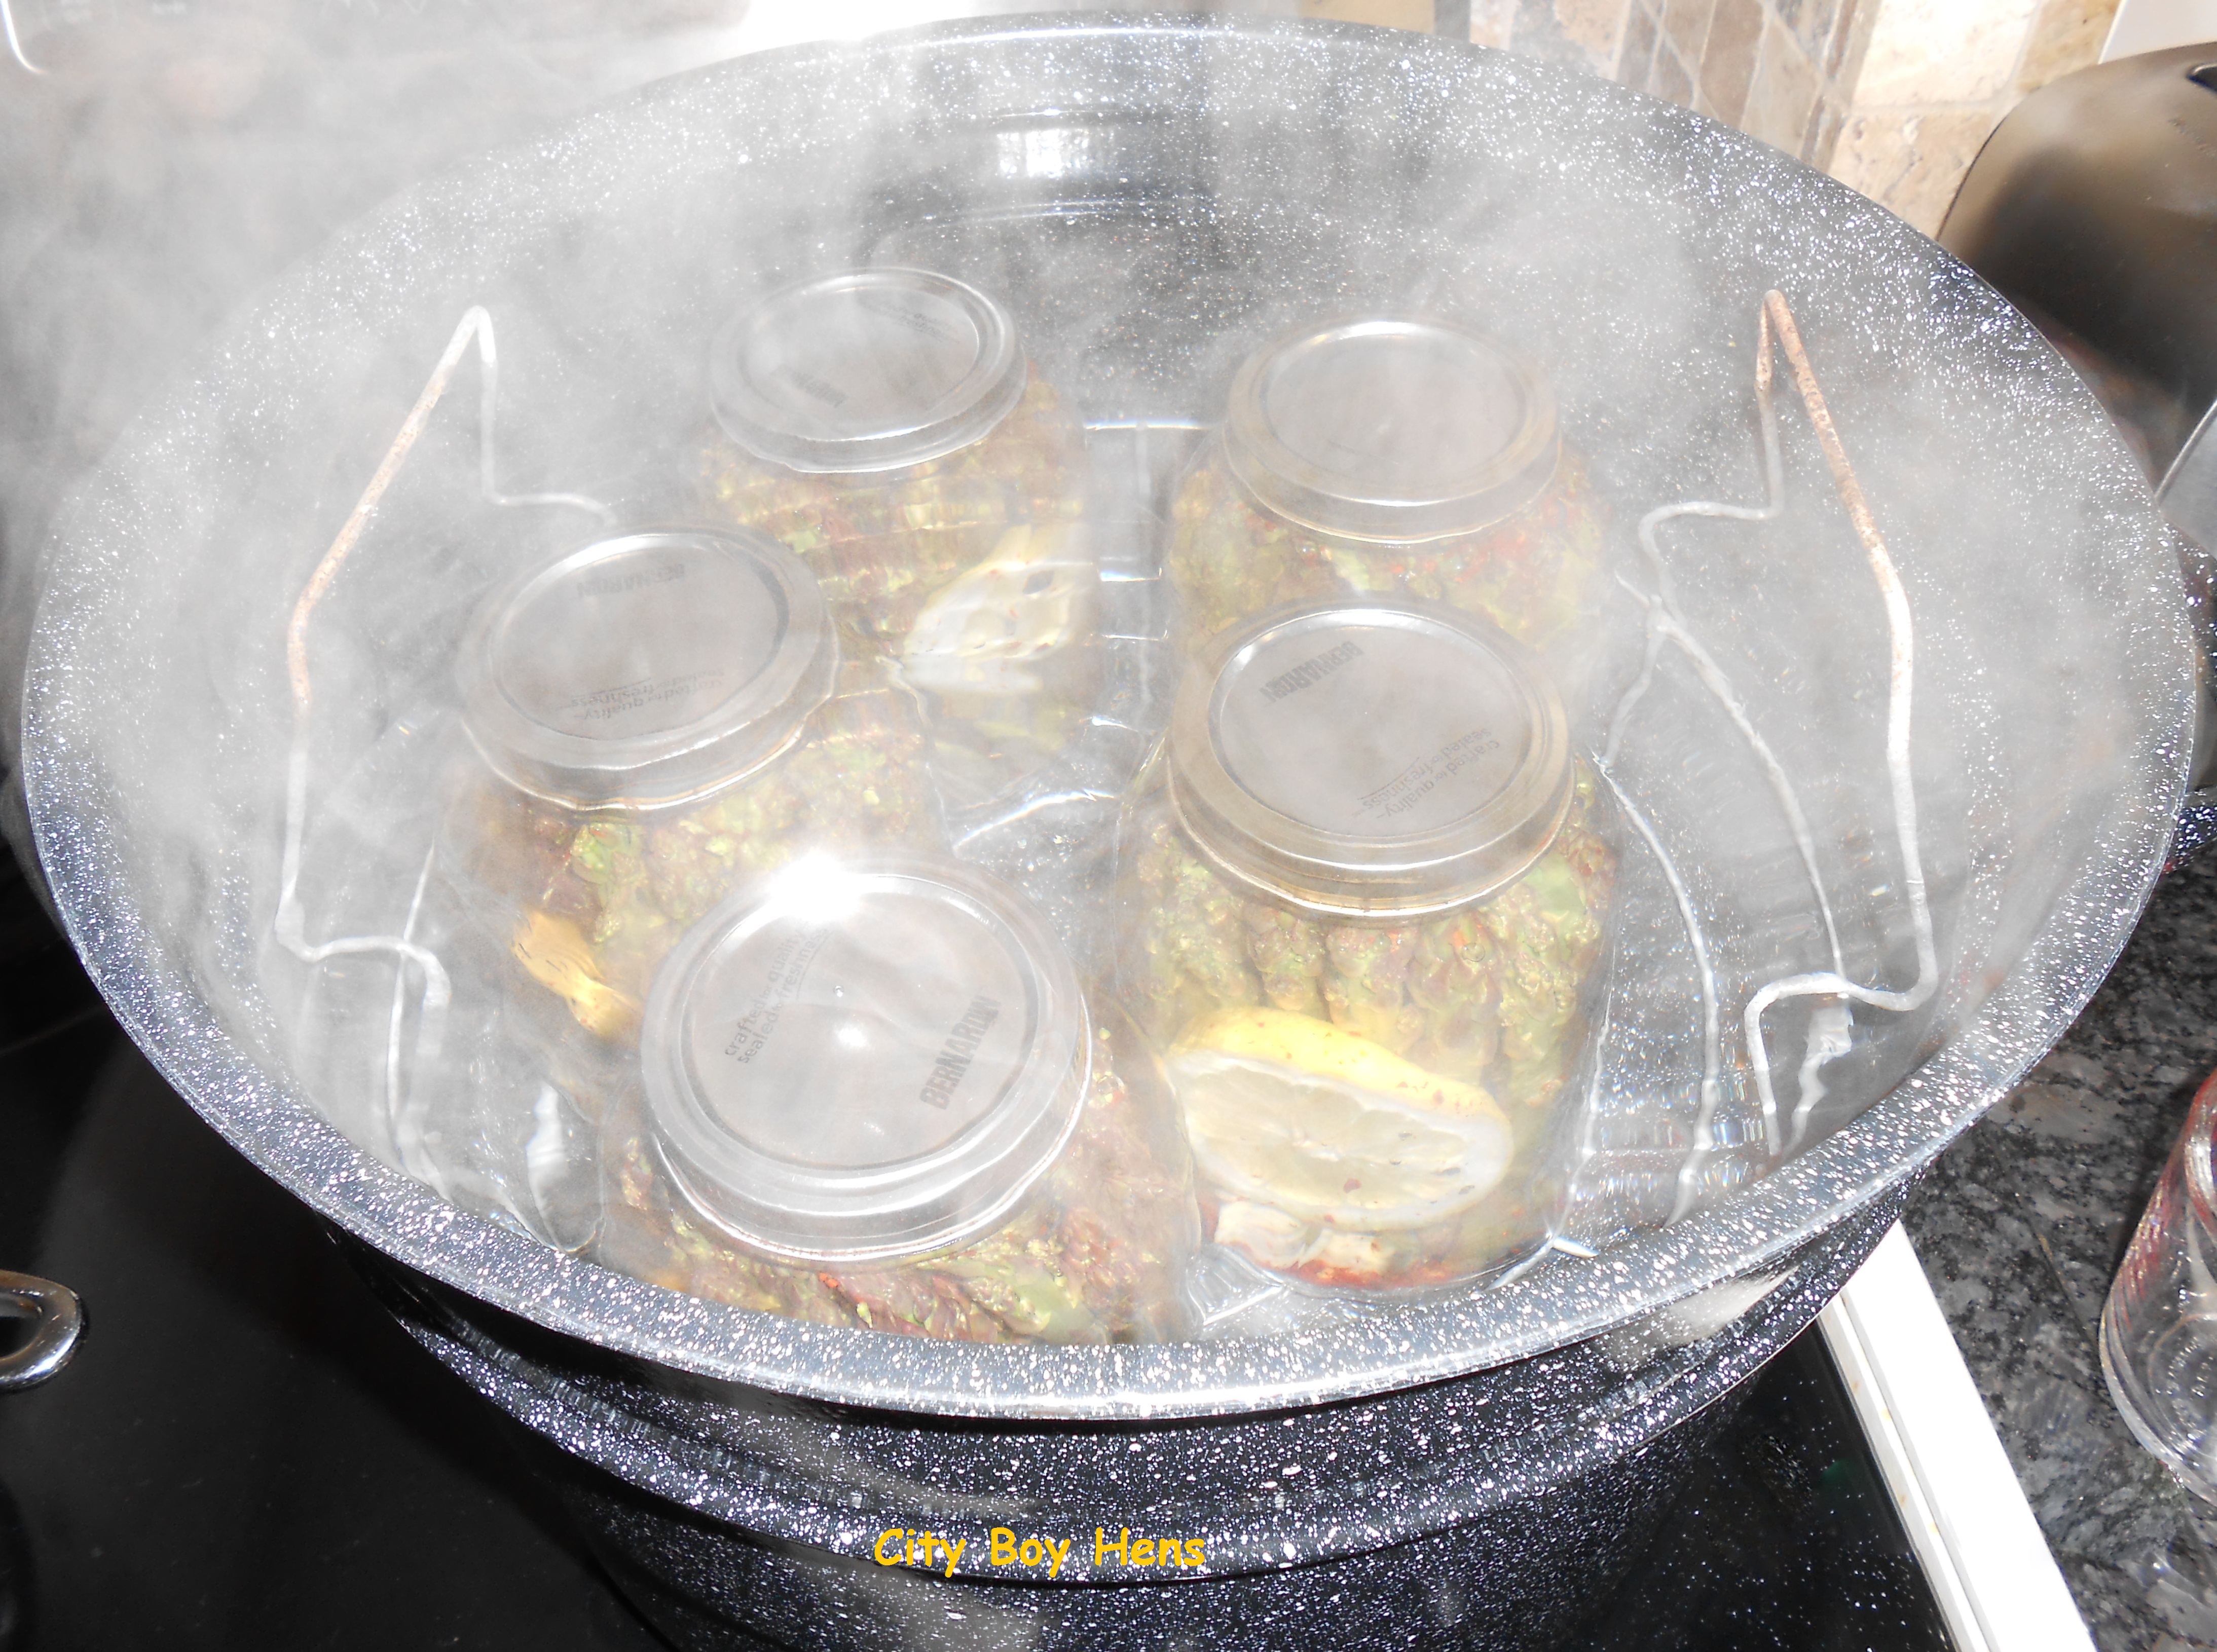
Carefully remove the jars with canning tongs and place the hot jars on a rack to cool. After a while, you will hear the great sound of “SNAP”. That means your jars have sealed. Let your jars completely cool (over night) and then put them in your cantina or cupboard until it is time to enjoy the taste of pickled asparagus. Enjoy!

I love Asparagus, This recipe looks great, thanks for sharing!
HI Sandra,
Thanks for your comment and checking out my blog. Enjoy the recipe!
Let me know how you made out.
Regards
City Boy
I am curious about the texture of the canned asparagus. We are crazy about it and I plan to put in quite a bit more than we currently have growing. So, I hope in a few years to have so much on hand I am looking for many ways to fix it! The commercial canned stuff is so nasty mushy, but yours doesn’t look to be at all mushy.
Hi May,
Thanks for checking out my blog. Mine is never mushy – even after a year in the cantina! I hope you will preserve some in the future.
Please check back again and tell me how you made out.
Regards,
City Boy
Thank you for sharing this post on our From the Farm Blog Hop. I love to can and preserve our harvest. I can’t wait to try your recipe so that we can enjoy asparagus for months to come!
I just pinned this post to a few of my Pinterest boards. I know that my followers will love learning how to make this recipe. I hope that you’ll come back and link up again next week.
Jennifer @1840Farm
HI Jennifer,
Thanks for your compliment! I hope you enjoy preserving the asparagus.
I’ll be back at the blog hop next week!
Regards,
City Boy
I’m the only one in my house that eats asparagus, but the rest all love pickles. I’m going to have to try this one and see if I can convert a few asparagus lovers. Thanks for sharing.
HI Natalie,
Thanks for dropping by. I hope you gain some converts!
Please drop by again.
Regards,
CB
Gorgeous! Thanks so much for sharing on The HomeAcre Hop! Stop by today to share your latest adventures!
http://www.theselfsufficienthomeacre.com/2013/06/the-homeacre-hop-22.html
Thank you for sharing on Wildcrafting Wednesday! It looks delicious and I’m wondering if you’ve ever tried fermenting instead of pickling? Still the same (or similar) zing but then it becomes a probiotic and good for your gut. Just curious. 🙂
Hi Katherine,
Have never tried fermenting the asparagus.
I will look into it further.
Thanks for dropping by.
Regards,
CB
I recently tried this with a pressure cooker. I blanched the asparagus for 60 seconds in boiling water and then ran cold water over them while they drained. They were cooked for 40 minutes at 10 lbs of pressure.Mine came out very mushy. Should I eliminate the blanching or have you ever heard of using pickling crisp? Lastly, is the shelf life any longer using one technique over the other?
Hi David,
I don’t have any experience with a pressure cooker though it sounds to me that the asparagus was over cooked. Mine are never mushy and I do not use a pickling crisp for this recipe. Best of success.
Regards,
CB
I plan to start canning and preserving for the first time this summer. When you put the jars in the hot water bath, are they completely submerged? And you leave them that way for 15 minutes?
Thanks in advance!
Hi Taylor,
You must completely submerge the jars for 15 minutes. Best of success this coming Spring.
Regards,
CB