
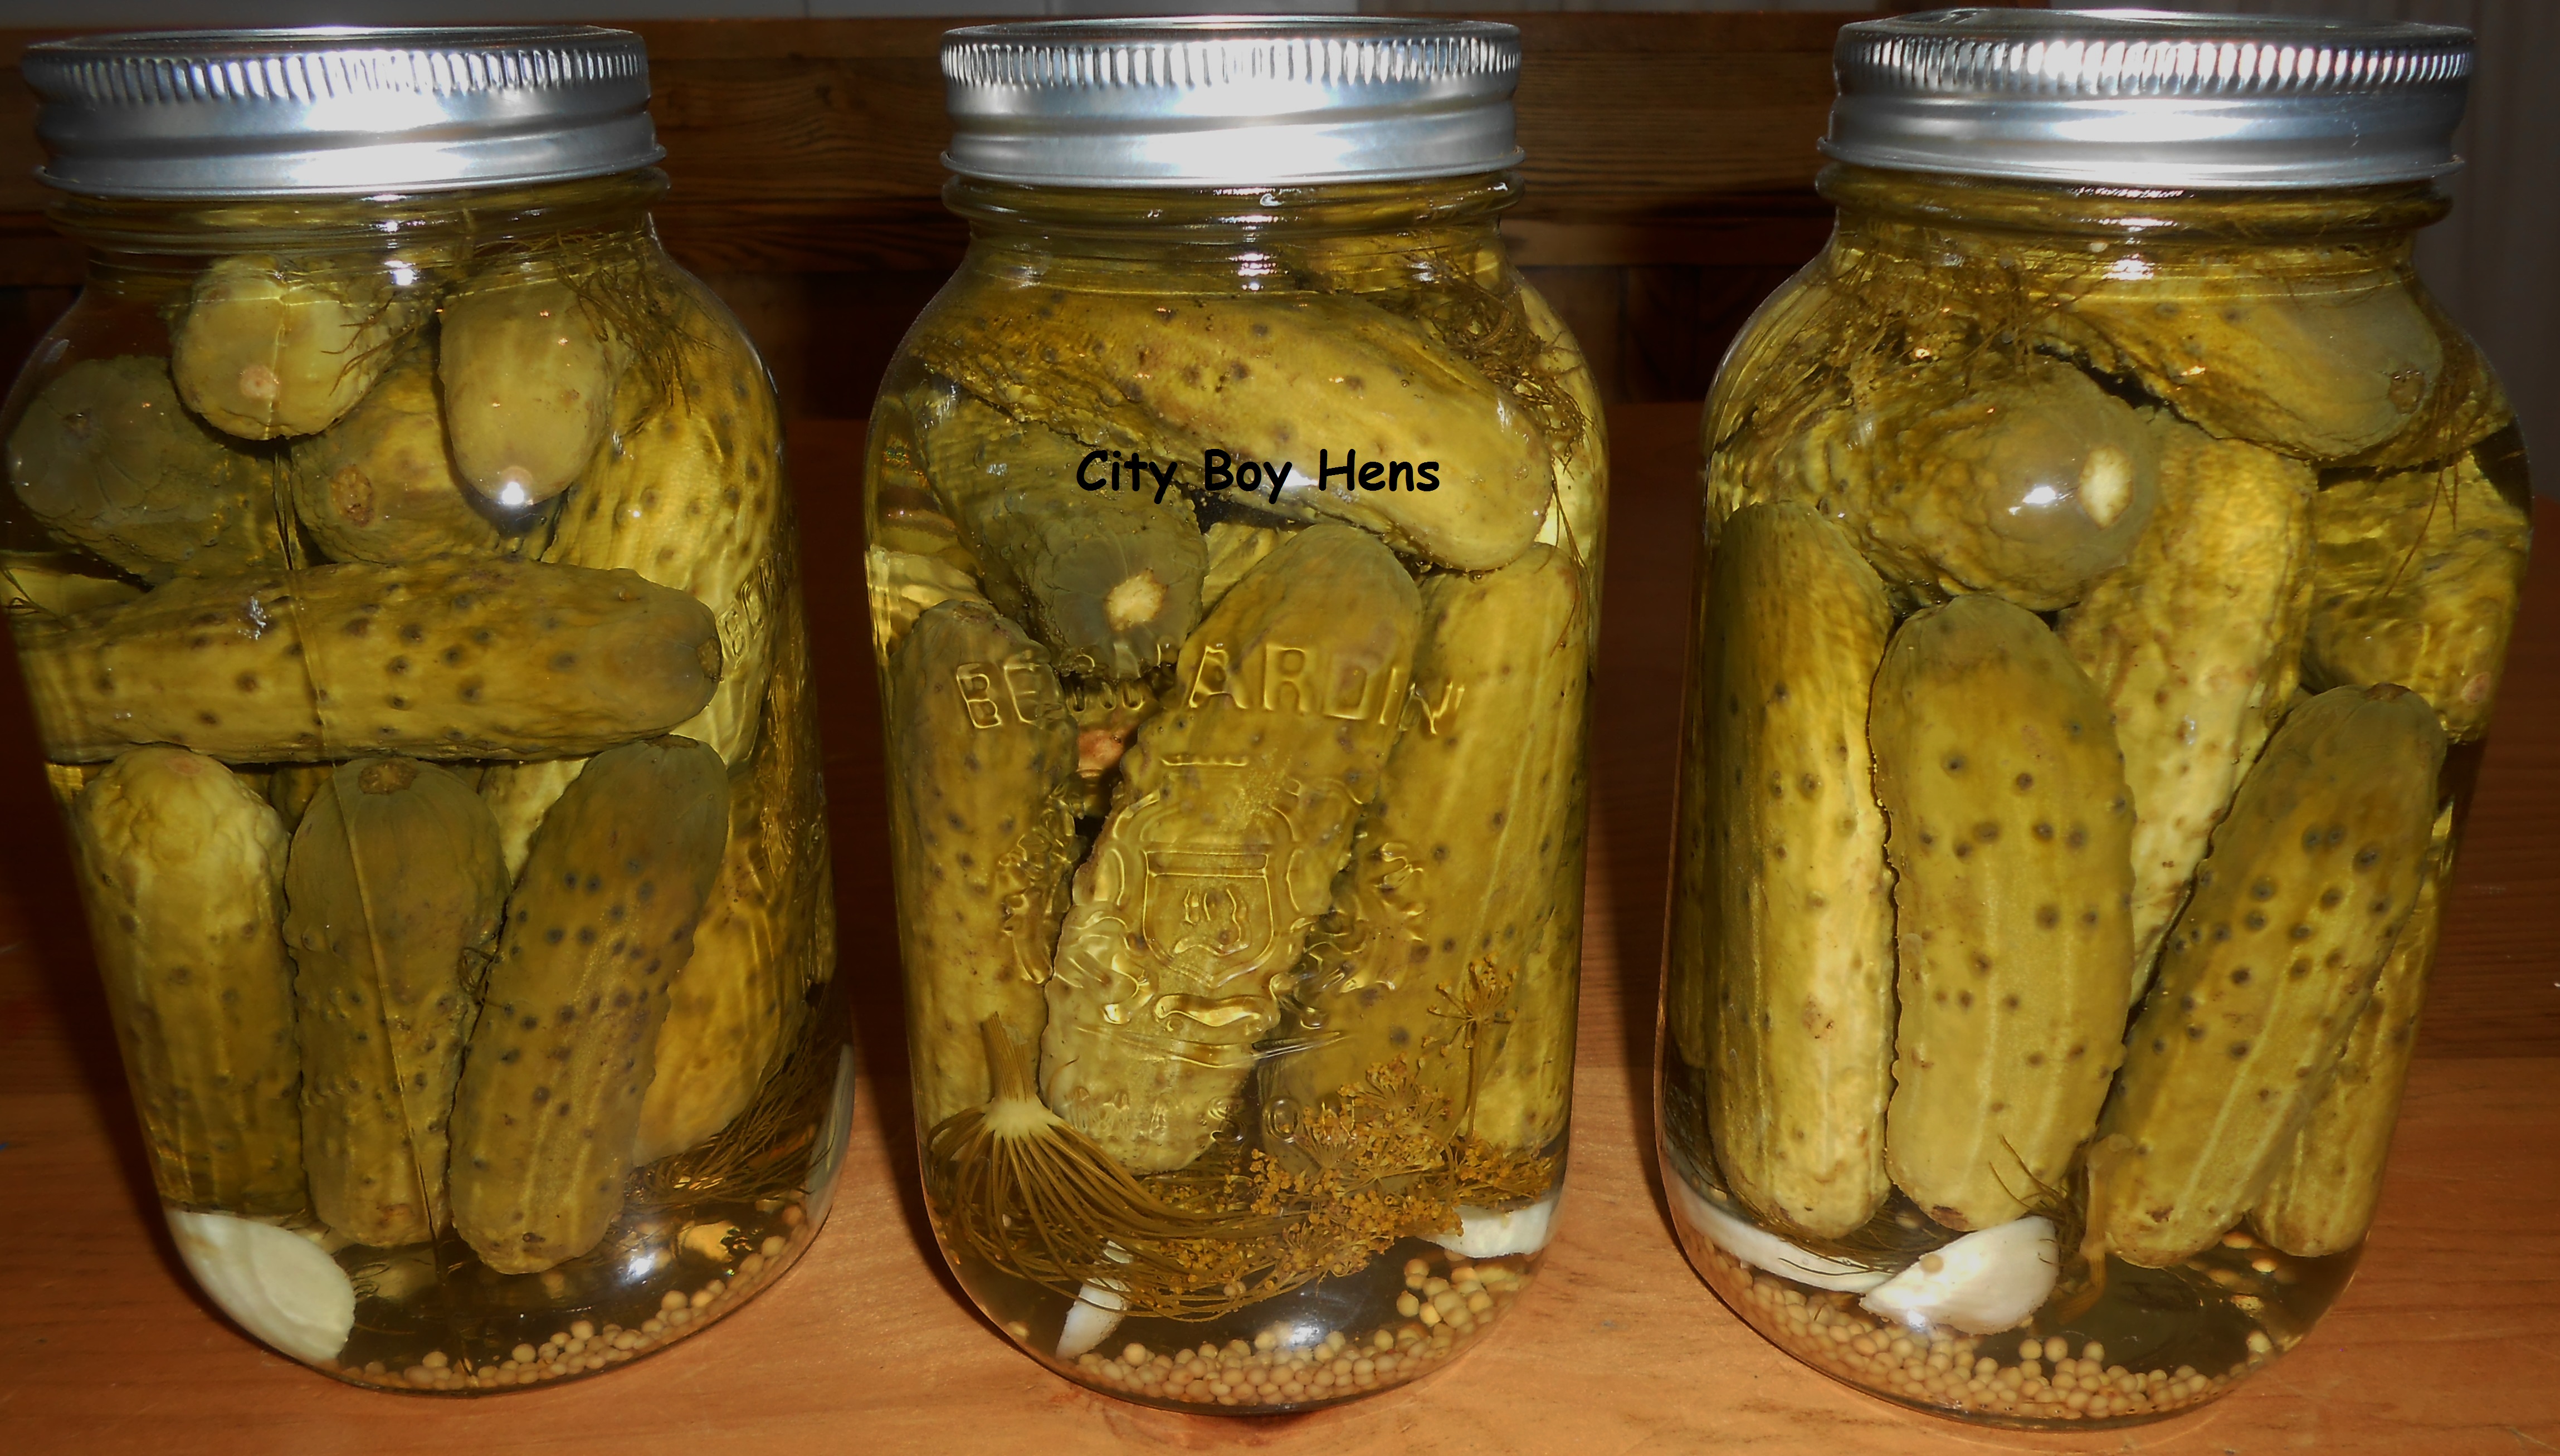
With canning season in full swing, I thought I’d share 3 of my best pickle recipes. I hope you give them a try!


Happy Canning!
Regards,
CB
With canning season in full swing, I thought I’d share 3 of my best pickle recipes. I hope you give them a try!
Happy Canning!
Regards,
CB

Washington cherries are now in your favorite grocery store and a sure sign that summer is on the way. Why not think about putting a few of these jars away for the Christmas and New Years celebrations. It will be here before you know it! CLICK HERE for an easy and great tasting recipe.
Enjoy responsibly!
Regards,
CB
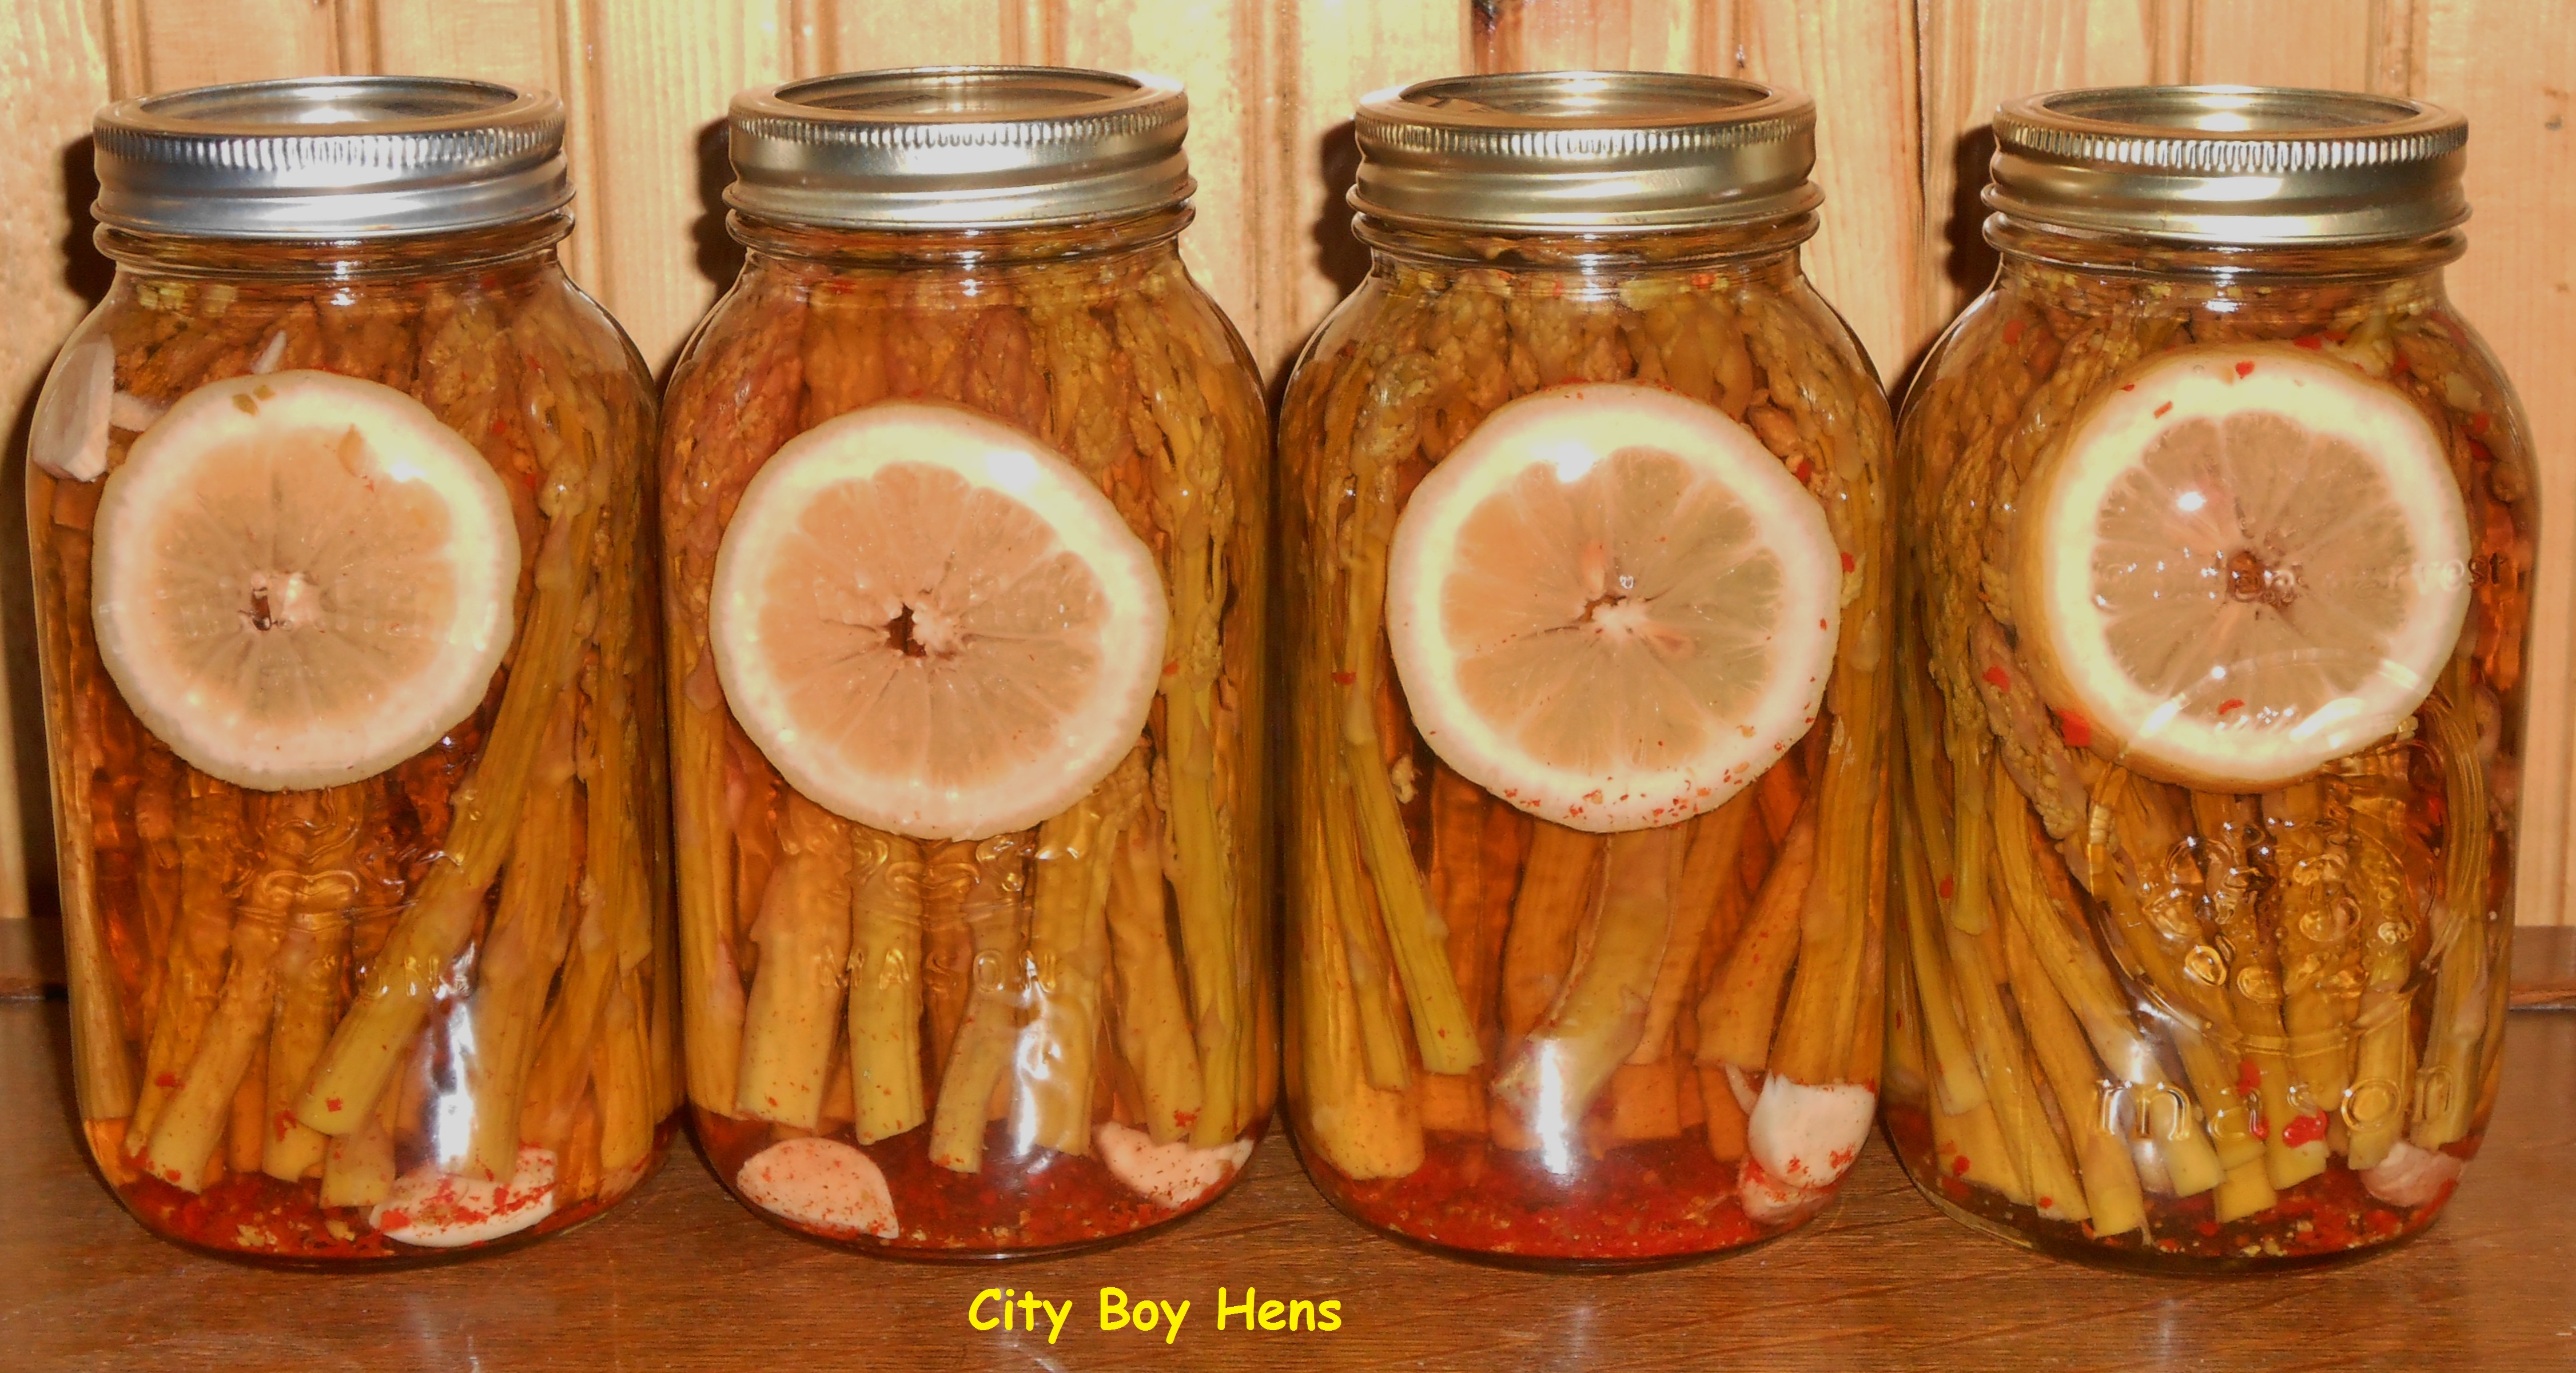 Canning season officially starts at City Boy Hens with pickled asparagus. Around here, it is included in our antipasto, the “topper” to “special events” salads, a great addition to any sandwich or just as a pickled treat with dinner.
Step 1: Sterilize your jars, lids and rings.
You can use the dishwasher on the high temperature setting, your canner (big pot) for 15 minutes at a “rolling boil” or your oven at 225 degrees Fahrenheit for 20 minutes to sterilize your jars. Whatever way you choose, remember to keep the jars warm after the required length of time and do not sterilize the lids in any of these ways. The rubber seal may become compromised do to the extended length of heat and may prevent a good seal for your canned goods. For me, the oven is my method of choice.
For the seals and bands, I find it easiest to put these in a small pot of water and keep them just below a boil. Make sure that you separate all of the lids. They can easily become stuck together and appear as one. The last thing you are going to want is to go through the entire process below and find that you are short one lid because you put two on one jar without knowing!
Step 2: Fill your canner up with water.
I know it sounds like an easy step, but it is worth mentioning that you need to find the right volume of water. Too much and the water will overflow when you add your jars that are heavy with their contents. Too little and the jars will not be completely submerged which will not allow for proper sterilization of contents. I fill my canner to around 2/3 full in order to accommodate 6 large canning jars. Note: Use hot water to fill the canner. This will help to speed up the process of bringing the water to a boil. Even with doing this, it will still take some time to get this water to a boil so start now!
Step 3: Wash and cut your asparagus.
Asparagus spears are quite long and a good portion of the vegetable must be cut off in order for it to properly fit into your canning jar. I have found that the easiest way to do this is to cut one piece to its designated length and then position each bunch beside your one piece and “chop”. Follow up with a good wash for the asparagus in the sink. Note: Don’t discard the remaining stem of the asparagus. Bend each piece until it snaps and keep the tender end. This can be canned, cooked for the next few meals or made into soup!
Step 4: Make your brine.
6 cups of pickling vinegar (5% acetic acid)
9 cups of water
9 tbsp. of pickling salt. Iodized salt will leave your brine cloudy.
Bring this to a boil.
Step 5: Pack your jars.
Before I begin packing my canning jars with asparagus, I add 1 clove of garlic (cut into 3 pcs.), 1/2 tsp. of chili peppers and 1 slice of lemon. Feel free to omit any of these ingredients though I highly recommend them all. Now it’s time to pack your jars. I find that it is easiest to lay the jar on its side when it is time to pack the asparagus into the jars. You may be surprised at how many spears you will be able to pack into each jar. I averaged around 35 per jar. This number will vary on the thickness of the asparagus stalks. It is important to pack your jars as tight as you can without breaking off the tips of the asparagus. I find that a table knife works well to help move the asparagus from side to side in order to make room for a few more spears.
Step 6: Add the brine and seal your jars.
Now it’s time to add the brine to your jars. A large ladle and a canning funnel makes easy work of this step. Make sure not to fill the brine up to the top of the jar. Leave around 1/4″of “head space”. Once this is done, take one of your sterilized seals out of your pot with a pair of tongs and place it on the lip of the jar. Note: make sure to wipe the lip of your jar before placing the seal on the jar. This will ensure that nothing is trapped on the lip which could prevent a tight seal and spoil your asparagus as it sits in your cantina (cellar) for up to 1 year. Once this is done, tightly screw the canning ring onto the jar.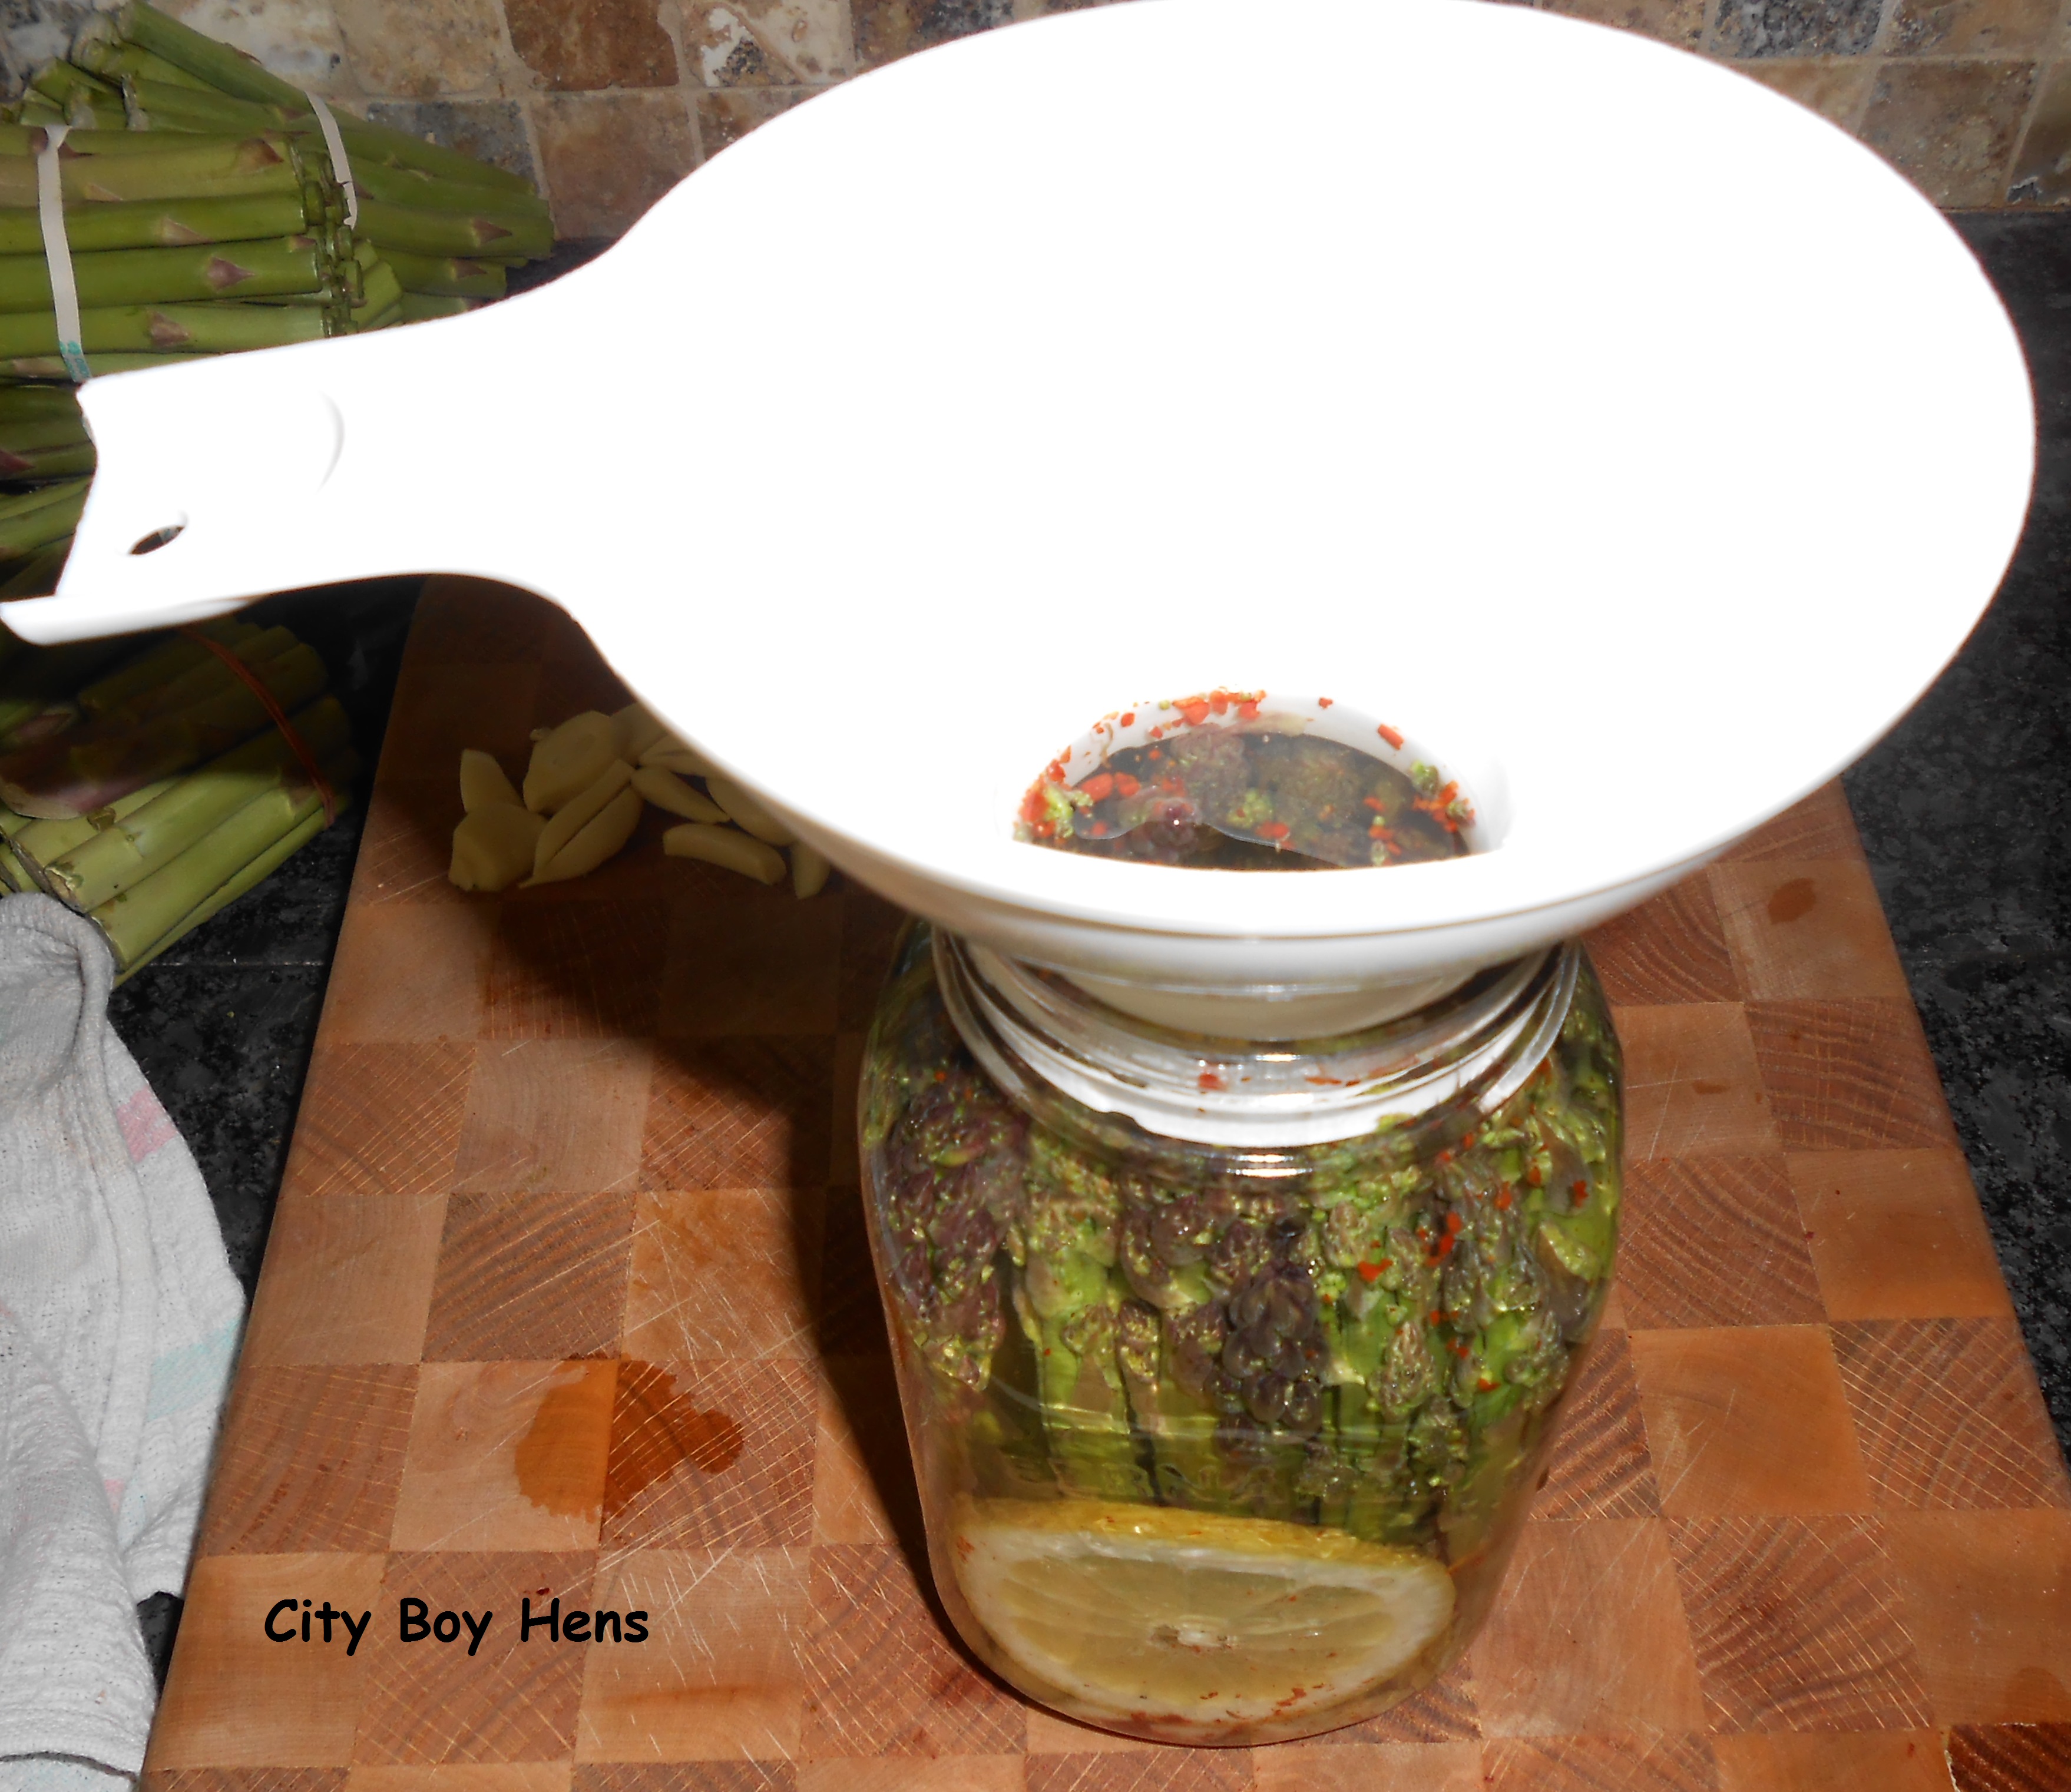
Step 7: Water bath.
The water bath is debatable and many people omit this step. Some rationalize the omittance by claiming that the boiling brine is enough to kill any bacteria that may be left on the asparagus. I also recognize that this step is a pain in the butt and can be quite dangerous because you are transferring a relatively heavy jar into and out of boiling water. With that said, I feel better eliminating my family’s chance at botulism and using a canning tongs to work the jars into and out of the boiling water. This process should be done for 15 minutes.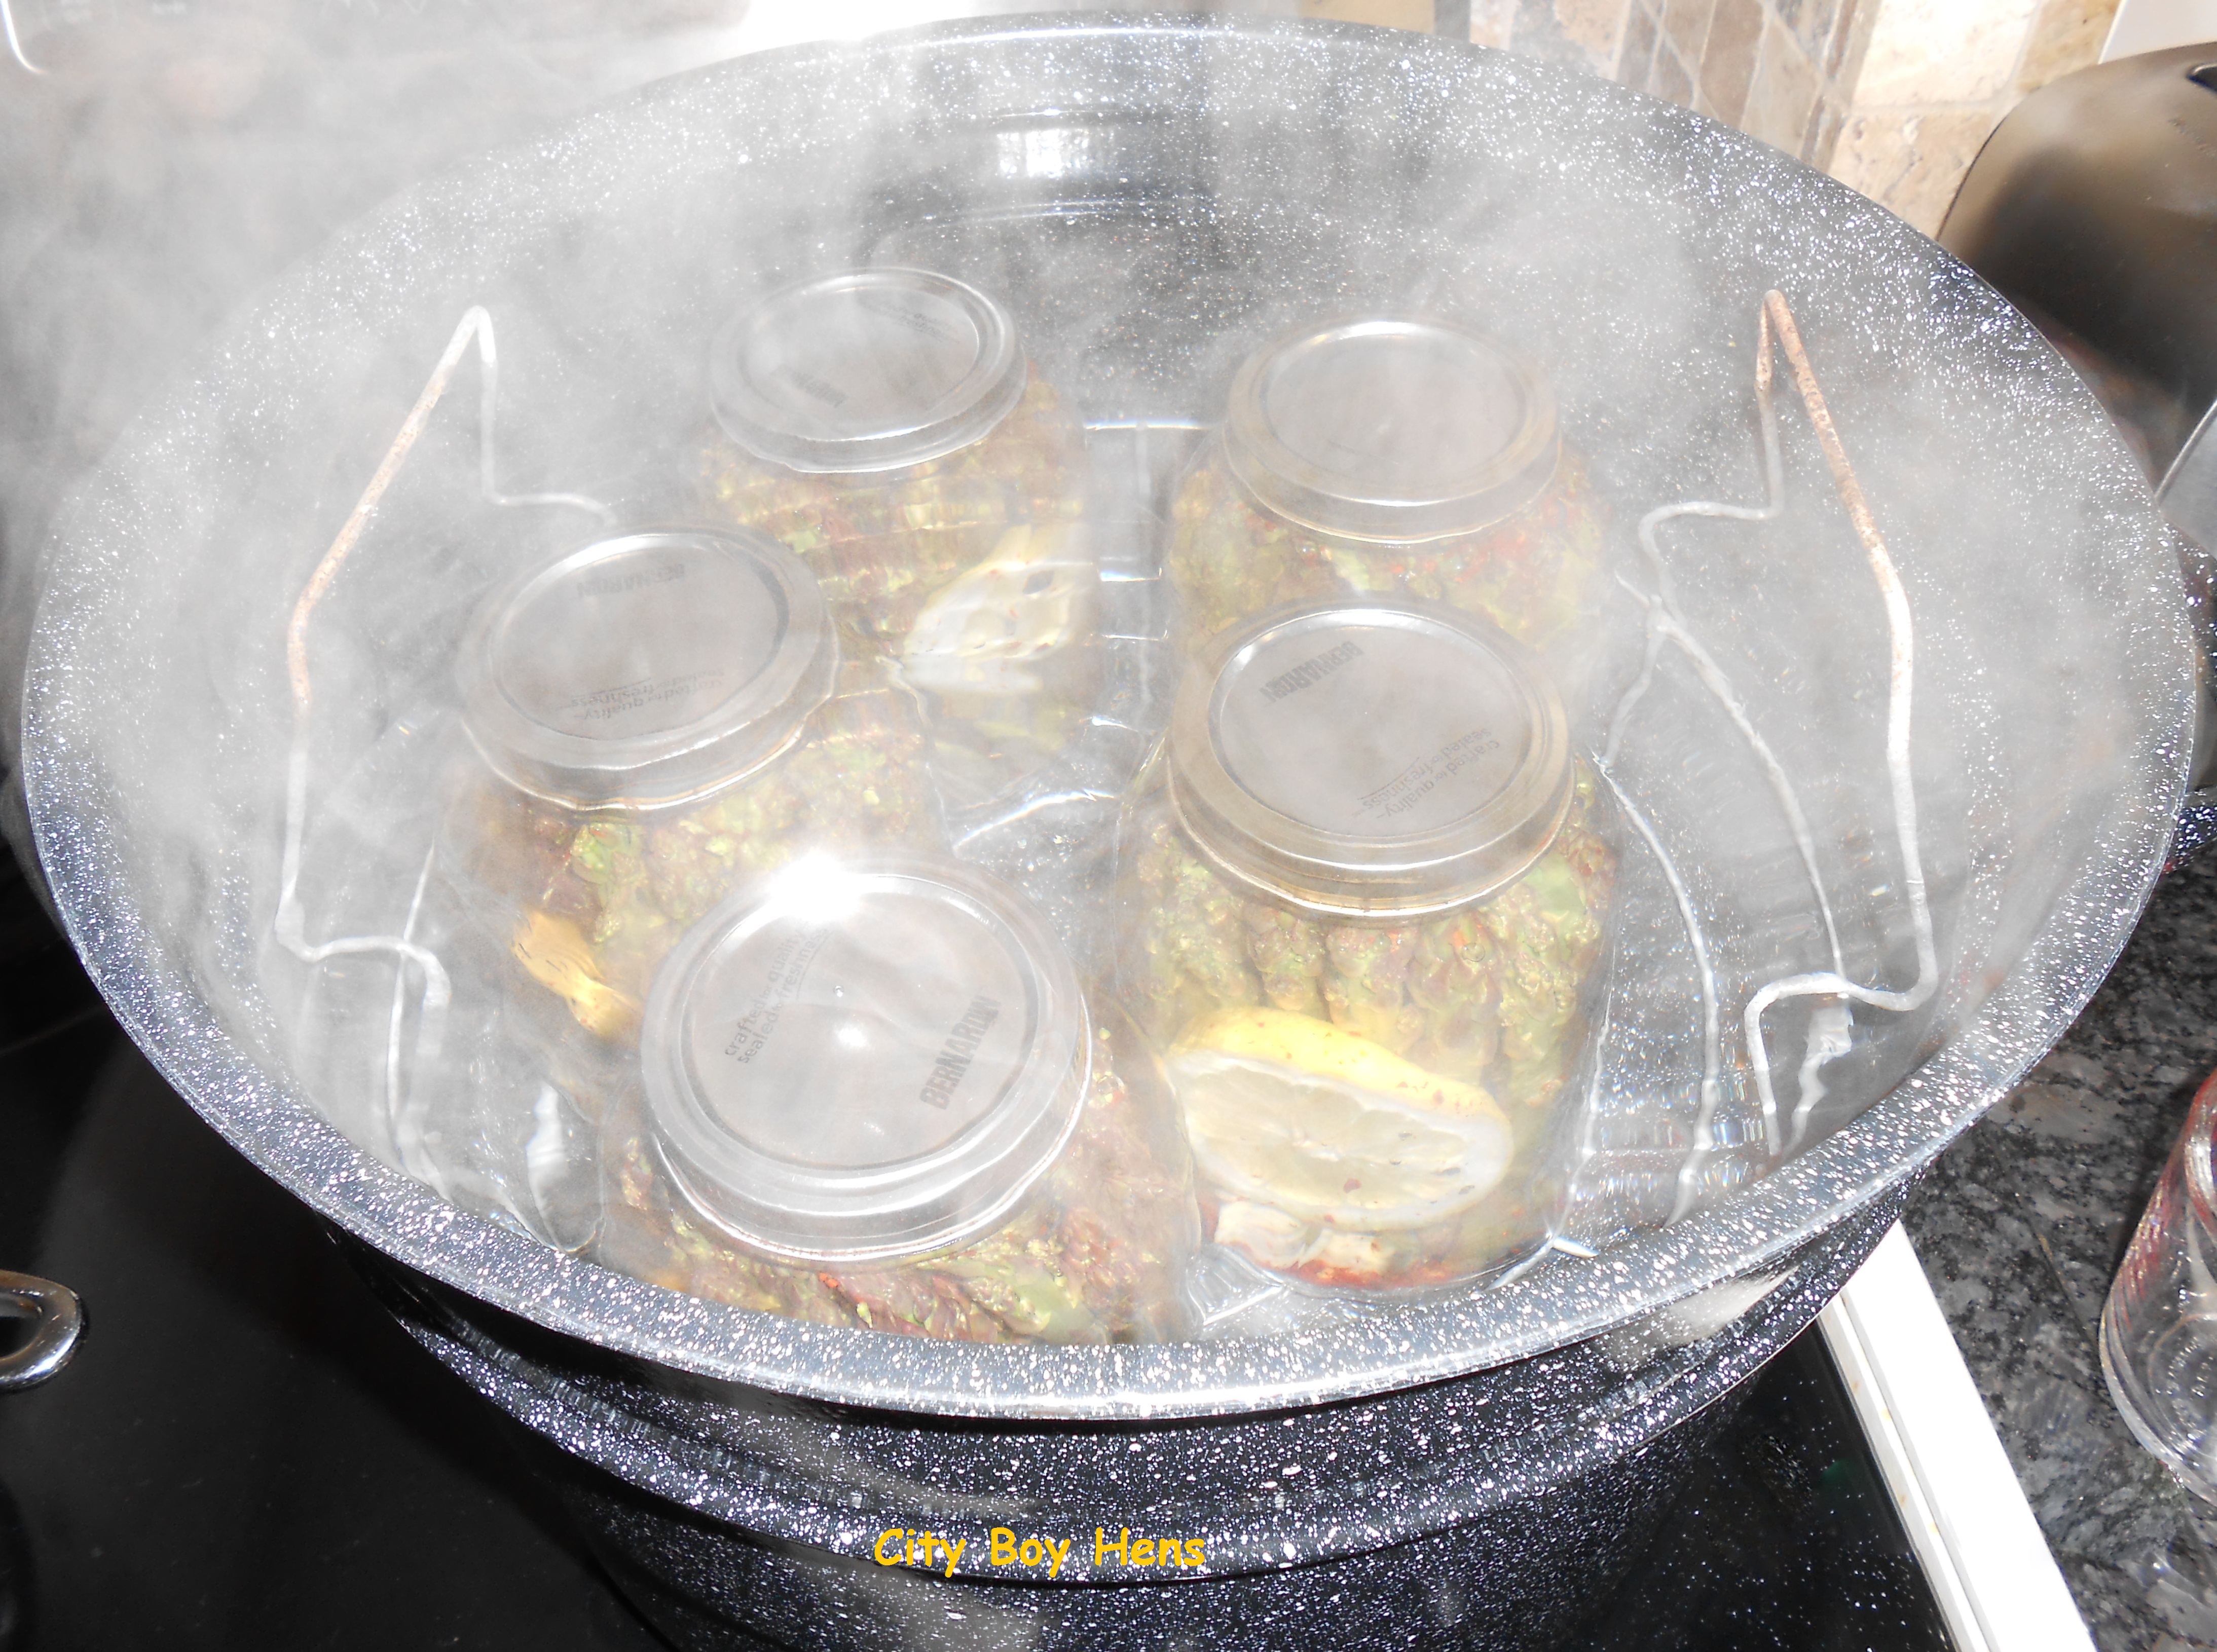
Carefully remove the jars with canning tongs and place the hot jars on a rack to cool. After a while, you will hear the great sound of “SNAP”. That means your jars have sealed. Let your jars completely cool (over night) and then put them in your cantina or cupboard until it is time to enjoy the taste of pickled asparagus.

Crescia Bread
With the celebration of Easter just around the corner, it’s time to make Crescia. If you love cheesy egg-rich bread, I urge you to give this traditional bread a try. If you grew up eating this bread at Easter, I’m certain that the aroma of it baking will bring you back to those memories of your youth!
CLICK HERE for my easy to follow recipe.
Happy Easter
Buona Pasqua
CB
I love honey! I love it sooooooo much that I can easily consume a couple of pounds each month just in my tea. I not only love it, but I’ve begun to acquire a taste for different flavors. Whether it is buckwheat, blueberry blossom, linden, clover or wildflower…….I love them all! The only trouble is some granulate a lot faster than others.  Granulating is no big deal. In fact, there’s too many folks who think that granulated honey is honey gone bad. There’s nothing bad about it. In fact, granulating is a good indication that your honey is pure and minimally filtered because it is those minute bits of propolis, pollen and wax (the good stuff) which act as bonding agents for this crystallization to begin . It’s this “stuff” that you want in your honey as opposed to the pasteurized honey which kills a lot of the enzymes with high temperature and takes out so much of the good stuff with over-filtration.
But, if you’re like me, and want your honey to remain in its liquid state then you’ll need to warm it back up to around the same temperature that it was when it was still in the hive. Believe it or not, the optimum temperature in a beehive is around 95 F (35 C). The key to properly liquefying honey is a balance between warm and slow. Too hot or too fast and you’ll kill all the “good stuff” in your unpasteurized honey. That’s why I am not a fan of using the microwave for this process.
Instead, fill a sauce pan with warm water and place it on your stove burner. Turn your burner on low and put your jar of crystalized honey into the sauce pan. Monitor the temperature of the water with a thermometer and adjust accordingly in order to keep the temperature below 100 F.  With the honey partially dissolved (15-20 minutes), stir the contents with a knife in order to allow the heat to work its way up to the upper portion of the jar. Before you know it, your honey will be completely liquified and you’ll be spilling it once again on the table or counter as you race with that spoon from the honey jar to your mug of tea.
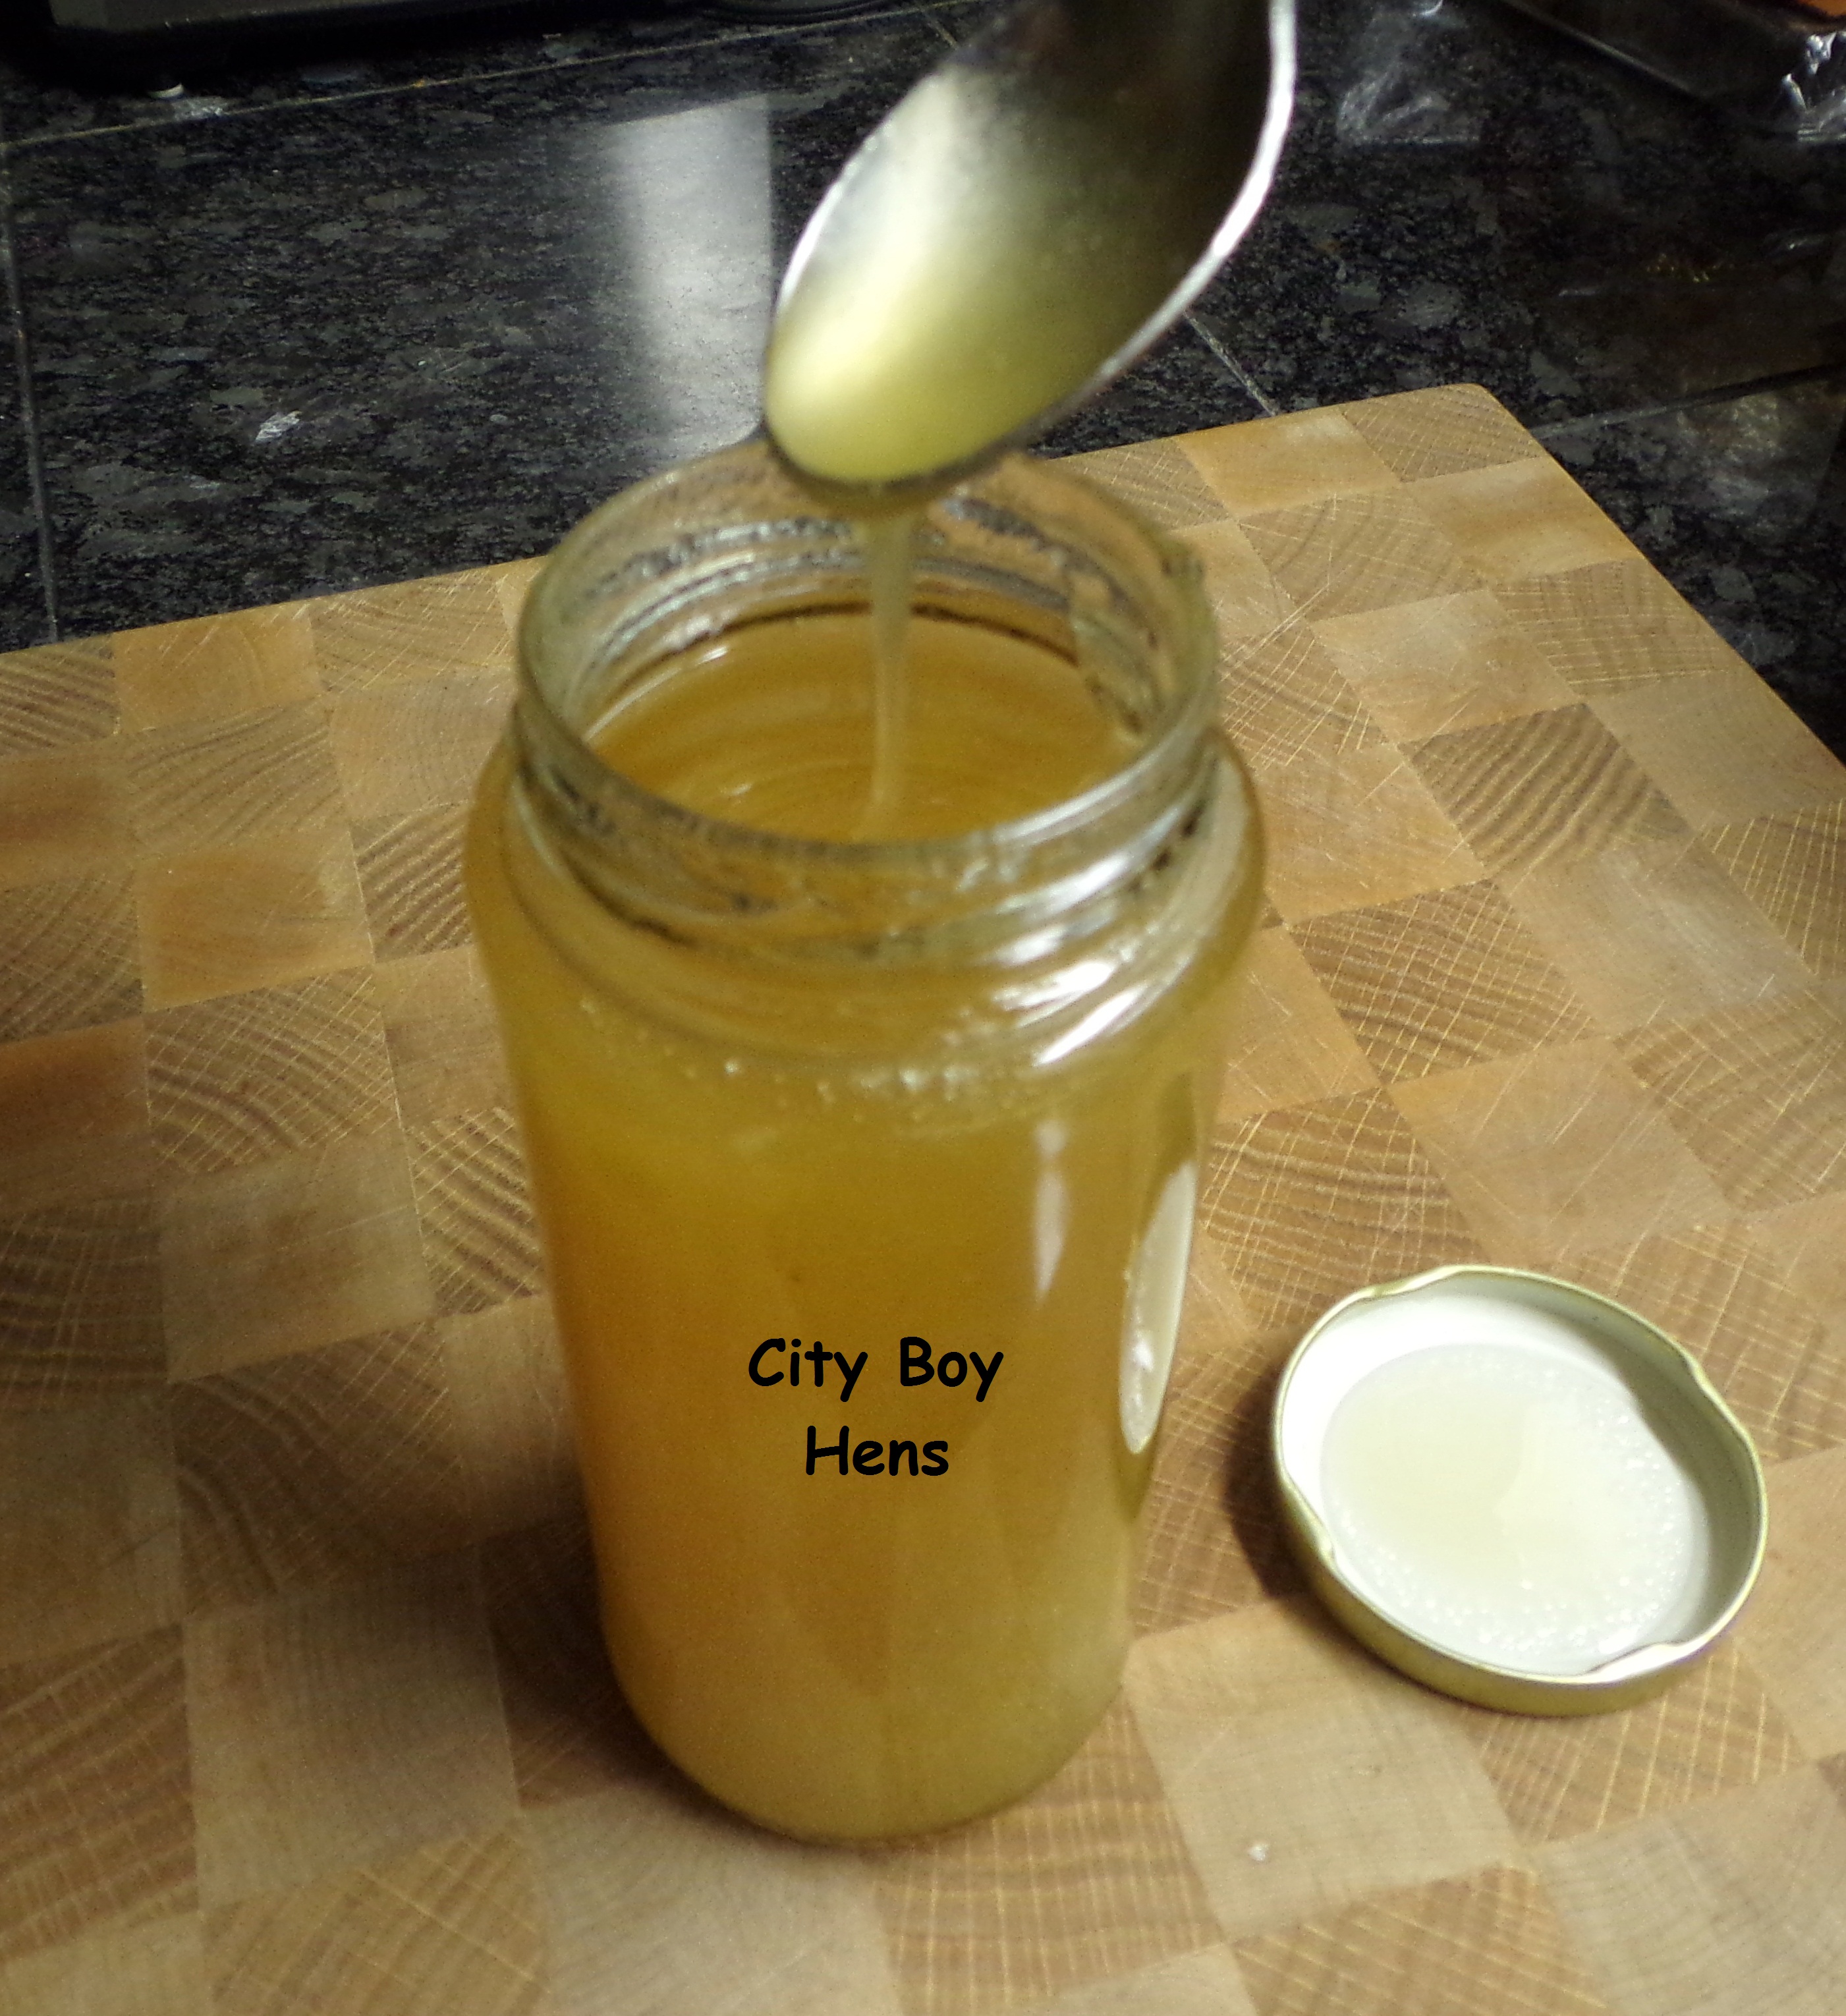 Regards, CB
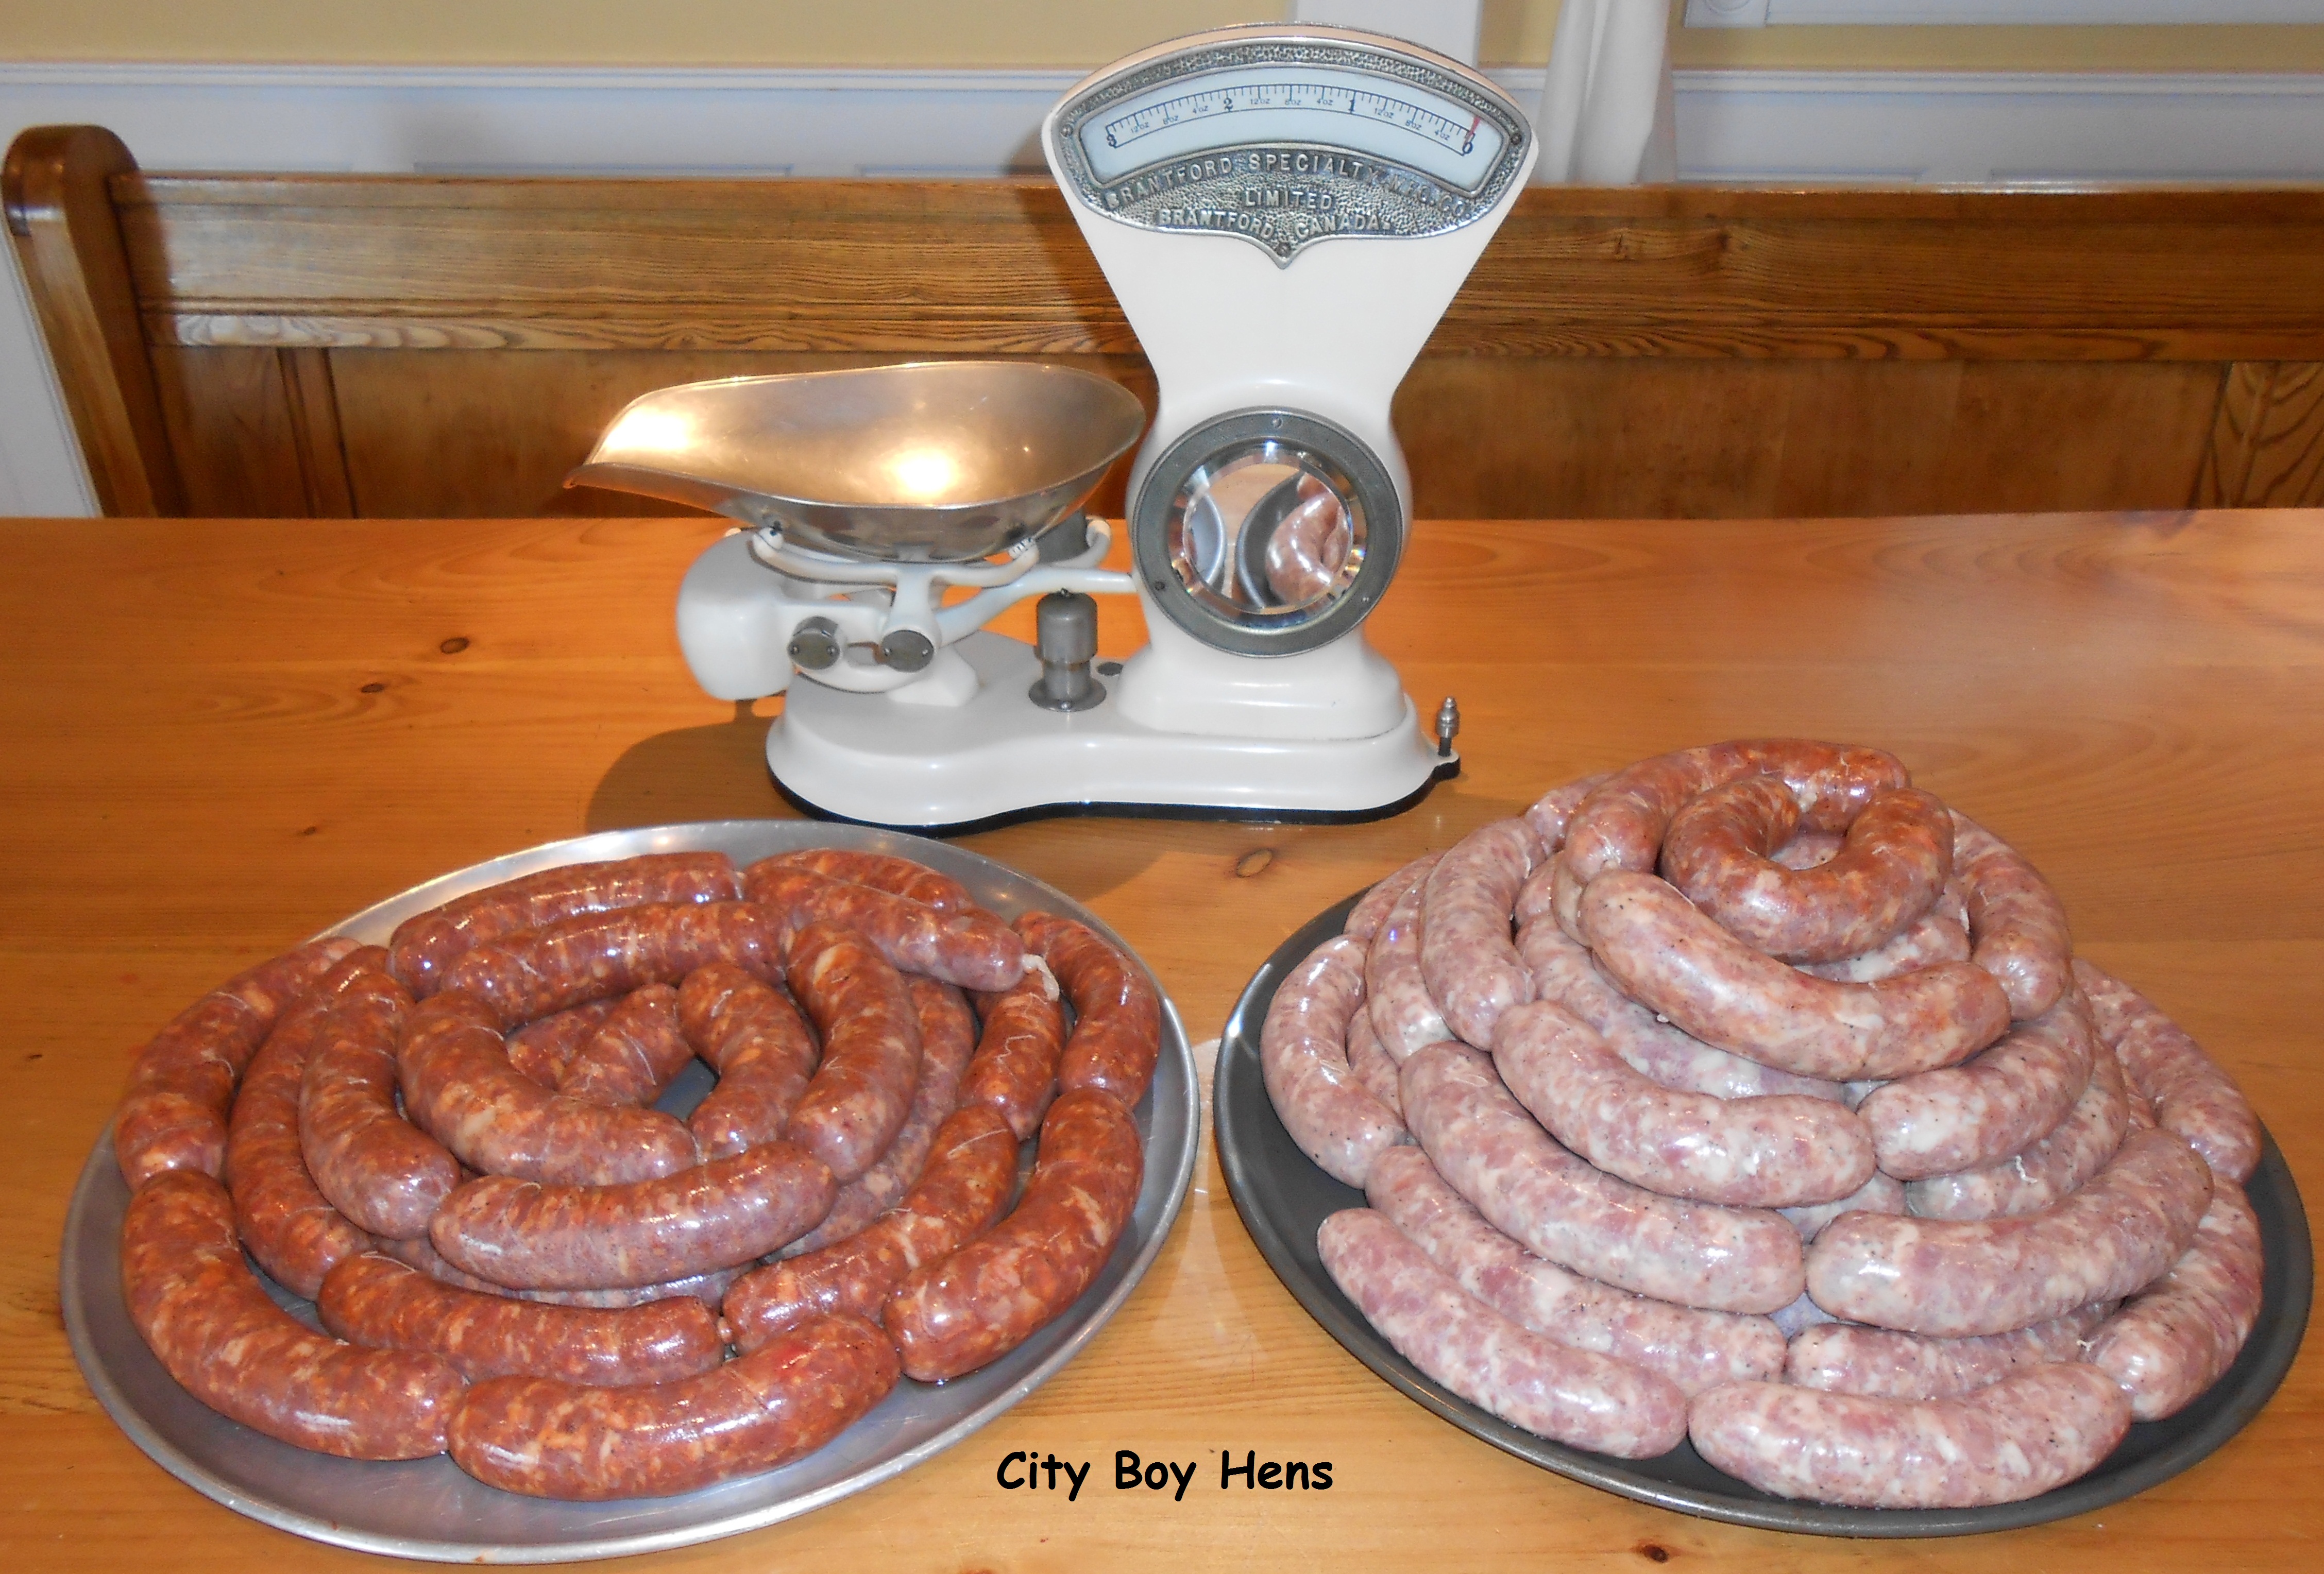
Hot & Sweet sausage.
Yesterday afternoon I had a hankering for chicken & sausage cacciatorie. My vitamin E deprived body was growing tired of sparring with Old Man winter and some good ol’ comfort food was gonna’ be the trick to fix those winter blahs. The only trouble was……..I was out of homemade Italian sausage.
Making sausage is easy. The financial investment is minimal, the cost is way cheaper than those store-bought links, but best of all……….THEY TASTE GREAT! I need to give my good friend Mike a call and get busy making some homemade Italian sausage.
You should give it a try. I promise you’ll never go back to those store-bought links once you & your family feast on this delicious treat!
CLICK HERE for an easy lesson on sausage making.
Regards,
CB

With the Holiday Season now in the past and Winter boredom beginning to grow, I think it’s time to get off the couch and make some salami. If you love the taste of salami and are always looking to try your hand at a new food adventure, then I urge you to give this a try. It’s really not that complicated. I’ve taken a lot of the “guess-work” out in the link below. If you want to give it a try CLICK HERE.
Regards,
CB
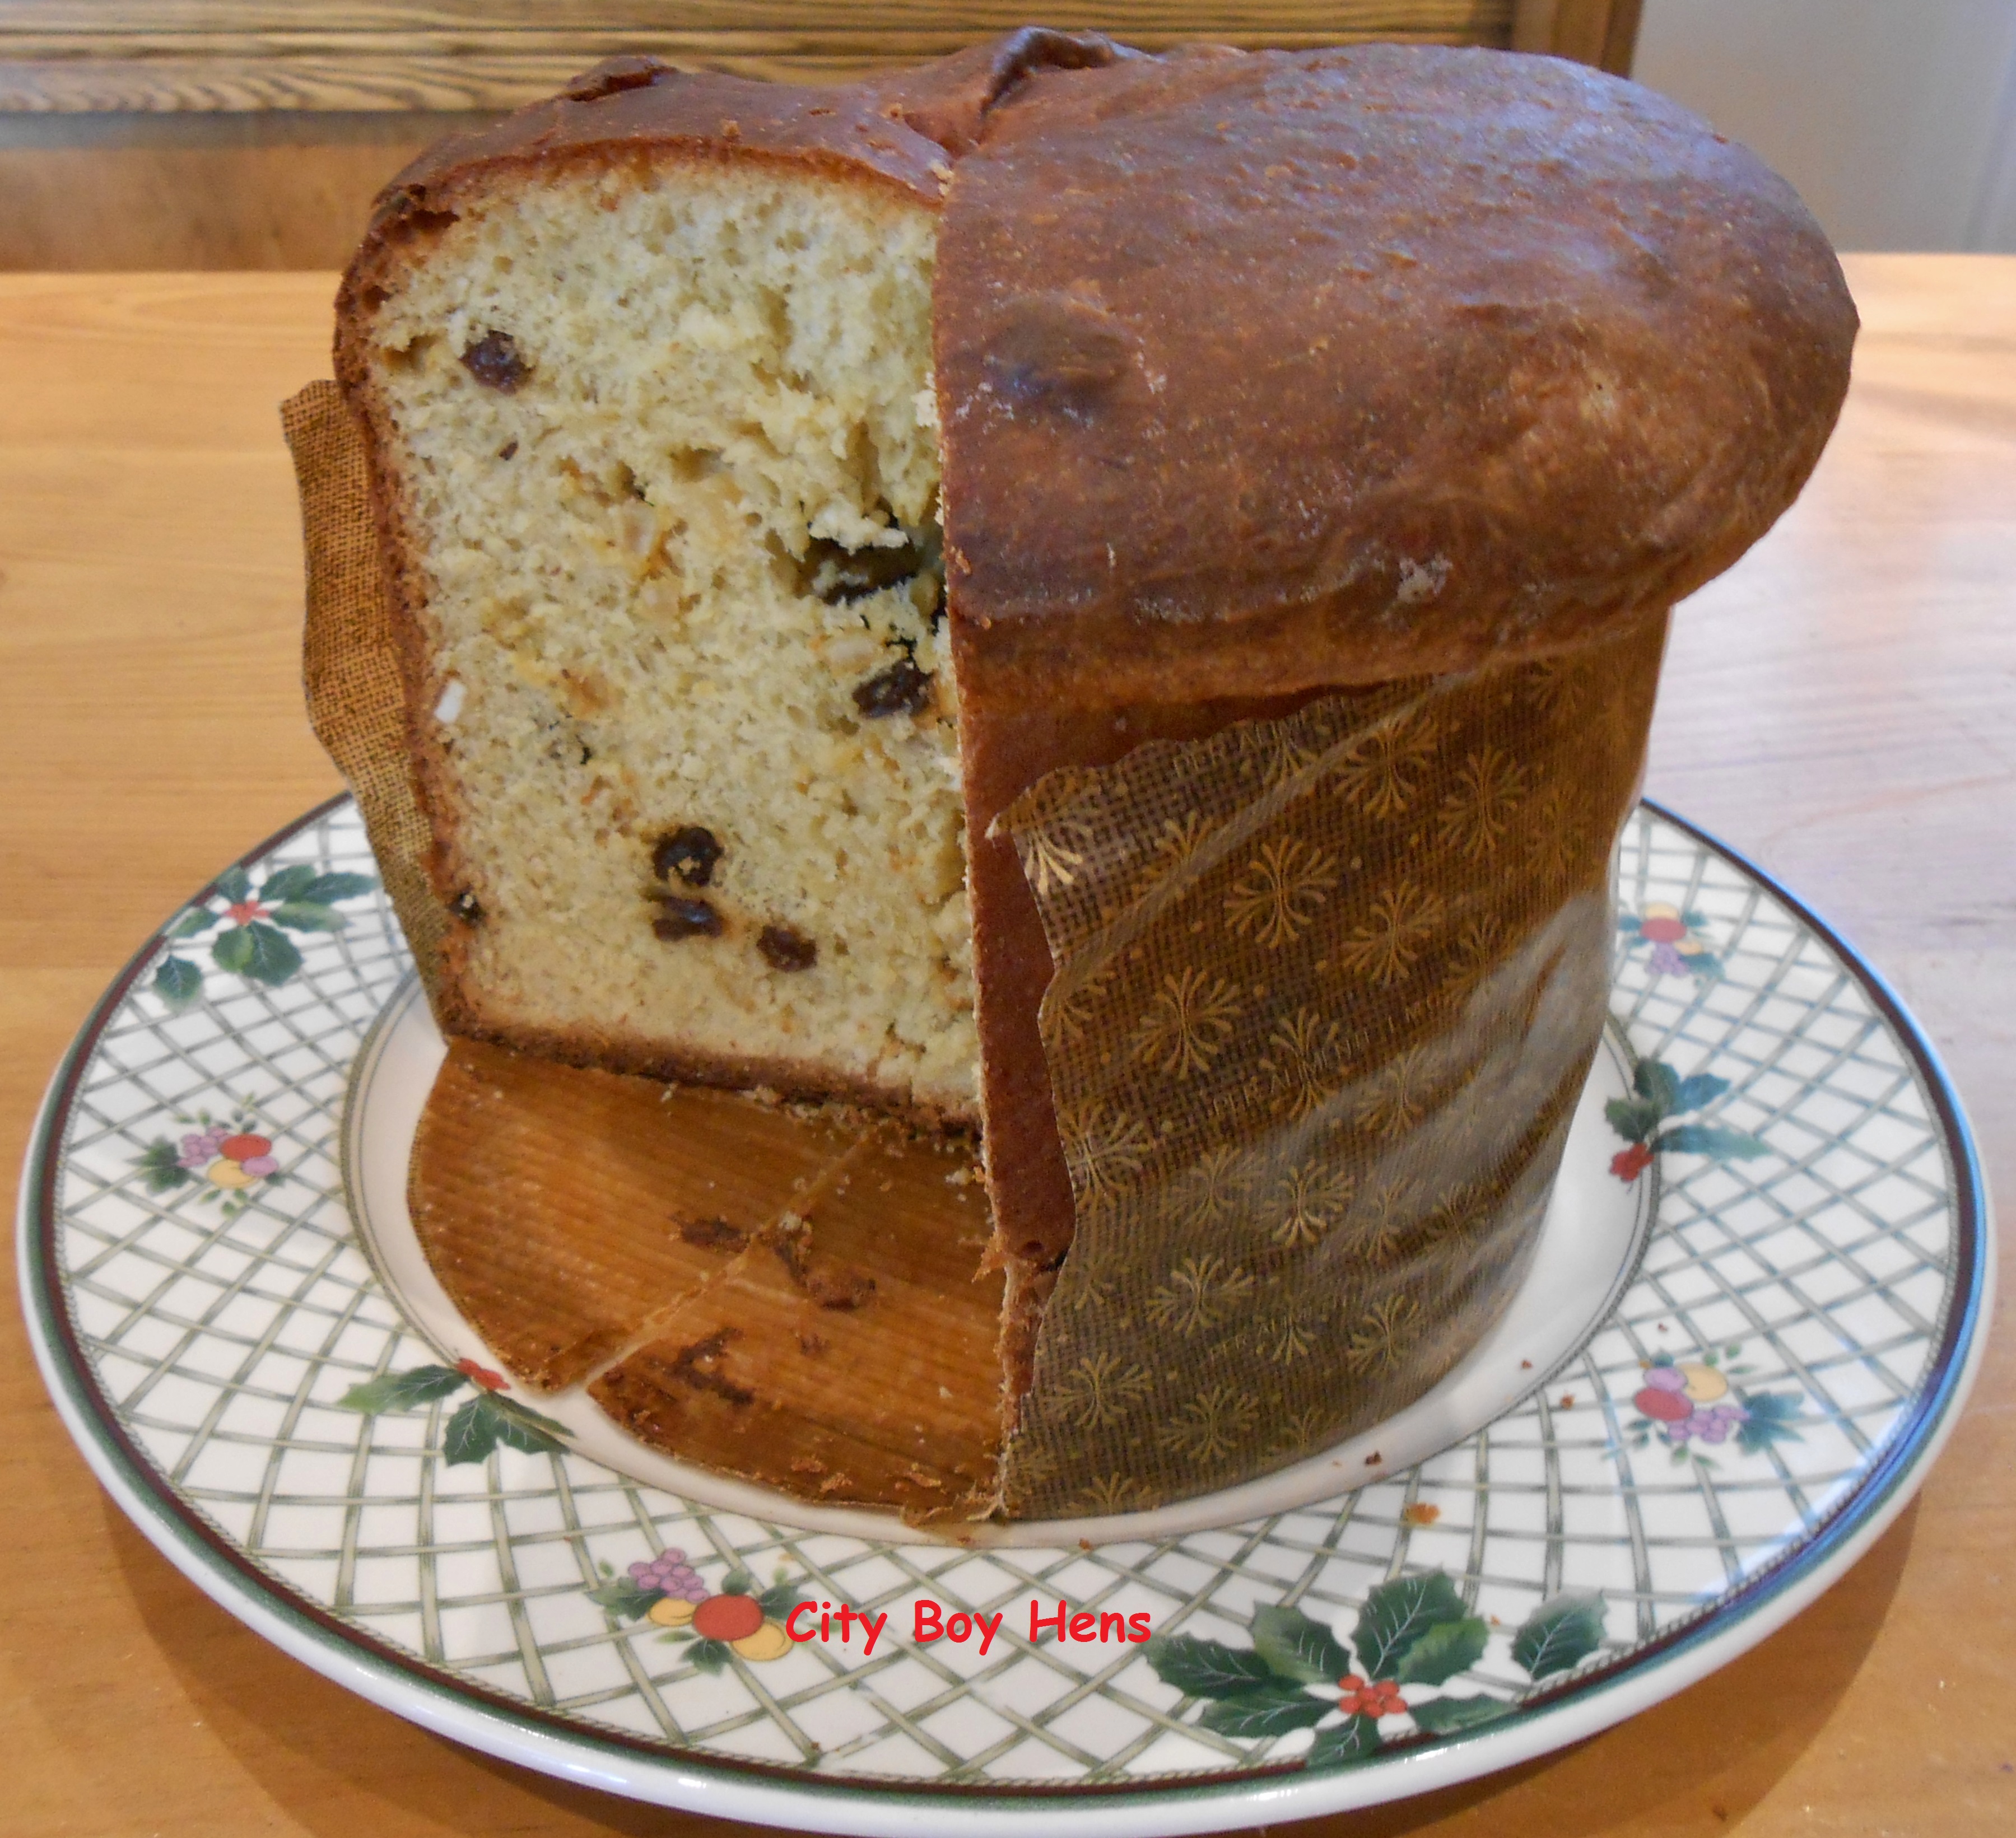
Well….with only 5 more sleeps till that Jolly Old Elf makes his appearance once again, I think it is time to make a panettone. If you are a fan of candied citrus peel, raisins and yeasty egg rich bread, than I urge you to give this bread a try. Oh…..and don’t get caught up in the fact that it has to rise a few times. It’s really no big deal. If this City Boy can bake it, than so can you!
If you want to give it a try, Click Here
Wishing you all a Merry Christmas and a peaceful New Year.
Warm Regards,
CB
It has definitely been a while since I have hit “publish”. To my blogging friends, I say “hello again”. To those that are “new followers”, I say “welcome”. The blog has definitely been on the “back-burner” for the last 7 months and I have not given it the attention that I set out with a few years back.
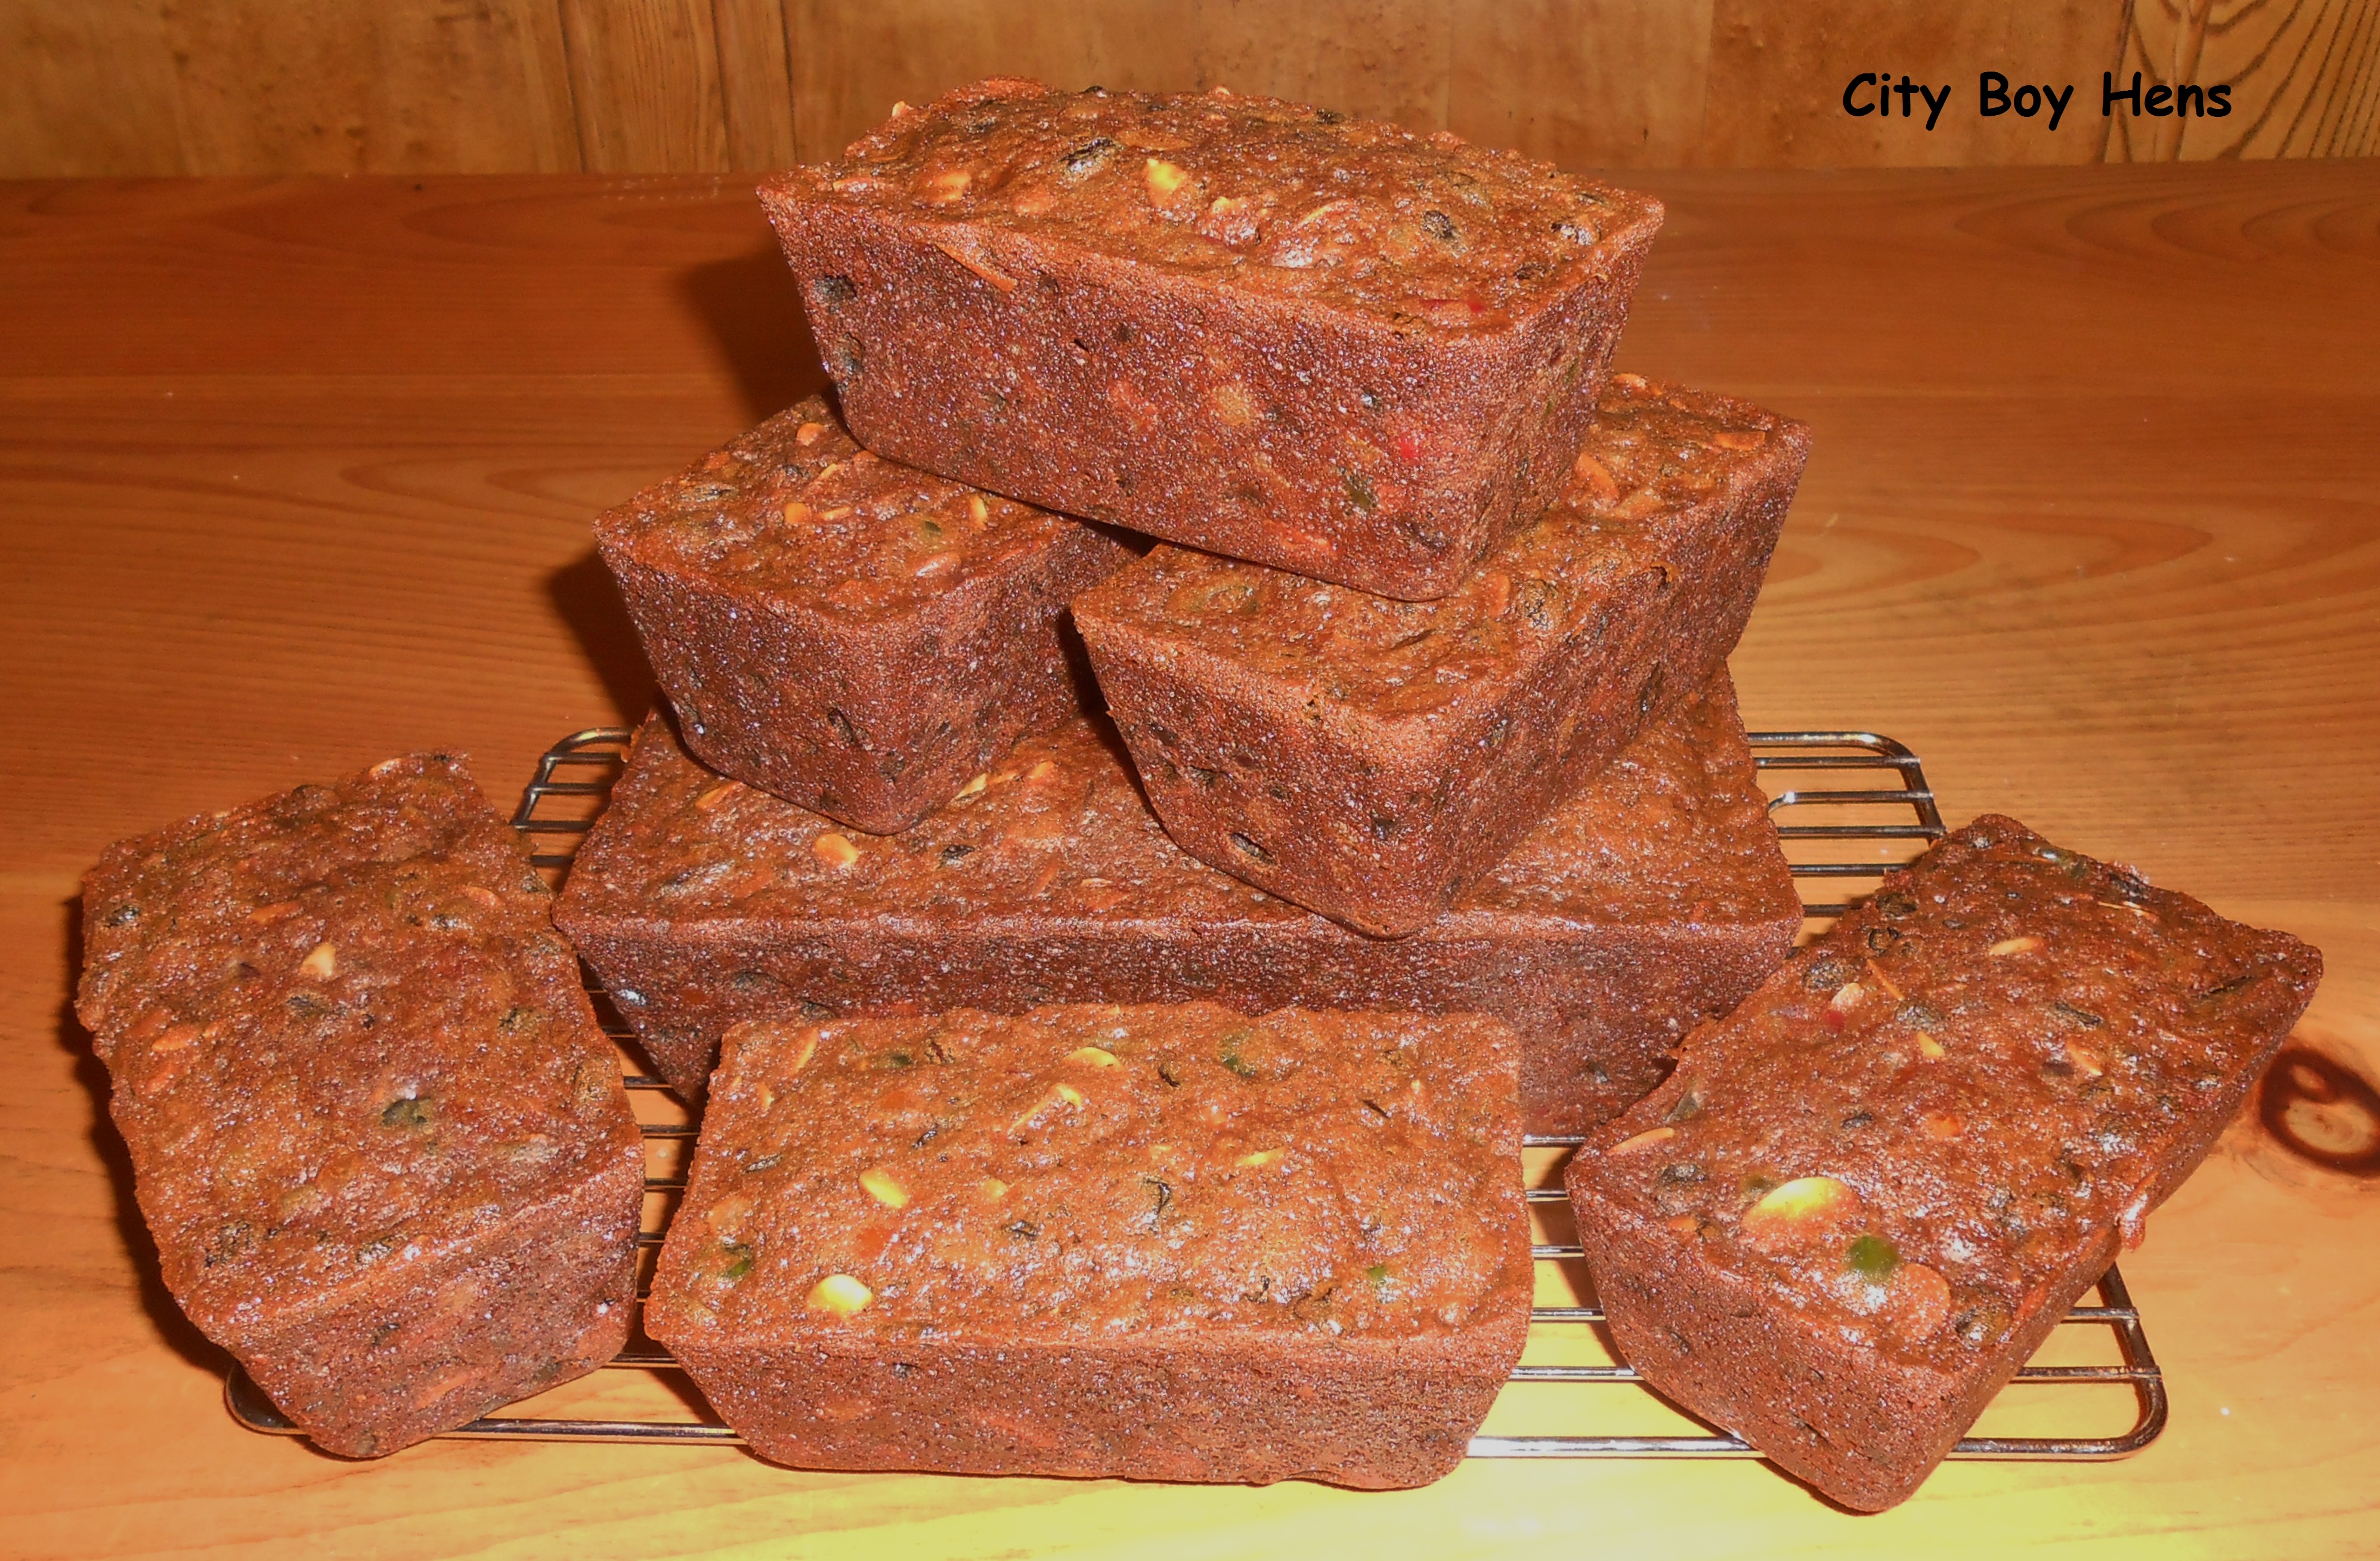
Anyways, last weekend I decided to make Christmas fruit cake for the second year, but this Christmas I wanted to make some smaller cakes as gifts for family and friends who enjoy this yuletide treat. So I tripled the recipe in the link below and adjusted the bake time for the smaller cakes.
If you like Christmas cake, I urge you to give this one a try. It’s really easy and tastes just like those childhood memories.
Warm regards,
CB
My Family came to Canada in 1913 from the town of Pesaro in the Province of Le Marche, Italy. Over the years, traditions were lost or no longer practiced as my ancestors blended more into the Canadian fabric. But, Crescia has always survive the test of time and it has now been alive and well for 4 generations in our Canadian family. I’m sure it’s not the same as the one my great-grandmother (Bisnonna Laura) made, but I hope it’s a close second.
Crescia is a vastly different bread, depending on the region of its origins. It can be as thin as focaccia or as high as the crescia that originated in Pesaro. The later is the one that my Family has made for generations, though it was denser and did not rise as high as the one that I make. But, it is similar in its signature ingredients of eggs, black pepper and cheese.
I don’t think it’s a coincidence that Easter breads are so laden with eggs. As you backyard chicken owners know, heritage breed hens take a break from laying eggs during the Winter and resume their production in the Spring which happens to coincide with Easter. As well, eggs, cheese, meat and olive oil were historically omitted from the diet in Italy during the period of Lent so everyone must have been “chompin’ at the bit” to return to these foods after those 40 extremely bland days!
As I write this post, the scent of baking crescia fills the air! It reminds me of my ancestors who came to this great country over 100 years ago. Times were a lot harden then, but they were also flavoured with great traditions which always revolved around food. Unfortunately, a lot of those great traditions have been lost or misplaced in our progression to a busier life.
I’m not sure if we have made a good trade. Perhaps, it’s worth “stepping back” now and then and carrying on some of those great traditions that remind us of our roots and the journey that has brought us to this today!
I hope I “did you proud” Bisnonna Laura!
If you would like to make crescia, please CLICK HERE for my family’s recipe.
Happy Easter / Buona Pasqua to all!

